Picture this: a rich, creamy cheesecake with the unmistakable charm of red velvet, studded with crunchy Oreo cookie bits that add the perfect texture contrast. That’s exactly what my Red Velvet Oreo Cheesecake Recipe brings to your table—a luscious dessert that’s as stunning to look at as it is delicious to eat.

Jump to:
Why You'll Love This Recipe
I don’t say this lightly, but this cheesecake has become my go-to when I want to impress friends without hours of fuss. That velvety red batter bonded with Oreo bits? Total crowd-pleaser every time. The balance of cream cheese richness and that signature cocoa-red velvet flavor? It’s just *chef’s kiss* perfection.
- Unforgettable Flavor Combination: The red velvet and Oreo duo create a unique, indulgent taste you won’t easily forget.
- Simple Yet Elegant: Despite its gourmet appearance, the recipe is straightforward and beginner-friendly.
- Perfect Texture Play: Creamy cheesecake filling with crunchy Oreo crust and cookie bits inside makes every bite exciting.
- Great for Any Occasion: It’s equally at home on a holiday table or for a special celebration or cozy night in.

Ingredients & Why They Work
Each ingredient in this Red Velvet Oreo Cheesecake Recipe plays a role in creating that perfect texture and flavor harmony. I always recommend using full-fat dairy for creaminess and making sure everything’s at room temperature to avoid lumps and cracks.

- Chocolate sandwich cookie crumbs: Oreo crumbs give a sturdy, tasty base that holds up well and adds crunch.
- Unsalted butter: Melts into the cookie crumbs, binding the crust while adding richness without extra saltiness.
- Full-fat cream cheese: Key for a creamy, velvety filling—don’t substitute with low-fat or whipped versions!
- Granulated sugar: Sweetens just right, helping to balance the cocoa and cream cheese tang.
- Full-fat sour cream: Adds moisture and subtle tang, making the cheesecake luscious and smooth.
- Eggs: Provide structure by setting the filling as it bakes.
- Unsweetened cocoa powder: Brings in that signature chocolate depth characteristic of red velvet.
- Liquid red food coloring: Gives the cheesecake its festive, vibrant color—McCormick works great!
- Vanilla extract: Rounds out the flavor, balancing the cocoa and cream cheese.
- Cream Cheese Whipped Cream or Small Batch Whipped Cream: For topping, adding a beautiful final touch of lightness and creaminess.
Make It Your Way
One of the things I love about this recipe is how you can tweak it without losing that classic red velvet Oreo goodness. I usually stick to the original, but sometimes I like to add a little extra cookie crumble on top for crunch or swap the food coloring brands depending on what I have.
- Variation: For a richer chocolate flavor, I’ve mixed in a tablespoon of melted bittersweet chocolate into the batter. It changes the texture slightly but adds a decadent punch.
- Dairy-free modification: While I haven’t tried this myself yet, using dairy-free cream cheese and sour cream alternatives should work if you want to make it vegan or allergen-friendly.
- Seasonal twists: Around the holidays, I sometimes sprinkle crushed peppermint candies over the top for a festive touch that pairs beautifully with the red velvet flavor.
Step-by-Step: How I Make Red Velvet Oreo Cheesecake Recipe
Step 1: Prep your crust for that perfect crunch
Start by preheating your oven to 325°F, and wrapping the outside of your springform pan with foil. Trust me, the foil wrap is essential because the cheesecake will bake in a water bath, and that prevents water from seeping in and ruining your crust. Mix the Oreo cookie crumbs with melted butter until you get that sandy texture, then press it firmly into the bottom of the pan. A quick tip: press down with the bottom of a glass or cup for a smooth, even crust. Bake it for 10 minutes to set everything up nicely – this step really locks in that sturdy base that'll hold your cheesecake together beautifully.
Step 2: Whip up a luscious, smooth filling
While the crust bakes, grab your mixer and beat the cream cheese, sugar, and sour cream on medium-high speed until the mix looks fluffy and smooth. This usually takes about 2-3 minutes. Don’t rush it, and scrape down the bowl to make sure everything blends evenly — this step makes all the difference between a dense cheesecake and a silky texture. Then add your eggs in one at a time, beating gently to avoid trapped air bubbles that can cause cracks. Finally, mix in the cocoa powder, red food coloring, and vanilla. The batter will turn that festive, rich red color that's so inviting.
Step 3: Bake it in a water bath like a pro
Pour your luscious batter over the pre-baked crust, smoothing it out evenly. Place your springform pan inside a larger pan (an 8x8 or bigger works well), then carefully pour hot water into the outer pan until it reaches halfway up the springform pan. The water bath keeps the cheesecake moist and helps prevent cracking—this trick has saved me from cracked cheesecakes more times than I can count! Bake for 65-75 minutes until the edges are set and a little golden brown, and the center jiggles slightly but isn't liquidy. Checking the internal temperature with a thermometer is a neat tip — you’re aiming for around 150°F.
Step 4: Cooling and chilling makes all the difference
Once baked, run a knife gently around the edge of the cheesecake to loosen it from the pan, and let it cool in the water bath for 15 minutes before carefully removing it. Then let it cool at room temperature for about an hour. Patience here really pays off because abrupt temperature changes are the main culprits for cracks. Once cooled, cover and stick it in the fridge for at least 4 hours or overnight. This resting time lets the flavors meld and the texture fully set—that’s when this Red Velvet Oreo Cheesecake Recipe truly shines.
Top Tip
From my experience making this Red Velvet Oreo Cheesecake Recipe multiple times, a few little details make a huge difference in the final result. Trusting these tips will save you some last-minute stress and help you get that bakery-quality dessert right at home.
- Room Temperature Ingredients: Make sure your cream cheese, sour cream, and eggs aren’t cold. Cold ingredients can lead to lumps or cracks in the cheesecake.
- Water Bath is Your Friend: Don’t skip wrapping the pan with foil and the water bath step—this keeps moisture in and prevents the edges from overbaking.
- Don’t Overbeat the Eggs: Overbeating can incorporate too much air, which causes cracks when baking. Add and mix gently but thoroughly.
- Slow Cooling: Let the cake cool gradually to room temp before refrigerating to avoid cracks and ensure creamy texture.
How to Serve Red Velvet Oreo Cheesecake Recipe

Garnishes
I’m usually all about simplicity here—I love topping this cheesecake with a generous swirl of cream cheese whipped cream. Sometimes I sprinkle crushed Oreo pieces or a few red velvet crumbs on top for that extra “wow” factor. If I’m feeling festive, a light dusting of cocoa powder or a drizzle of melted white chocolate does wonders for presentation and flavor.
Side Dishes
Since this cheesecake is already quite rich, I often serve it alongside a fresh berry compote or simple whipped cream to cut through the richness. A cup of strong coffee or black tea balances the flavors perfectly, especially after a hearty meal.
Creative Ways to Present
For special occasions, I’ve made mini individual cheesecakes using muffin tins lined with foil – perfect for portion control and cute party treats. I’ve also tried layering red velvet Oreo crumbs between slices for a pretty striped effect when serving. Don’t hesitate to get creative with edible flowers or seasonal sprinkles for a festive vibe!
Make Ahead and Storage
Storing Leftovers
I always cover leftovers tightly with plastic wrap or store in an airtight container in the fridge. This cheesecake keeps beautifully for up to 5-7 days, and the flavors even deepen after a couple of days, making it an excellent make-ahead dessert if you’re throwing a party.
Freezing
This cheesecake freezes like a dream! I slice it into portions, wrap each slice in plastic wrap, then place in a freezer-safe container. When you want a treat, just thaw overnight in the fridge. It retains its texture surprisingly well, making it great for prepping ahead.
Reheating
Honestly, I prefer this cheesecake chilled, but if you want to reheat a slice, pop it in the microwave for about 15 seconds just to take the chill off. This way, it feels more like homemade comfort food without melting the topping. Let it sit a couple of minutes before digging in.
Frequently Asked Questions:
For the best texture and flavor, use full-fat cream cheese at room temperature. Low-fat or whipped cream cheese tends to make the cheesecake less rich and can affect how it sets.
Baking the crust for 10 minutes helps it set up so it won't become soggy when you add the wet filling. It also intensifies the flavor and gives a nice crunchy texture.
Make sure to use a water bath, avoid overbeating the eggs, and cool the cheesecake slowly to room temperature before refrigerating. Running a knife along the edge right after baking also helps.
Yes! This recipe works in a 7-inch springform pan without adjustments. For a 9-inch pan, you'll want to check out a slightly different recipe to account for batter volume and baking time.
Final Thoughts
This Red Velvet Oreo Cheesecake Recipe holds a special place in my kitchen because it brings together two favorite indulgences in one unforgettable bite. I've made it for holidays, birthdays, or sometimes just because I want a little treat that feels extra special. You’ll love how easy it is to pull off and how impressive it looks. Give it a try—you might just find it becomes your new dessert obsession.
Print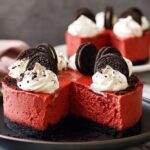
Red Velvet Oreo Cheesecake Recipe
- Prep Time: 20 minutes
- Cook Time: 1 hour 15 minutes
- Total Time: 6 hours 35 minutes
- Yield: 6 servings
- Category: Dessert
- Method: Baking
- Cuisine: American
Description
This Christmas Red Velvet Oreo Cheesecake is a festive and indulgent dessert featuring a rich, creamy red velvet cheesecake filling on a chocolate Oreo cookie crust. Perfectly baked in a water bath for a smooth texture, it’s topped with whipped cream for a delightful holiday treat.
Ingredients
Crust
- 1 cup chocolate sandwich cookie crumbs, such as Oreo
- 2 tablespoons unsalted butter, melted
Cheesecake Filling
- 16 ounces (2 blocks or 16 tablespoons) full-fat cream cheese, room temperature and not cold to the touch
- ½ cup granulated sugar
- 2 tablespoons full-fat sour cream, room temperature and not cold to the touch
- 2 eggs, room temperature and not cold to the touch
- 1 tablespoon unsweetened cocoa powder
- 2 teaspoons liquid red food coloring (McCormick brand or similar)
- 1 teaspoon vanilla extract
Topping
- Cream Cheese Whipped Cream or Small Batch Whipped Cream (amount as desired)
Instructions
- Prepare the Pan: Preheat oven to 325F. Wrap the outside of a 6x2 or 6x3 springform pan with foil to prevent water leakage. Lightly grease the inside of the pan.
- Make the Crust: In a large bowl, mix together the Oreo crumbs and melted butter until evenly combined. Press the mixture firmly into the bottom of the prepared springform pan. Bake the crust for 10 minutes, then remove from oven.
- Mix the Cheesecake Batter: In a large mixing bowl with a stand mixer fitted with a paddle attachment, beat the cream cheese, granulated sugar, and sour cream on medium-high speed until the mixture is light and fluffy, about 2-3 minutes. Scrape down the bowl as needed for even mixing.
- Add Eggs: Beat in the eggs one at a time, mixing each for about 1 minute until smooth. Avoid overbeating to prevent cracking.
- Incorporate Flavorings: Scrape down the bowl again, then beat in the unsweetened cocoa powder, liquid red food coloring, and vanilla extract until fully combined and uniform in color.
- Assemble for Baking: Pour the cheesecake batter over the baked crust in the springform pan, filling it to the top if using a 6x2 pan. Place this pan inside a larger 8x8 or bigger baking pan for a water bath.
- Set Up Water Bath and Bake: Carefully pour hot water into the outer pan until it reaches halfway up the sides of the springform pan, ensuring no water seeps inside the foil. Bake the cheesecake for 75 minutes or until the edges are set and brown, the center is mostly set with slight wobble, and the internal temperature reaches 150F.
- Cool in Water Bath: Remove the cheesecake from the oven and gently run a knife around the edges to loosen. Let it cool for 15 minutes in the water bath.
- Cool at Room Temperature: Remove the springform pan from the water bath and allow the cheesecake to cool completely at room temperature for 1 hour.
- Chill: Cover the cheesecake and refrigerate for at least 4 hours or overnight for best results before adding whipped cream or frosting topping.
- Serve and Store: Top with cream cheese whipped cream or your preferred small batch whipped cream. Store leftovers in an airtight container in the refrigerator for up to 5-7 days.
Notes
- For a 9-inch cheesecake, follow a different recipe: omit chocolate crust, then add ¼ cup sour cream, 2 tablespoons cocoa powder, and 1 tablespoon red food coloring to the batter.
- Other small cheesecake options include 6 Inch Cheesecake, Chocolate Cheesecake with Oreo Crust, Small Pumpkin Cheesecake, and Peanut Butter Cheesecake.
- For more red velvet treats, try Small Red Velvet Cake, Red Velvet Cupcakes, Red Velvet Sugar Cookies, and Red Velvet Bars.
- Ensure all dairy ingredients are at room temperature to avoid lumps and cracking.
- Using a water bath helps prevent cracks and achieves a smooth cheesecake texture.
- Use full-fat cream cheese and sour cream for the best creaminess and structure; avoid sub fat-free or whipped versions.
Nutrition
- Serving Size: 1 slice (approximate)
- Calories: 450 kcal
- Sugar: 30 g
- Sodium: 250 mg
- Fat: 32 g
- Saturated Fat: 18 g
- Unsaturated Fat: 10 g
- Trans Fat: 0 g
- Carbohydrates: 28 g
- Fiber: 1 g
- Protein: 7 g
- Cholesterol: 95 mg


Leave a Reply