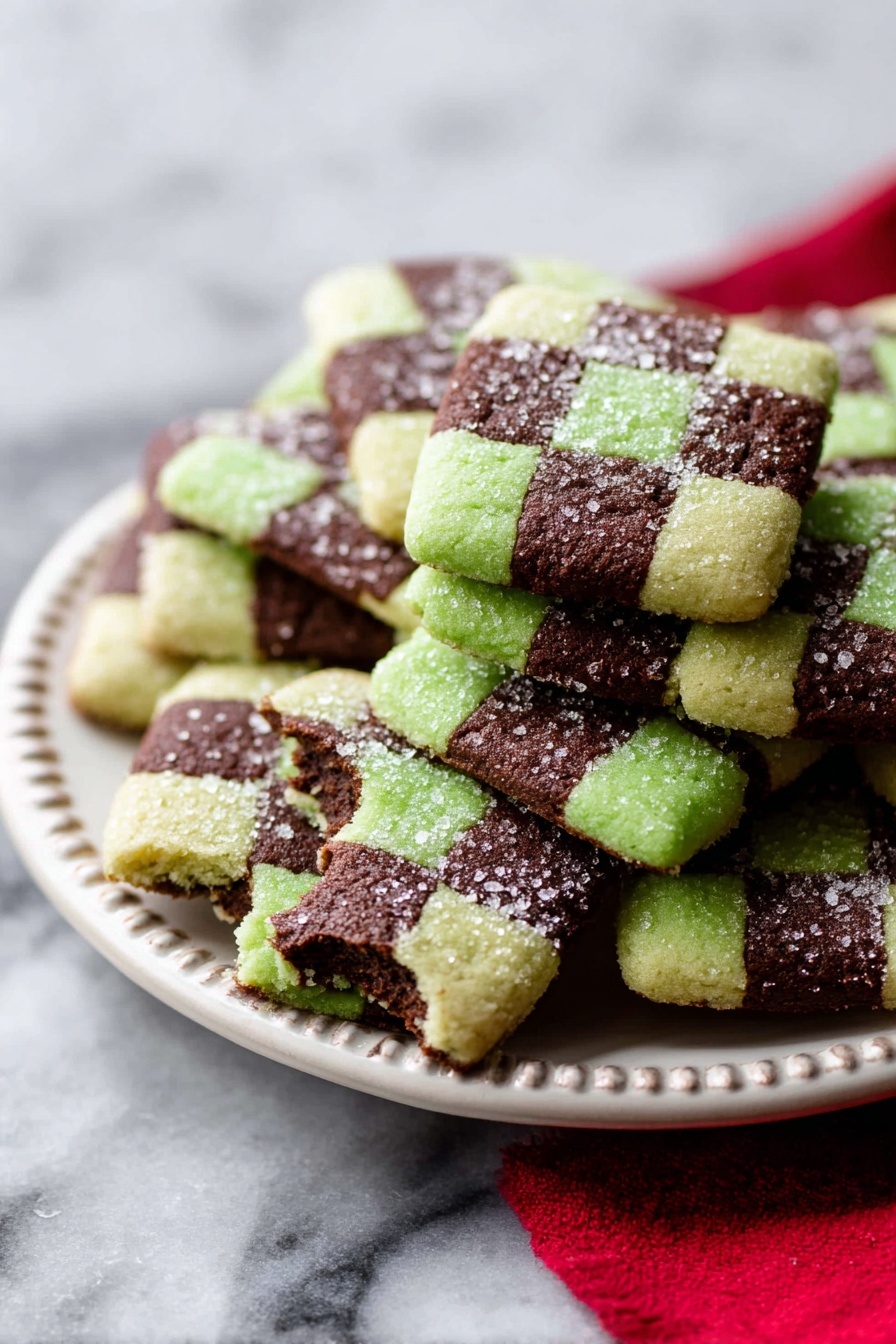
There’s something so satisfying about the classic look and refreshing flavor of the Mint Chocolate Checkerboard Cookies Recipe. These cookies aren’t just pretty to look at—they deliver a cozy balance of minty freshness and rich chocolate that’s perfect for sharing or savoring with a cup of tea.

Jump to:
- Why You'll Love This Recipe
- Ingredients & Why They Work
- Make It Your Way
- Step-by-Step: How I Make Mint Chocolate Checkerboard Cookies Recipe
- Top Tip
- How to Serve Mint Chocolate Checkerboard Cookies Recipe
- Make Ahead and Storage
- Frequently Asked Questions:
- Final Thoughts
- Mint Chocolate Checkerboard Cookies Recipe
Why You'll Love This Recipe
I gotta admit, the first time I made these Mint Chocolate Checkerboard Cookies, I was captivated by how the simple dough transformed into a stunning classic pattern. It’s such a fun baking project, and the flavor combo feels both nostalgic and fresh.
- Showstopper Appearance: The checkerboard pattern looks fancy but is surprisingly easy to achieve with a little patience.
- Perfect Mint-Chocolate Balance: The mint extract gives just enough freshness to complement the deep cocoa flavor without overpowering.
- Fun to Customize: You can tweak colors, thickness, or even add espresso powder to deepen the chocolate flavor.
- Great for Gifting: These cookies look impressive on a platter, making them a delightful homemade gift for holidays or special occasions.
Ingredients & Why They Work
This recipe relies on a classic buttery cookie base, split and flavored two ways to create those iconic checkerboard stripes. Selecting quality ingredients really elevates the final flavor, so I always start with fresh butter and pure peppermint extract.
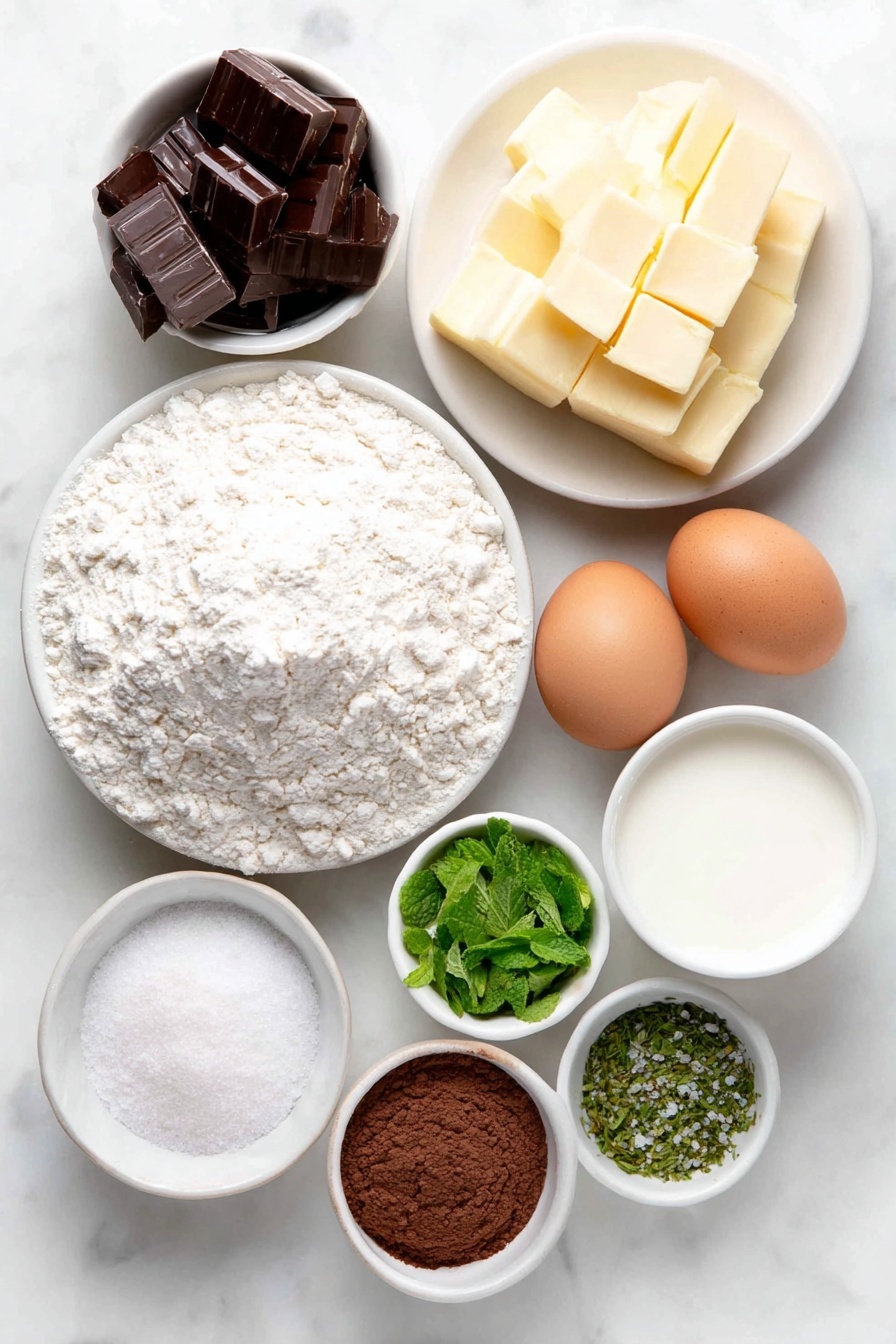
- All-purpose flour: Provides the perfect structure—not too cakey or crumbly.
- Baking powder & salt: Helps the cookies rise gently and balances sweetness.
- Unsalted butter: Softened butter adds richness and smooth texture.
- Granulated sugar: Gives sweetness and helps with spreading and browning.
- Egg and egg yolk: Bind everything and add tenderness; saving the extra egg white for your egg wash adds a sparkle on top.
- Vanilla extract: Adds depth and enhances all flavors.
- Peppermint extract: The star of the mint dough; a little goes a long way for freshness.
- Cocoa powder: Use natural or dutch-process—each offers a slightly different chocolate profile.
- Milk: A touch to loosen the cocoa dough so it’s pliable enough to shape.
- Optional espresso powder: Boosts chocolate intensity without adding coffee flavor.
Make It Your Way
I love mixing in a tiny bit of espresso powder on those days when I want the chocolate flavor to really pop. But feel free to dial up or down the mint depending on your tastes—this recipe is super forgiving and customizable.
- Mint Intensity: I started with just one teaspoon of peppermint extract and found it balanced perfectly—if you love mint, try adding a bit more next time.
- Food Coloring Fun: A drop or two of green gel food dye gives that classic mint look, but you can skip it if you prefer natural colors.
- Cookie Thickness: I usually slice for thicker cookies, about ½ inch, but thinner slices bake faster and have a more delicate crunch.
- Dietary Variations: For dairy-free, try swapping butter for a vegan alternative; just expect slightly different texture.
Step-by-Step: How I Make Mint Chocolate Checkerboard Cookies Recipe

Step 1: Whisk Your Dry Ingredients
Start by combining the flour, baking powder, and salt in a medium bowl. Doing this upfront ensures your cookies rise evenly and have the perfect texture—it also helps prevent lumps when you mix in the wet ingredients later.
Step 2: Cream Butter and Sugar to Perfection
Using a stand mixer or hand mixer, beat the softened butter and sugar on medium-high for about three minutes until fluffy. This step is critical for that tender crumb and light texture. If you’re unsure how to cream properly, don’t worry—I’ve got a handy tutorial linked in the tools above that can help you nail it.
Step 3: Add Eggs and Vanilla
Mix in the whole egg, extra egg yolk, and vanilla extract on high speed until everything’s combined and smooth. Scrape down the bowl edges to make sure no pockets of butter or sugar remain—this little detail pays off in even dough consistency.
Step 4: Combine Wet and Dry Ingredients
Switch to low speed and gradually add your dry flour mixture to the wet ingredients. The dough will get thick and sticky, which is just right. Don’t overmix here—stop as soon as the dough comes together.
Step 5: Divide and Flavor Your Doughs
Split your dough roughly in half on a floured surface. Return half to the bowl and add the peppermint extract and green coloring for the mint dough. The other half gets cocoa, milk, and optional espresso powder for the chocolate side. Mix each just until combined—you want to keep the dough pliable.
Step 6: Shape Your Dough Blocks and Chill
Form each dough half into a neat rectangle about 6 inches long, 2 inches wide, and 2 inches tall. Don’t worry if your shaping isn’t flawless—that’s why we trim later! Wrap them tightly and chill in the fridge for only one hour. This short chill firms up the dough just enough so you can cut clean strips but still let the pieces stick together when assembling. Any longer chill, and you’ll need to let dough soften before handling.
Step 7: Cut Strips and Build the Checkerboard
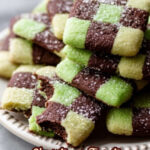
With a sharp knife, cut each chilled dough block lengthwise into 3 even strips, then crosswise into thirds, making 9 strips per block. Trim any rounded edges for clean lines. Arrange strips alternating mint and chocolate, pressing gently to eliminate gaps. Repeat with the second block, starting with the alternate color to complete your board.
Step 8: Chill Again Before Baking
Wrap your checkerboard blocks and refrigerate for 2 more hours or up to 4 days. This extra chill time solidifies the pattern and makes slicing easier.
Step 9: Slice, Optional Egg Wash, and Bake
Preheat your oven to 350°F (177°C). Slice each block into 12-18 cookies depending on thickness preference. You can brush with a simple egg wash made from reserved egg white plus water and sprinkle with coarse sugar for a little sparkle and crunch. Bake on parchment-lined sheets for about 12-14 minutes until edges just begin to brown.
Top Tip
I've learned from baking these cookies that the chilling times are key to success. Too little chilling and the dough becomes too soft to cut cleanly; too much and it's hard to press pieces together without cracking. Finding that sweet spot means practicing once or twice is worth it for gorgeous results.
- Even Cutting: Use a sharp knife and a gentle sawing motion to keep your strips neat—no squished edges here!
- Soft But Firm Dough: Aim for pliable dough after chilling—not rock-hard—to ensure the checkerboard edges stick tight.
- Press Gently: When assembling, softly press strips together rather than squeezing hard to keep your pattern crisp.
- Trim for Perfection: Don’t hesitate to trim dough edges for perfectly square cookies, then bake the scraps separately—they’re just as tasty!
How to Serve Mint Chocolate Checkerboard Cookies Recipe
Garnishes
I love brushing these cookies with an egg wash and sprinkling coarse sugar just before baking—it adds a subtle sparkle and slight crunch on top. For festive occasions, a dusting of powdered sugar or even crushed peppermint candies can be a fun twist.
Side Dishes
Pair these cookies with a hot cup of black tea, a minty green tea, or even coffee. They’re also a perfect finish to a dinner party alongside a scoop of vanilla ice cream or a dollop of whipped cream for a cool, mint-chocolate dessert plate.
Creative Ways to Present
For extra flair, I sometimes slice the checkerboard dough blocks thinner and use cookie cutters to create festive shapes like stars or hearts, showcasing the checkerboard pattern inside. Laying the cookies out on a platter in a circle or stacked like a cake tower makes a stunning display for parties!
Make Ahead and Storage
Storing Leftovers
Once baked and cooled, store your cookies in an airtight container at room temperature. They stay fresh and crisp for up to a week—perfect if you bake a batch early for holiday guests.
Freezing
I’ve found freezing both baked cookies and unbaked dough blocks works equally well. Freeze dough wrapped tightly for up to three months—then thaw overnight before slicing and baking. Baked cookies freeze just as nicely and thaw without losing their charm.
Reheating
If you want to refresh a stale cookie, a quick 5-8 second zap in the microwave brings back a bit of softness and warms that mint-chocolate flavor beautifully. Just don’t overheat or they’ll get rubbery.
Frequently Asked Questions:
Absolutely! The food coloring is purely for visual impact. Skipping it won’t change the flavor; you’ll just have classic mint and chocolate tones instead of green mint dough.
Using a sharp knife and chilling the dough blocks properly are key. Trim rounded edges before assembling and slice carefully after chilling the full block for the cleanest results.
Definitely! Once you assemble, you can roll out the dough blocks slightly and cut with cookie cutters for festive shapes, although the checkerboard effect will be less uniform.
You can refrigerate the assembled checkerboard dough blocks for up to 4 days. Just make sure to cover them tightly to prevent drying out. If chilling longer, let the dough sit at room temperature a bit before slicing for easier cutting.
Final Thoughts
The Mint Chocolate Checkerboard Cookies Recipe has become one of my favorite projects for a relaxed weekend bake—there’s something so satisfying about watching those colorful strips come together in a beautiful pattern and tasting that perfect mint-and-chocolate harmony. I hope you’ll enjoy making these as much as I do; they’re a sweet way to brighten any day or celebration.
Print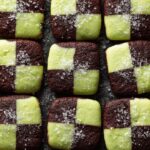
Mint Chocolate Checkerboard Cookies Recipe
- Prep Time: 4 hours 45 minutes
- Cook Time: 14 minutes
- Total Time: 5 hours
- Yield: 24 cookies
- Category: Dessert
- Method: Baking
- Cuisine: American
Description
Mint Chocolate Checkerboard Cookies are a visually stunning and delicious treat featuring a classic checkerboard pattern made from alternating strips of mint-flavored and chocolate-flavored cookie dough. These buttery, soft cookies combine a hint of peppermint with rich cocoa, perfect for festive occasions or everyday indulgence.
Ingredients
Base Cookie Dough
- 2 and ½ cups (313g) all-purpose flour (spooned & leveled)
- ½ teaspoon baking powder
- ½ teaspoon salt
- 1 cup (16 Tbsp; 226g) unsalted butter, softened to room temperature
- 1 cup (200g) granulated sugar
- 1 large egg + 1 egg yolk, at room temperature
- 1 and ½ teaspoons pure vanilla extract
- Optional for topping: 1 Tablespoon (15ml) water and ¼ cup (50g) coarse sugar
Mint Dough
- 1 teaspoon peppermint extract
- Optional: 1 drop green food dye (leaf green gel recommended)
Chocolate Dough
- 2 Tablespoons (10g) unsweetened natural or dutch-process cocoa powder
- 1 Tablespoon (15ml) milk
- Optional: 1 teaspoon espresso powder
Instructions
- Prepare Dry Ingredients. Whisk together the all-purpose flour, baking powder, and salt in a medium bowl. Set aside.
- Cream Butter and Sugar. In a large bowl, use a hand mixer or stand mixer with paddle attachment to beat softened butter and granulated sugar on medium-high speed for about 3 minutes until light and fluffy.
- Add Eggs and Vanilla. Add the large egg, egg yolk, and vanilla extract to the creamed butter mixture. Beat on high speed until fully incorporated, about 1 minute. Scrape down the sides and bottom of the bowl as needed.
- Combine Dough. Add the dry ingredients to the wet ingredients and mix on low speed until combined. The dough will be thick and sticky. Remove from mixing bowl.
- Divide Dough in Half. Divide the dough roughly evenly into two portions, about 2 cups each.
- Make Mint Dough. Place one half back into the mixing bowl. Add peppermint extract and optional green food dye starting with one drop. Beat on low speed until combined. Add an additional drop of food coloring if a deeper green is desired. Remove dough from the bowl.
- Make Chocolate Dough. Place the other half of dough in the mixing bowl. Add the cocoa powder, milk, and optional espresso powder. Beat on low speed until well combined. Remove dough from bowl.
- Shape and Chill Dough Blocks. On a lightly floured surface, shape each dough half into a 6-inch long, 2-inch wide, and 2-inch tall rectangle block. Wrap tightly in plastic wrap or cover with foil. Refrigerate for exactly 1 hour to firm up but remain pliable.
- Cut Strips for Checkerboard Pattern. Remove blocks from refrigerator and unwrap. Using a sharp knife, cut each block lengthwise into 3 equal strips, then cut each strip into thirds to create 9 strips per block. Trim off rounded edges for clean lines.
- Assemble Checkerboard Blocks. Lay strips alternating mint and chocolate dough tightly together to form a checkerboard pattern, pressing gently to avoid gaps. Create two blocks starting with mint and chocolate strips alternately. Trim edges to clean shape if needed.
- Chill Checkerboard Blocks. Wrap or cover the assembled blocks and refrigerate for 2 hours up to 4 days to firm up before slicing and baking.
- Preheat Oven and Prepare Baking Surface. Preheat oven to 350°F (177°C). Line two baking sheets with parchment paper or silicone mats.
- Slice and Prepare Cookies. Slice each checkerboard block into 12 pieces about ½ inch thick for thicker cookies or 18 pieces about ⅓ inch thick for thinner cookies. Optionally trim edges for neat squares. Brush each cookie lightly with egg wash (extra egg white mixed with 1 Tablespoon water) and sprinkle with coarse sugar.
- Bake Cookies. Arrange cookies on prepared baking sheets 2-3 inches apart. Bake for 14 minutes or until edges are lightly browned. Thin cookies will bake approximately 1 minute less.
- Cool Cookies. Remove from oven and cool on baking sheets for 5 minutes before transferring to a wire rack to cool completely.
- Store. Keep cookies covered at room temperature for up to 1 week.
Notes
- Make Ahead: Cookies freeze well up to 3 months. Thaw overnight in refrigerator and bring to room temperature before serving.
- You can assemble checkerboard dough blocks and refrigerate up to 4 days or freeze up to 3 months before baking.
- Use a sharp knife to trim dough strips and cookies for neat edges; leftover scraps can be rolled out and baked as additional cookies.
- Egg wash made from extra egg white and water adds crunch and sparkle when brushed on cookies before baking.
- If chilling dough longer than 1 hour initially, let it sit at room temperature 15-30 minutes to regain pliability for shaping.
Nutrition
- Serving Size: 1 cookie
- Calories: 150 kcal
- Sugar: 10 g
- Sodium: 90 mg
- Fat: 8 g
- Saturated Fat: 5 g
- Unsaturated Fat: 2 g
- Trans Fat: 0 g
- Carbohydrates: 18 g
- Fiber: 1 g
- Protein: 2 g
- Cholesterol: 35 mg


Leave a Reply