There’s something truly magical about these crisp, chocolatey cookies kissed with cool peppermint. This Homemade Thin Mint Cookies Recipe brings that iconic flavor right into your kitchen with simple ingredients and a fun dipping step that feels like a little indulgence in every bite.

Jump to:
Why You'll Love This Recipe
I’m genuinely excited about this Homemade Thin Mint Cookies Recipe because it perfectly balances rich chocolate with refreshing peppermint in a way that feels homemade but professional. It’s that satisfying crunch combined with creamy chocolate coating that makes coming back for “just one more” so easy.
- Real Peppermint Flavor: Using peppermint extract—not just any mint—gives these cookies the authentic cooling punch that sets them apart.
- Simple, Trustworthy Ingredients: Nothing fancy or hard-to-find, which anyone can gather and whip up without stress.
- Chilling the Dough: This step is key! It makes rolling easier and helps the cookies keep their perfect thin shape.
- Dipped in Chocolate: That semi-sweet coating is not just for looks—it adds texture and a glossy finish that’s downright irresistible.
Ingredients & Why They Work
Each ingredient in this Homemade Thin Mint Cookies Recipe plays a part in delivering that iconic cookie experience. From the butter’s creaminess to the cocoa’s depth, here’s why these choices make your cookies shine.
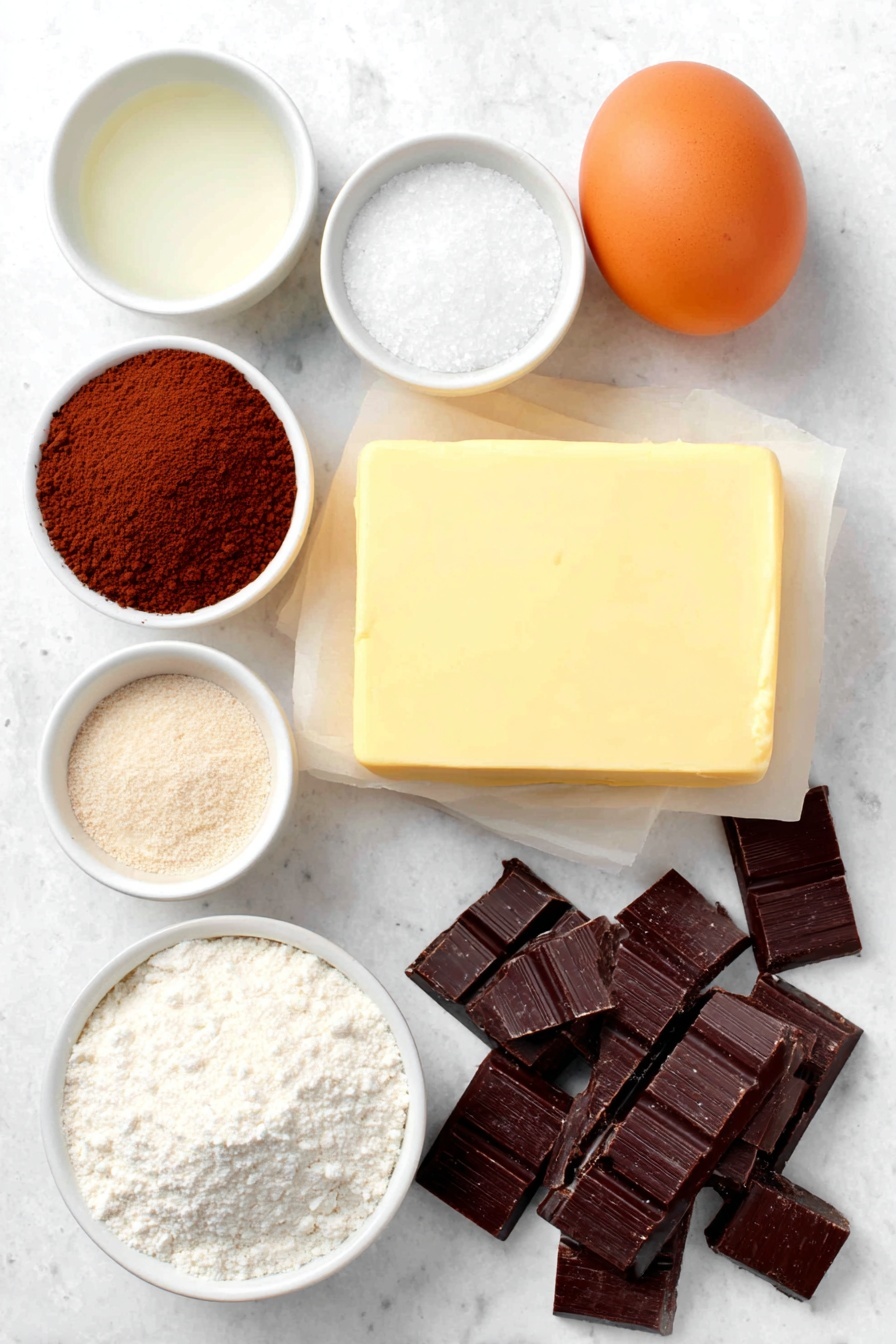
- Unsalted Butter: Softened to room temp so it whips to a creamy base, providing tender texture and flavor control without added salt.
- Granulated Sugar: Creates the right sweetness and helps the cookies crisp up nicely in the oven.
- Egg: Adds moisture and helps bind the dough together for structure.
- Vanilla Extract: Brings warmth and depth to the chocolatey base.
- Peppermint Extract: The real hero of this recipe! It gives you the cool, refreshing mint taste that’s pure Thin Mint magic.
- All-Purpose Flour: Provides structure without making the cookies tough—spooning and leveling it keeps the texture light.
- Cocoa Powder: Use natural or dutch-processed for rich, intense chocolate flavor with a slightly different depth (I’ve used both—your choice!).
- Baking Powder & Salt: Make sure the cookies rise just enough to be tender; salt balances the sweetness and enhances flavors.
- Semi-Sweet Chocolate: The chocolate coating is your final flourish—choose good quality chocolate for the smoothest, most luscious dip.
- Canola or Vegetable Oil: Added to melted chocolate to keep it shiny and easy to dip.
Make It Your Way
I like to tweak this recipe depending on the occasion—sometimes a kiss of extra peppermint extract for a punchier mint hit, or swapping out semi-sweet chocolate for dark if I want a slightly more intense coating. Feel free to experiment! The base is forgiving and adaptable.
- Slice ‘n’ Bake Variation: I’ve tried rolling this dough into logs and chilling, then slicing—it’s a neat alternative if you want to skip rolling out thin sheets. Just keep in mind the dough gets a little sticky!
- Chocolate Options: Use milk chocolate for a sweeter, mellow finish or even white chocolate dyed green for a festive twist—but peppermint extract is non-negotiable in my book.
- Textural Tweaks: For crunchier cookies, bake an extra minute or two, but watch closely—they can go from perfect to dry quickly.
Step-by-Step: How I Make Homemade Thin Mint Cookies Recipe
Step 1: Cream the Butter and Sugar
Start by beating your softened butter for about a minute until it’s smooth and creamy. Then add the sugar and keep beating on a higher speed until the mixture turns light and fluffy—this is key for texture and flavor development. Adding the egg and extracts last lets them blend in with a beautiful silky finish. Don’t forget to scrape down the bowl sides to get everything incorporated evenly.
Step 2: Combine Dry Ingredients and Mix Gently
Whisk together your flour, cocoa, baking powder, and salt to make sure they’re evenly distributed—this is especially helpful for the baking powder. Then add the dry mix slowly into your wet ingredients on low speed so the dough forms just right. Overmixing can make cookies tough, so keep it gentle until there are no streaks of flour.
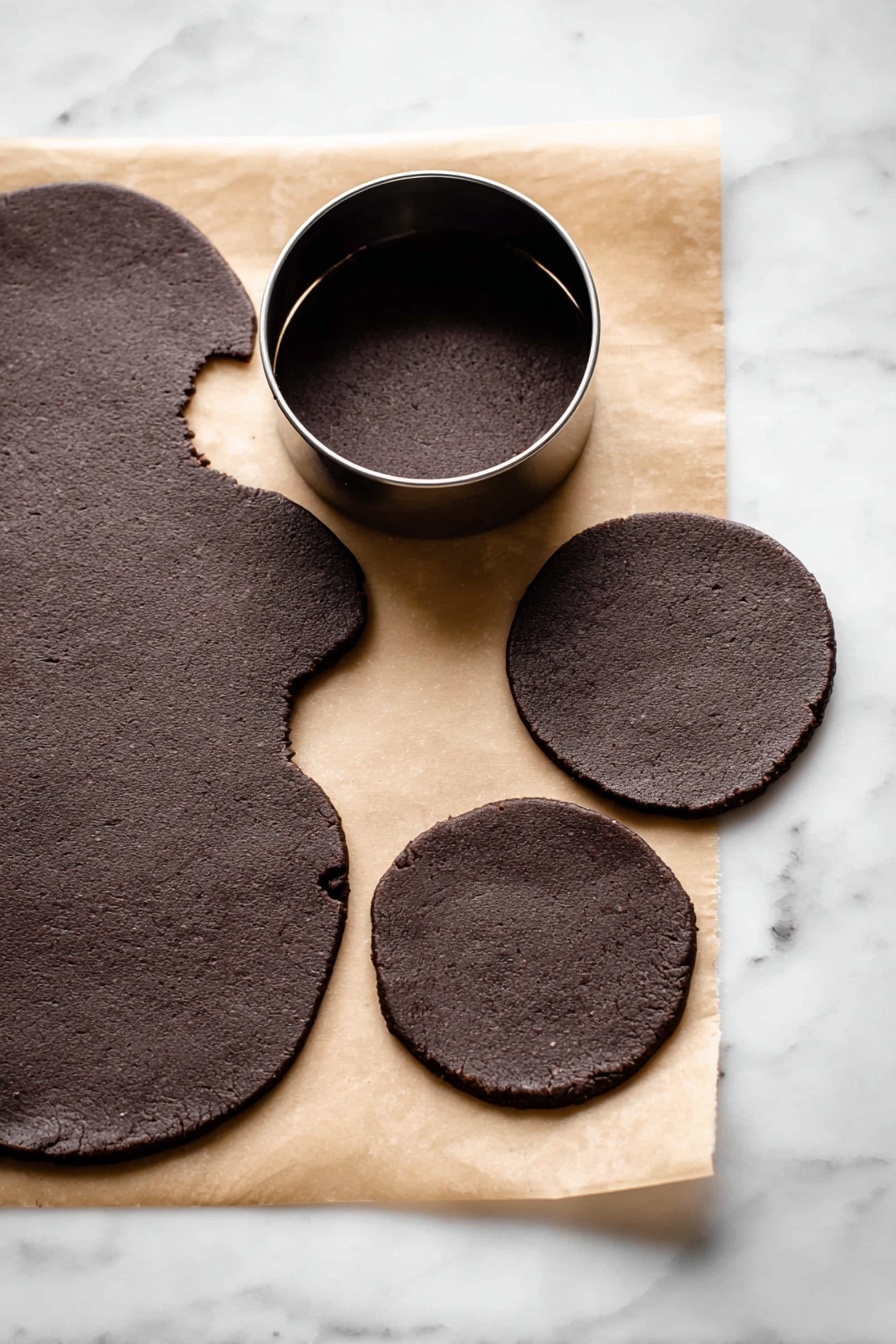
Step 3: Roll Out and Chill the Dough
Divide the dough in two and roll each on parchment paper to about ¼ inch thick. This is where the magic of chilling comes in—it firms up the dough so cutting neat rounds is a breeze and helps keep that thin, crisp texture after baking. If you want to prep ahead, chill up to two days; just keep the top dough piece covered.
Step 4: Cut and Bake
Preheat your oven to 350°F (177°C) and line your baking sheets with parchment or silicone mats. Using a 2-inch round cutter gives you that classic Thin Mint size. As you cut, gather scraps and re-roll—the dough holds up well to a few rounds of rolling. Baking only 8-10 minutes leaves the centers soft but edges set, perfect for that melt-in-your-mouth crispness once cooled.
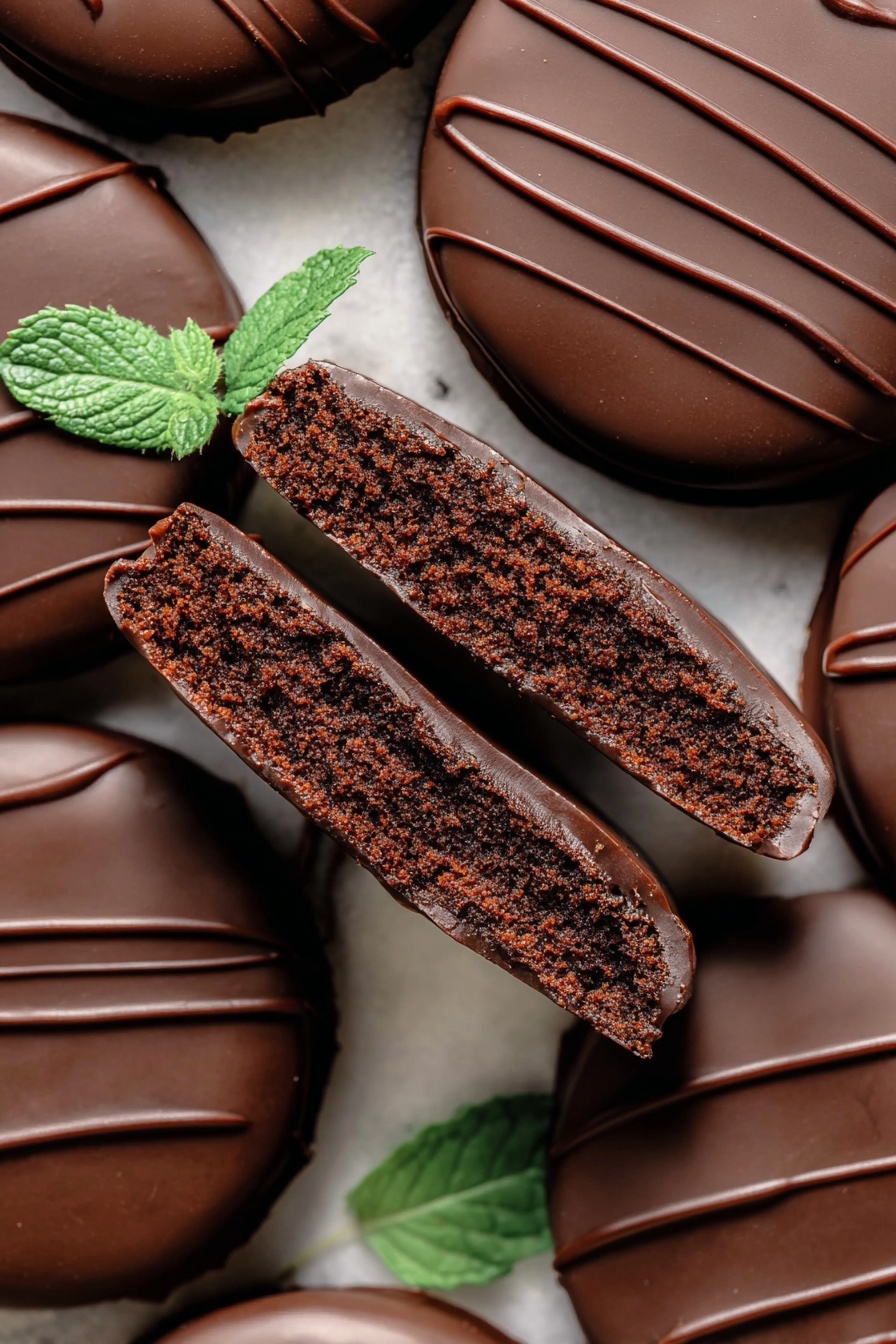
Step 5: Dip in Peppermint Chocolate
Once cooled completely, melt your semi-sweet chocolate with oil gently—either over a double boiler or in short bursts in the microwave, stirring often. Stir in the peppermint extract to brighten the flavor before diving in. Use a fork to dip and lift, then let the excess drip off before setting on parchment. A quick chill in the fridge firms up the coating beautifully. This part is my absolute favorite—you get to really feel like a chocolate artisan with every dip.
Top Tip
From making these cookies multiple times, I’ve learned a few tips that really help your Homemade Thin Mint Cookies Recipe turn out beautifully every time:
- Chill the Dough Thoroughly: It’s tempting to skip, but chilling is key to rolling thin, even sheets and ensuring the cookies bake up crisp without spreading too much.
- Use Peppermint Extract, Not Mint: Peppermint extract gives you that clean, cool flavor responsible for that true Thin Mint taste—mint extract can taste toothpaste-y and overpowering.
- Be Gentle When Mixing: Over-mixing the dough once the flour goes in can make the cookies tough, so mix just until combined.
- Work in Batches While Dipping: The chocolate sets quickly once you add peppermint extract, so dip a few cookies at a time and keep the rest warm if you can.
How to Serve Homemade Thin Mint Cookies Recipe
Garnishes
I usually keep things classic with just the chocolate coating, but for special occasions, I’ve sprinkled a bit of finely crushed candy canes or a tiny pinch of sea salt on wet chocolate—it adds a fun festive crunch or contrast that’s surprisingly delightful.
Side Dishes
Pairing these with a glass of cold milk is a no-brainer, but they’re also fantastic alongside a cup of hot coffee or peppermint tea to really highlight the mint-chocolate harmony.
Creative Ways to Present
For holidays, I like stacking these in cute, clear jars with ribbons tied around or arranging them neatly on a platter with fresh mint sprigs for a pop of green. They also make darling edible gifts tucked inside decorated tins.
Make Ahead and Storage
Storing Leftovers
I keep the cookies in an airtight container at room temperature for up to 3 days, which typically doesn’t last long in my house! If you want to keep them for longer, the fridge works well for about a week and keeps the dipping chocolate firm.
Freezing
I’ve frozen both the baked cookies and the raw dough. Leftover cookies freeze beautifully wrapped tightly in plastic wrap and stored in a freezer bag for up to 3 months. Thawing overnight in the fridge keeps them fresh, and I love eating them cold right out of the freezer for a refreshing treat.
Reheating
These cookies don’t really need reheating, but if you’d like to soften them just a bit, I give a quick 5-10 second zap in the microwave. Be careful not to melt the chocolate coating; otherwise, they are perfect just as they are.
Frequently Asked Questions:
Mint extract is often peppermint with added flavors and can taste more like spearmint toothpaste, which isn’t ideal. Peppermint extract gives that bright, cool flavor essential to Thin Mints.
Aim for about ¼ inch thick. Thinner cookies won’t hold together well and thicker ones lose the signature crispness. Chilling the dough helps you roll it out evenly at this thickness.
This recipe as-is uses butter and egg, so to make it dairy-free or vegan, substitute with vegan butter and an egg replacer. Keep in mind the texture and taste might vary a bit from traditional Thin Mints.
A double boiler is my go-to for gently melting chocolate without burning it, but using short bursts in the microwave and stirring between each works well too. Adding a little oil helps keep the chocolate smooth and easy to dip.
Final Thoughts
Sharing this Homemade Thin Mint Cookies Recipe feels like passing along a little secret of my favorite wintertime treat. Once you make these, you might never go back to store-bought again. So gather your ingredients, grab that peppermint extract, and enjoy the process—because these cookies are as fun to make as they are delicious to eat.
Print
Homemade Thin Mint Cookies Recipe
- Prep Time: 2 hours 15 minutes
- Cook Time: 10 minutes
- Total Time: 3 hours 15 minutes
- Yield: 36 cookies
- Category: Dessert
- Method: Baking
- Cuisine: American
Description
These Homemade Thin Mint Cookies are a delightful copycat version of the classic Girl Scout treat. With a rich cocoa base, a refreshing hint of peppermint, and a smooth semi-sweet chocolate coating, these cookies offer a perfect balance of flavors and textures. Perfect for mint and chocolate lovers looking for a delicious homemade cookie experience.
Ingredients
Cookie Dough
- ¾ cup (12 Tbsp; 170g) unsalted butter, softened to room temperature
- 1 cup (200g) granulated sugar
- 1 large egg, at room temperature
- 1 teaspoon pure vanilla extract
- ¼ teaspoon peppermint extract
- 1 and ½ cups (188g) all-purpose flour (spooned & leveled)
- ¾ cup (62g) unsweetened natural cocoa powder (or Dutch process)
- 1 teaspoon baking powder
- ⅛ teaspoon salt
Topping
- 14 ounces (395g) quality semi-sweet chocolate, coarsely chopped
- ½ teaspoon canola or vegetable oil
- ¼ teaspoon peppermint extract
Instructions
- Prepare the butter and sugar: In a large bowl using a handheld mixer or stand mixer fitted with a paddle attachment, beat the softened butter for 1 minute on medium speed until smooth and creamy. Add the granulated sugar and beat on medium-high speed until fluffy and light in color.
- Add eggs and extracts: Beat in the egg, vanilla extract, and peppermint extract on high speed. Scrape down the sides and bottom of the bowl as needed to ensure even mixing.
- Combine dry ingredients: Sift together the all-purpose flour and cocoa powder in a medium bowl. Whisk in the baking powder and salt until evenly combined.
- Mix dry with wet ingredients: On low speed, slowly add the dry mixture into the wet ingredients until just combined and a dough forms.
- Chill the dough: Divide the dough into two equal parts. Roll each portion out onto parchment paper to about ¼ inch thickness. Stack with parchment paper between layers on a baking sheet and refrigerate for at least 1 hour. Cover top dough with parchment if chilling more than a couple of hours; dough can chill up to 2 days.
- Preheat oven and prepare baking sheets: Preheat your oven to 350°F (177°C). Line 2-3 large baking sheets with parchment paper or silicone mats.
- Cut and bake cookies: Remove one dough portion from fridge. Use a 2-inch round cookie cutter to cut dough into circles and transfer to prepared baking sheet. Re-roll scraps and continue until dough is used up. Bake for 10 minutes, rotating pans halfway through. Cookies will look soft in center but edges should be set.
- Cool cookies: Let cookies cool on baking sheet for 5 minutes, then transfer to wire racks to cool completely before dipping.
- Prepare chocolate topping: Melt semi-sweet chocolate and canola oil together using a double boiler or microwave (in 15 second increments stirring after each). Stir in peppermint extract once fully melted and smooth.
- Dip cookies: Dip each cooled cookie completely into melted chocolate. Use a fork to lift them out and tap fork gently on bowl edge to remove excess chocolate. Place dipped cookies on parchment or silicone mat-lined sheet.
- Set the chocolate: Refrigerate dipped cookies until chocolate is firm and set.
- Storage: Store leftover cookies covered at room temperature for 2-3 days or refrigerated up to 1 week. Cookies can also be enjoyed straight from the freezer.
Notes
- Make Ahead & Freezing: The cookie dough can be chilled up to 2 days before baking, and finished cookies freeze well up to 3 months. Thaw cookies overnight in the refrigerator before serving.
- You can freeze the dough before rolling as well, for up to 3 months. Thaw overnight in fridge, then bring to room temperature about 1 hour prior to rolling.
- Use peppermint extract instead of mint extract for a cool, authentic mint flavor that complements chocolate perfectly.
- For a slice-and-bake alternative, roll dough into two 2-3 inch diameter logs, chill at least 1 hour, then slice into 16-18 cookies before baking.
- Recommended tools include an electric mixer, rolling pin, cookie cutters, parchment paper or silicone mats, cooling rack, and double boiler or microwave-safe bowl for melting chocolate.
Nutrition
- Serving Size: 1 cookie
- Calories: 150 kcal
- Sugar: 12 g
- Sodium: 50 mg
- Fat: 9 g
- Saturated Fat: 5 g
- Unsaturated Fat: 3 g
- Trans Fat: 0 g
- Carbohydrates: 18 g
- Fiber: 2 g
- Protein: 2 g
- Cholesterol: 20 mg


Leave a Reply