There’s something truly magical about the buttery crumb of shortbread and the sweet pop of icing decorated just right. My Festive Shortbread Cookies with Icing Recipe brings holiday cheer to your kitchen, whether you’re gifting, sharing, or just indulging yourself after a busy day.

Jump to:
- Why You'll Love This Recipe
- Ingredients & Why They Work
- Make It Your Way
- Step-by-Step: How I Make Festive Shortbread Cookies with Icing Recipe
- Top Tip
- How to Serve Festive Shortbread Cookies with Icing Recipe
- Make Ahead and Storage
- Frequently Asked Questions:
- Final Thoughts
- Festive Shortbread Cookies with Icing Recipe
Why You'll Love This Recipe
Honestly, this recipe feels like a warm hug during the holidays. I keep coming back to it because it’s simple enough for a weekday treat but pretty and festive enough for special occasions — and the icing? It’s the perfect sweet finish that brings these cookies to life.
- Perfect buttery texture: The cookies melt in your mouth without being crumbly or dry.
- Versatile decorating options: Whether you love classic icing or fancy chocolate designs, you can customize these cookies your way.
- Simple ingredients you probably have: No complicated shopping trips required, making it easier to whip up on a whim.
- Chill and roll method: Gives the dough just the right consistency to cut clean shapes and hold their form beautifully while baking.
Ingredients & Why They Work
This mix of simple ingredients comes together in a way that’s foolproof yet produces that classic shortbread melt-in-your-mouth consistency. Here’s why each part plays such a crucial role:
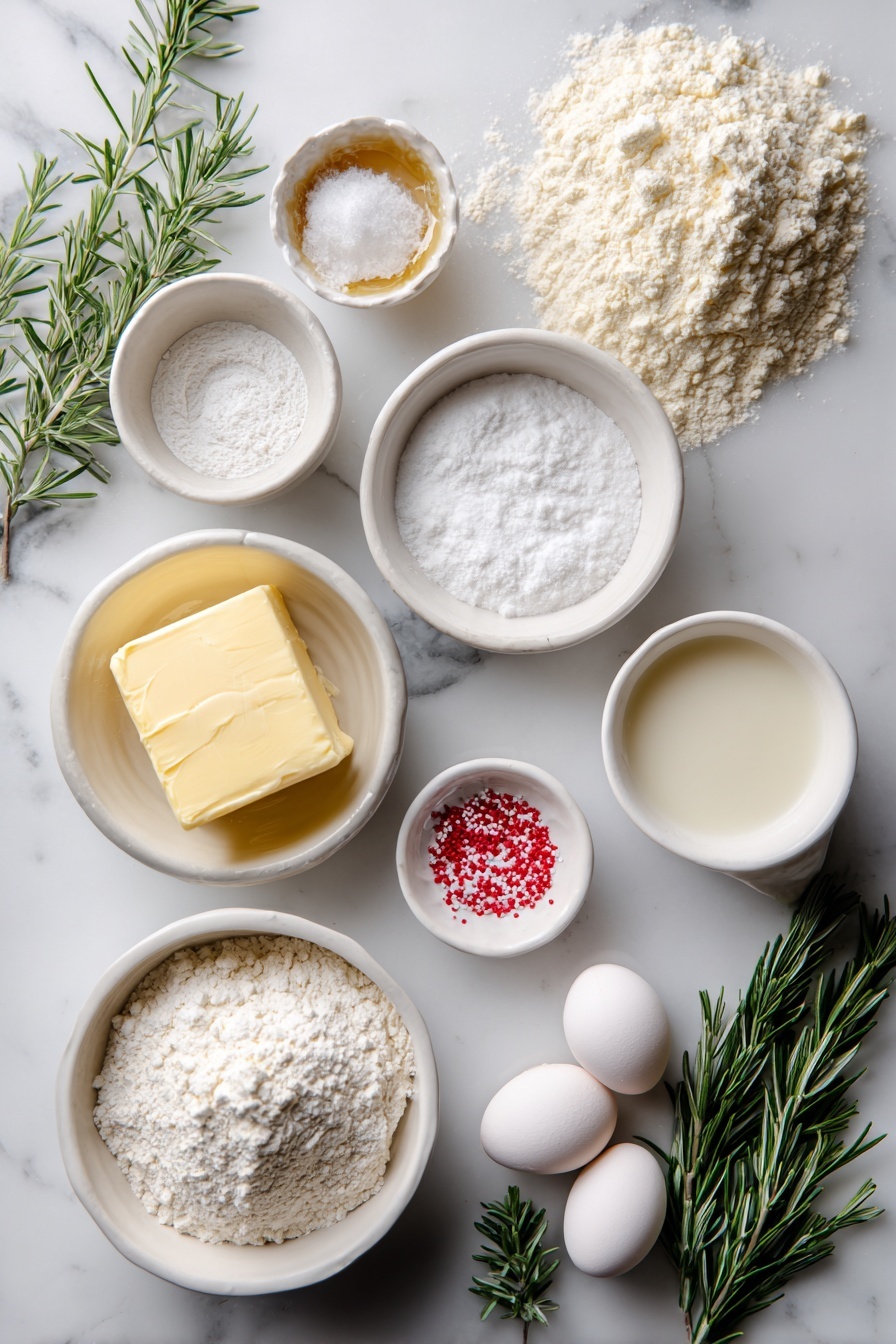
- Unsalted butter: Room temperature butter creams smoothly for that tender, crumbly texture.
- Powdered sugar: Provides sweetness without graininess and helps the dough stay soft.
- Vanilla bean paste: Adds warm, real vanilla flavor far beyond extract — if you don’t have it, vanilla extract works fine too.
- Salt: Just a pinch balances the sweetness and boosts all the rich flavors.
- All-purpose flour: Forms the structure of the cookie; gluten-free works to adapt to different needs.
- Cornstarch: Lightens the dough, giving the shortbread that characteristic tender snap rather than toughness.
- For icing - powdered sugar, vanilla extract, and milk: These create a smooth spread or dip that hardens just right on cooling.
- White chocolate and red oil-based food coloring: Perfect for beautifully colored festive decorations without risking seizing the chocolate.
- Rosemary and sprinkles: For that fresh green and bright red color combo that screams holiday spirit.
Make It Your Way
I love how flexible these festive shortbread cookies are. You can go classic with simple icing and sprinkles or get creative with shapes, flavors, and decorations. It’s all about what feels fun in your kitchen that day.
- Variation: One year, I swapped vanilla bean paste for almond extract and topped with crushed toasted nuts — the flavor twist was so warming and instantly loved by my family.
- Diet-friendly substitutions: Try coconut oil instead of butter for a dairy-free version or gluten-free flour if needed — just expect subtle texture changes.
- Seasonal flair: Swap rosemary sprigs for crushed peppermint or edible glitter for a sparkly snowy effect.
Step-by-Step: How I Make Festive Shortbread Cookies with Icing Recipe
Step 1: Cream the Butter and Sugar
Start by beating your room temperature unsalted butter on medium-high speed until it’s smooth and creamy — about 1-2 minutes. This step is crucial because properly creamed butter creates that perfect tender bite. Then add powdered sugar and beat again. Don’t rush — scrape the bowl often to make sure everything is incorporated evenly.
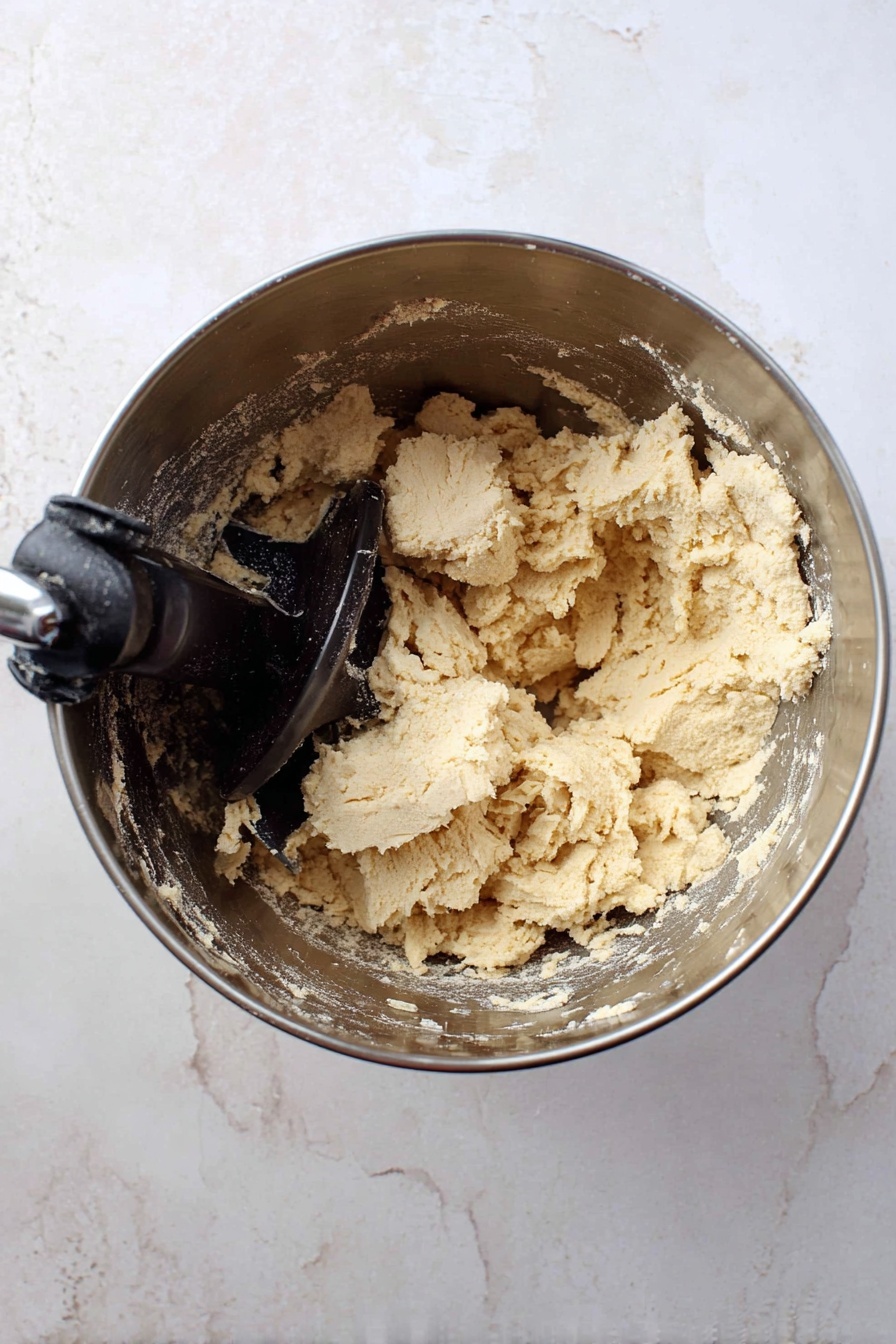
Step 2: Add Flavors and Dry Ingredients
Mix in the vanilla bean paste and salt until they’re blended in well. Then add the flour and cornstarch on medium-low speed. At first, the dough might look a little dry and crumbly. That’s totally normal! Keep scraping down the sides and mixing until it starts pulling away from the bowl sides and clumps into a firm dough.
Step 3: Chill the Dough
Wrap your dough bowl tightly in plastic wrap and refrigerate it for at least 30 minutes. Chilling helps the dough firm up, making it easier to roll without sticking and helps the cookies hold their shape in the oven.
Step 4: Roll, Cut, and Chill Again
Flour your clean surface generously and roll the dough to about ¼ inch thickness. Use your shaped cookie cutters—round, scalloped, whatever you love—to cut out the cookies. Don’t forget to re-roll scraps so nothing goes to waste. Arrange them spaced apart on a parchment-lined baking sheet, then chill for another 15 to 30 minutes. This second chill keeps them from spreading too much while baking.
Step 5: Bake to Perfection
Preheat your oven to 350°F (175°C). Bake your chilled cookies for around 8-10 minutes, rotating halfway through for even cooking. You want the edges set and just starting to turn golden—any darker, and you risk losing that tender texture. Let them cool slightly on the sheet before transferring to a wire rack to cool completely.
Step 6: Whip Up the Icing and Decorate
Whisk powdered sugar, vanilla extract, and milk until smooth and lump-free. Dip your cooled cookies upside down gently—this avoids cracking. For wreaths, top with rosemary and sprinkles before icing sets. For Santa hats, melt white chocolate, tint some with oil-based red coloring, then pipe creatively. I love how the colors and textures bring holiday cheer to life!
Top Tip
I’ve learned a few tricks over the years that really help nail this Festive Shortbread Cookies with Icing Recipe every time. A few small things made all the difference for me, and I’m excited to share them so you can skip the guesswork and get perfect cookies straight away.
- Use room temperature butter: This ensures your dough creams smoothly, avoiding grainy or greasy dough.
- Chill the dough twice: It sounds extra, but every time I skip this step my cookies spread too much and lose crisp edges.
- Oil-based food coloring for chocolate: Vanilla or other water-based colors will seize the white chocolate — so be sure to use oil-based for smooth piping.
- Don’t overbake: Watch closely in those last few minutes; overbaked shortbread becomes dry and stiff.
How to Serve Festive Shortbread Cookies with Icing Recipe
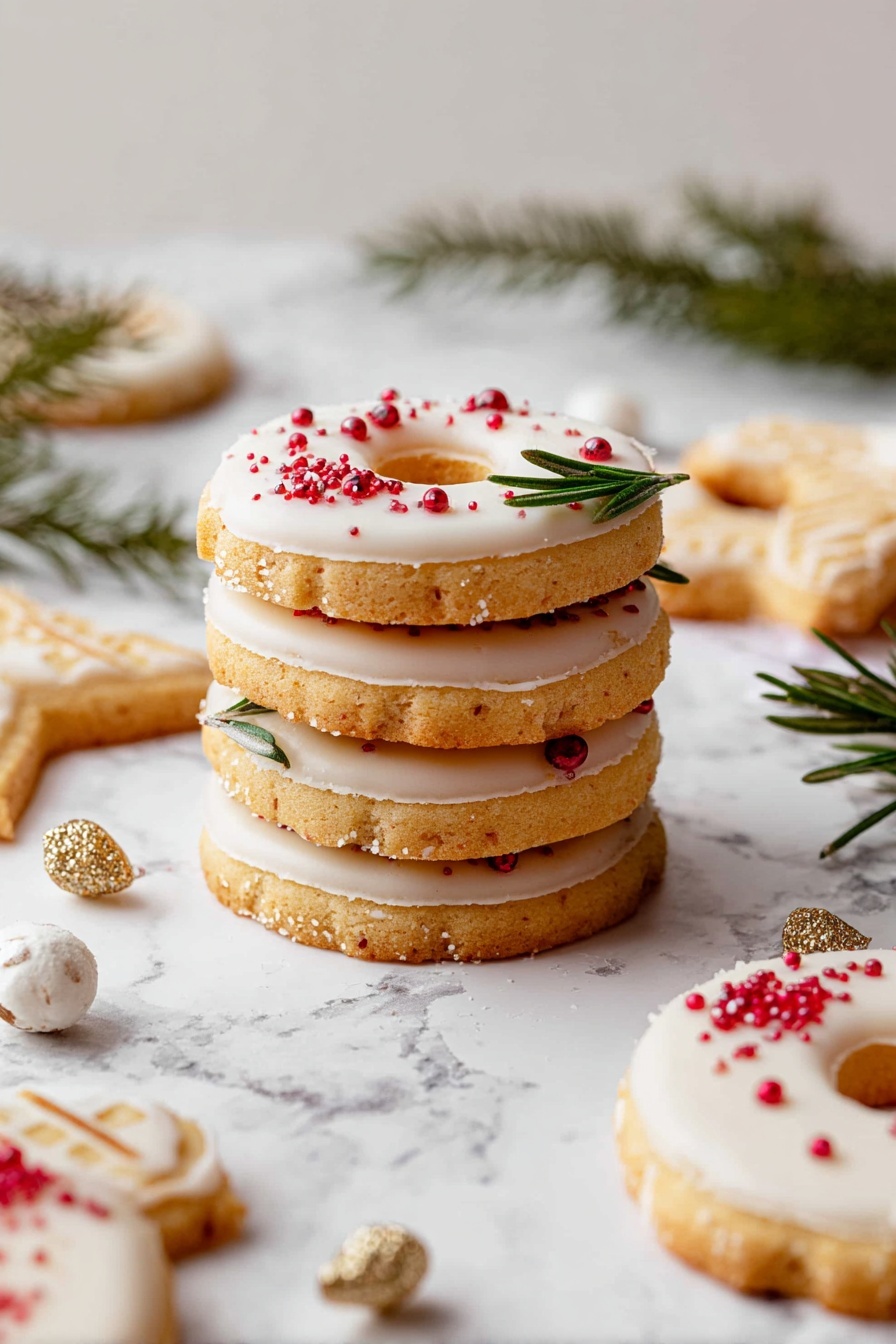
Garnishes
I’m personally a fan of rosemary sprigs and classic red sprinkles—they give the cookies that evergreen holiday vibe and a delightful crunch. Sometimes I toss on a little sanding sugar for sparkle or swap in crushed peppermint to add a fresh twist.
Side Dishes
One of my favorite pairings is a cozy cup of spiced chai or hot cocoa. The warm spices and creaminess complement the buttery, sweet cookies perfectly — it’s like a little festive tea party in your living room.
Creative Ways to Present
I’ve arranged these cookies on festive platters with pine cones and fairy lights for holiday gatherings. Or wrap small sets tied with twine and add a sprig of fresh rosemary for charming, edible gifts. Recently, I created a cookie wreath centerpiece on a cake stand that was a showstopper!
Make Ahead and Storage
Storing Leftovers
I store leftover cookies in an airtight container at room temperature, and they usually keep fresh for up to five days. Just be sure the icing is completely set before stacking them to avoid smudging the decorations.
Freezing
Freezing is a lifesaver! I freeze undecorated cookies flat between sheets of parchment for up to three months. When I’m ready, I thaw them fully before decorating. You can also freeze the dough rolled and wrapped; just bake straight from frozen, adding a couple minutes to the bake time.
Reheating
To freshen up leftovers, I pop cookies in a warm oven at 300°F for just a few minutes to take the chill off. Avoid microwaving, which softens the icing and can dry out the shortbread.
Frequently Asked Questions:
Regular (water- or gel-based) food coloring can cause white chocolate to seize and become grainy. For this recipe, always use oil-based food coloring to get smooth, vibrant colors when tinting your melted white chocolate.
Chilling the dough twice—once before rolling and once after cutting the cookies—is key. This firms up the butter so the cookies hold their shape during baking rather than spreading thin and losing their detail.
Yes! Substitute a gluten-free all-purpose flour blend to make these cookies gluten-free. Keep in mind that texture may vary slightly depending on the blend but overall, the recipe works quite well as a gluten-free treat.
You can decorate the cookies several days in advance. Just store them in an airtight container layered with parchment paper to keep the icing intact. Let the icing fully harden before stacking to avoid smudging.
Final Thoughts
This Festive Shortbread Cookies with Icing Recipe has become a holiday tradition in my house—not just because they’re delicious, but because making and decorating them brings everyone together. I hope you enjoy baking them as much as I do, and they fill your kitchen with warmth and joy just like they do mine. Trust me, once you bake these, you’ll keep this recipe in your festive rotation forever!
Print
Festive Shortbread Cookies with Icing Recipe
- Prep Time: 15 minutes
- Cook Time: 10 minutes
- Total Time: 1 hour 10 minutes
- Yield: 20 servings
- Category: Dessert
- Method: Baking
- Cuisine: American
- Diet: Vegetarian
Description
This Shortbread Cutout Cookies recipe features buttery, tender cookies perfect for holiday decorating. The dough is easy to work with and can be shaped into festive designs like wreaths and Santa hats. Decorate with homemade icing, white chocolate, rosemary sprigs, and sprinkles for a delightful holiday treat.
Ingredients
Cookie Dough
- 1 cup unsalted butter room temperature
- ¾ cup powdered sugar
- 1 Tablespoon vanilla bean paste
- ¼ teaspoon salt
- 2 cups all purpose flour gluten free if needed
- 1 Tablespoon cornstarch
Icing
- 1 cup powdered sugar
- ½ teaspoon vanilla extract
- 2 Tablespoons milk
Decorations
- 4 ounces white chocolate
- Rosemary sprigs, sprinkles, sanding sugar for decorating
- Red food coloring oil-based
Instructions
- Cream Butter and Sugar: Add the butter to the bowl of a stand mixer or a large bowl with an electric mixer, and beat on medium-high speed for 1-2 minutes until smooth. Scrape down the sides, add the powdered sugar, and beat again for 1 minute.
- Add Flavorings and Flour: Mix in the vanilla bean paste and salt, beating until incorporated. Scrape down the bowl as needed. Add the flour and cornstarch and beat on medium-low until the dough just comes together and pulls away from the sides. The dough will seem dry initially; continue to scrape and mix until it forms a cohesive dough. Cover and chill for 30 minutes.
- Roll and Cut Dough: Line a baking sheet with parchment paper. Generously flour your work surface, roll dough to ¼ inch thickness. Use floured cutters to cut out cookies and wreaths. Gather scraps and re-roll until all dough is used. Arrange cookies 1 inch apart on the baking sheet and chill for 15-30 minutes.
- Bake Cookies: Preheat oven to 350°F. Bake cookies for 10 minutes, rotating halfway through, until edges are set and just turning golden. Cool on pan 5 minutes, then transfer to wire rack to cool completely.
- Prepare Icing: Whisk powdered sugar, vanilla extract, and milk in a shallow bowl until smooth and lump-free.
- Ice Cookies: Dip cooled cookies upside down in icing carefully to avoid breakage. For wreath cookies, decorate with rosemary sprigs and sprinkles before icing sets.
- Decorate Santa Hats: Let remaining cookies set on baking sheet. Melt white chocolate and fill a pastry bag. Mix remaining white chocolate with red oil-based food coloring and fill another bag. Pipe red chocolate in the shape of hats, add white chocolate rim and top, then sprinkle with sanding sugar. Alternatively, use green food coloring for Christmas tree shapes.
- Final Step: Allow all decorated cookies to set fully before serving or packaging.
Notes
- Store cookies in an airtight container at room temperature for up to 5 days.
- Freeze baked undecorated cookies for up to 3 months; thaw completely before decorating.
- Cookie dough can also be rolled and frozen for up to 3 months; bake directly from frozen.
- Use oil-based food coloring with white chocolate to prevent seizing; water-based colors like gels may cause chocolate to seize.
Nutrition
- Serving Size: 1 cookie
- Calories: 120 kcal
- Sugar: 8 g
- Sodium: 55 mg
- Fat: 7 g
- Saturated Fat: 4 g
- Unsaturated Fat: 2 g
- Trans Fat: 0 g
- Carbohydrates: 14 g
- Fiber: 0.5 g
- Protein: 1 g
- Cholesterol: 20 mg


Leave a Reply