There's something magical about biting into a light, crisp cookie that melts away and leaves behind a cool hint of peppermint. This Festive Peppermint Meringue Cookies Recipe is just that—a perfect holiday treat that looks like a little snowflake and tastes just like Christmas. They're delicate, colorful, and surprisingly simple to make once you get the hang of it.

Jump to:
- Why You'll Love This Recipe
- Ingredients & Why They Work
- Make It Your Way
- Step-by-Step: How I Make Festive Peppermint Meringue Cookies Recipe
- Top Tip
- How to Serve Festive Peppermint Meringue Cookies Recipe
- Make Ahead and Storage
- Frequently Asked Questions:
- Final Thoughts
- Festive Peppermint Meringue Cookies Recipe
Why You'll Love This Recipe
Honestly, these peppermint meringue cookies have become my go-to festive treat for gifting and cookie trays alike. The fun colors, the peppermint kick, and the airy crunch just nail that holiday vibe perfectly!
- Light & Airy Texture: They’re crisp without being hard, almost like a sweet cloud melting on your tongue.
- Festive Flair: With a hint of red and green, they instantly brighten up any cookie platter or gift box.
- Simple Ingredients: You only need a handful of pantry staples, no fancy equipment required.
- Long Shelf Life: Store them well and they keep for a week—perfect for making ahead during the busy holidays.

Ingredients & Why They Work
Every ingredient in this Festive Peppermint Meringue Cookies Recipe plays a role in creating that perfect melt-in-your-mouth crunch and smooth peppermint flavor. Here’s the scoop on what you need and why each matters.

- Egg Whites: Use room temperature egg whites for maximum volume and stable peaks when whipped.
- White Vinegar: Helps stabilize the egg whites and keep your meringue from weeping or collapsing.
- Cornstarch: Gives the cookies a tender crunch and helps hold their shape while baking low and slow.
- Caster Sugar: Fine sugar dissolves quickly into the foam to create a glossy, smooth meringue; if you can’t find it, pulse granulated sugar briefly in a food processor.
- Peppermint Extract: The heart of that festive flavor—pure peppermint extract is best for authentic taste.
- Gel Food Coloring: I like using red and green gels because they don’t thin the batter like liquid colors can.
Make It Your Way
I love adding my own twist to the Festive Peppermint Meringue Cookies Recipe by switching up colors or trying other extracts, but peppermint will always be my holiday favorite. Don’t be afraid to make these cookies your own!
- Variation: One year, I swapped half the peppermint extract for vanilla and added a few mini chocolate chips piped onto the cookies before baking—game changer for chocolate lovers!
- Dietary: Since these cookies are naturally gluten-free and dairy-free, they’re great for most dietary needs. Just be sure to use a peppermint extract and food coloring without additives if allergies are a concern.
Step-by-Step: How I Make Festive Peppermint Meringue Cookies Recipe
Step 1: Whip to Foamy Peaks
Start by beating your room temperature egg whites on high speed until they turn foamy—about 30 seconds. This is when the meringue starts coming to life, so don’t rush it. Then add in the white vinegar and cornstarch and whip until soft peaks form, usually another minute or so. The texture should look silky but still soft enough to hold shape.
Step 2: Gradually Add Sugar & Peppermint
Slowly pour your caster sugar in a thin stream while beating constantly. This helps dissolve the sugar fully so your meringue stays stable and glossy. Once all sugar is incorporated, add the peppermint extract and continue beating for about 4 minutes until stiff peaks form—the meringue should be shiny and hold a firm peak when the beaters come out.
Step 3: Prepare Your Piping Bag
This next step is one of my favorites because it’s where the cookies get their festive look! Using a pastry bag fitted with a star tip, draw thin lines of red gel food coloring on the inside of the bag for one half of your batter. Fill the bag halfway with the meringue and pipe one-inch stars onto parchment-lined baking sheets. Repeat with green gel lines in a second bag for the remaining meringue.
Step 4: Low & Slow Baking
Bake your meringue cookies in a preheated 200°F oven for about 80 minutes. Then turn the oven off and leave the cookies inside for another 4 hours or overnight to fully dry out. This gentle, prolonged heat keeps them crisp but delicate—don’t be tempted to crank the temp or shorten the drying time!
Top Tip
Let me share some of the nuggets I’ve picked up making the Festive Peppermint Meringue Cookies Recipe year after year. These tips helped me avoid common pitfalls and get a perfect batch every time.
- Egg White Prep: Make sure there’s no yolk mixed in. Even a tiny bit can prevent stiff peaks.
- Adding Sugar Slowly: It’s tempting to rush, but pouring sugar too quickly can cause your meringue to deflate or be grainy.
- Watch Your Oven Temperature: Use an oven thermometer if you can. The low heat is drying, not baking, so temperature control is key.
- Patience is Key: Don’t skip the cool-down time inside the oven after baking. It’s what gives the cookies their crisp, dry bite.
How to Serve Festive Peppermint Meringue Cookies Recipe

Garnishes
I usually keep it simple with a dusting of powdered sugar or tiny crushed candy canes sprinkled on top to double-down on that peppermint vibe. The crushed candy adds just a little crunch and pizzazz without overpowering the delicate cookie.
Side Dishes
These cookies pair beautifully with a warm cup of hot cocoa or peppermint tea, making them a perfect holiday afternoon snack. I also like serving them alongside richer desserts like chocolate tarts to add a contrasting crunch and minty freshness.
Creative Ways to Present
For gift-giving, I love stacking these delicate cookies in a clear treat box lined with festive tissue paper. You can also arrange them on a beautiful platter, alternating red and green meringues for a cheerful effect that guests always comment on.
Make Ahead and Storage
Storing Leftovers
Store any leftover peppermint meringue cookies in an airtight container at room temperature. I find they keep their crispness beautifully for up to a week, but honestly, mine rarely last that long! Just make sure the container is sealed tightly to avoid moisture ruining the delicate crunch.
Freezing
You can freeze these cookies if you want to make a big batch early. I recommend freezing them in a single layer on a baking sheet until solid, then transferring to an airtight container or zip-top bag. When ready to enjoy, let them thaw at room temperature—no reheating necessary.
Reheating
Meringue cookies don’t really need reheating—just serve them as-is to enjoy their crisp texture. If you feel they’ve gotten a bit soft, gently warming them in a low oven (around 150°F) for a few minutes can help, but be careful to watch closely so they don’t brown or melt.
Frequently Asked Questions:
While caster sugar dissolves more easily for the smoothest meringue, you can create a makeshift version by pulsing granulated sugar in your food processor until it's fine but not powdery. Avoid powdered sugar as it alters texture too much.
The low and slow baking dries out the meringue without browning it, resulting in a crisp and delicate texture. High heat will bake them too quickly and risk making them cracked or chewy.
Absolutely! While peppermint is classic and festive, vanilla, almond, or even a drop of orange extract can work beautifully. Just be mindful of the concentration to keep the delicate balance of flavors.
Make sure your mixing bowl and beaters are perfectly clean, add sugar gradually after the whites are foamy, and whip until stiff peaks form. Also, avoid any yolk contamination and do not rush the process—patience pays off!
Final Thoughts
The beauty of this Festive Peppermint Meringue Cookies Recipe lies in its simplicity and festive charm. Every year, I look forward to making these with a cup of coffee in hand, knowing I’m creating something truly special that will spread holiday cheer. Give them a try—you might just find they become your holiday tradition too!
Print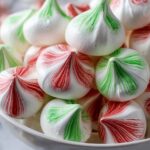
Festive Peppermint Meringue Cookies Recipe
- Prep Time: 15 minutes
- Cook Time: 1 hour 20 minutes
- Total Time: 5 hours 35 minutes
- Yield: 60 cookies
- Category: Dessert
- Method: Baking
- Cuisine: American
- Diet: Vegetarian
Description
Delight in these light and airy Christmas Meringue Cookies flavored with peppermint and decorated with festive red and green colors. Perfect for holiday celebrations, these cookies are crispy on the outside and melt-in-your-mouth soft on the inside, made with simple ingredients like egg whites, sugar, and a touch of vinegar.
Ingredients
Main Ingredients
- 4 egg whites room temperature
- 1 tablespoon white vinegar
- 1 tablespoon cornstarch
- 1 cup caster sugar
- ¾ teaspoon peppermint extract
Decoration
- Gel food coloring (red and green)
Instructions
- Prepare Egg Whites: Beat egg whites on high speed until foamy, about 30 seconds, ensuring a good base for your meringue.
- Add Vinegar and Cornstarch: Mix in the white vinegar and cornstarch, then continue beating until soft peaks form, about one minute, to stabilize the meringue.
- Incorporate Sugar and Peppermint: Slowly add caster sugar in a steady stream while beating, then add peppermint extract and continue beating for about 4 minutes until stiff peaks form for a glossy, firm meringue.
- Prepare Piping Bag: Using a pastry bag fitted with a star tip, draw red gel food coloring lines inside the bag for decorative effect, then fill the bag with half of the meringue mixture.
- Pipe Cookies: Pipe one-inch star-shaped cookies onto a parchment-lined baking sheet. Repeat this process with the remaining meringue, using green gel food coloring for a festive color variation.
- Bake: Place the baking sheet in a 200 degree oven and bake for about 80 minutes, gently drying the cookies without browning them.
- Cool Slowly: Turn off the oven and leave the cookies inside for 4 hours or overnight to fully dry and crisp up.
- Store: Keep the meringue cookies in an airtight container for up to one week to maintain their crisp texture.
Notes
- Don’t add sugar too soon; wait until egg whites are foamy to help them fluff properly.
- Be extra careful separating egg yolks from whites, as any yolk can prevent stiff peaks from forming.
- Check your oven temperature carefully; too hot will spoil the light texture of the cookies.
- For best flavor and texture, eat meringue cookies within a few hours after baking although they keep up to a week.
- Caster sugar can be made by pulsing granulated sugar in a food processor; do not substitute powdered sugar as it changes texture.
Nutrition
- Serving Size: 1 cookie
- Calories: 20 kcal
- Sugar: 3 g
- Sodium: 5 mg
- Fat: 0 g
- Saturated Fat: 0 g
- Unsaturated Fat: 0 g
- Trans Fat: 0 g
- Carbohydrates: 5 g
- Fiber: 0 g
- Protein: 0.2 g
- Cholesterol: 0 mg


Leave a Reply