Get ready to impress your sweetheart (or just treat yourself!) with this luscious Crispy White Chocolate Valentine Hearts Recipe. Creamy white chocolate layered with vibrant red hues and topped with adorable heart sprinkles—what's not to love about this festive homemade fudge?

Jump to:
- Why You'll Love This Recipe
- Ingredients & Why They Work
- Make It Your Way
- Step-by-Step: How I Make Crispy White Chocolate Valentine Hearts Recipe
- Top Tip
- How to Serve Crispy White Chocolate Valentine Hearts Recipe
- Make Ahead and Storage
- Frequently Asked Questions:
- Final Thoughts
- Crispy White Chocolate Valentine Hearts Recipe
Why You'll Love This Recipe
I absolutely adore making this Valentine Hearts fudge because it’s not just delicious, it’s also a joy to create and share. The layers coming together, the color pop—it feels like crafting a little edible love letter every time!
- Simple ingredients: You probably already have most of what you need in your pantry.
- Quick prep: Just 10 minutes to prep and only 3 minutes cooking time in the microwave.
- Beautifully festive: Bright red layers and heart sprinkles make it perfect for Valentine’s Day or any celebration.
- Great for gifting: Homemade fudge feels so much more special than store-bought sweets!
Ingredients & Why They Work
Choosing the right ingredients is key to making this white chocolate fudge creamy and smooth. Stick to high-quality white chocolate chips and the right kind of milk to ensure your fudge sets perfectly every time.
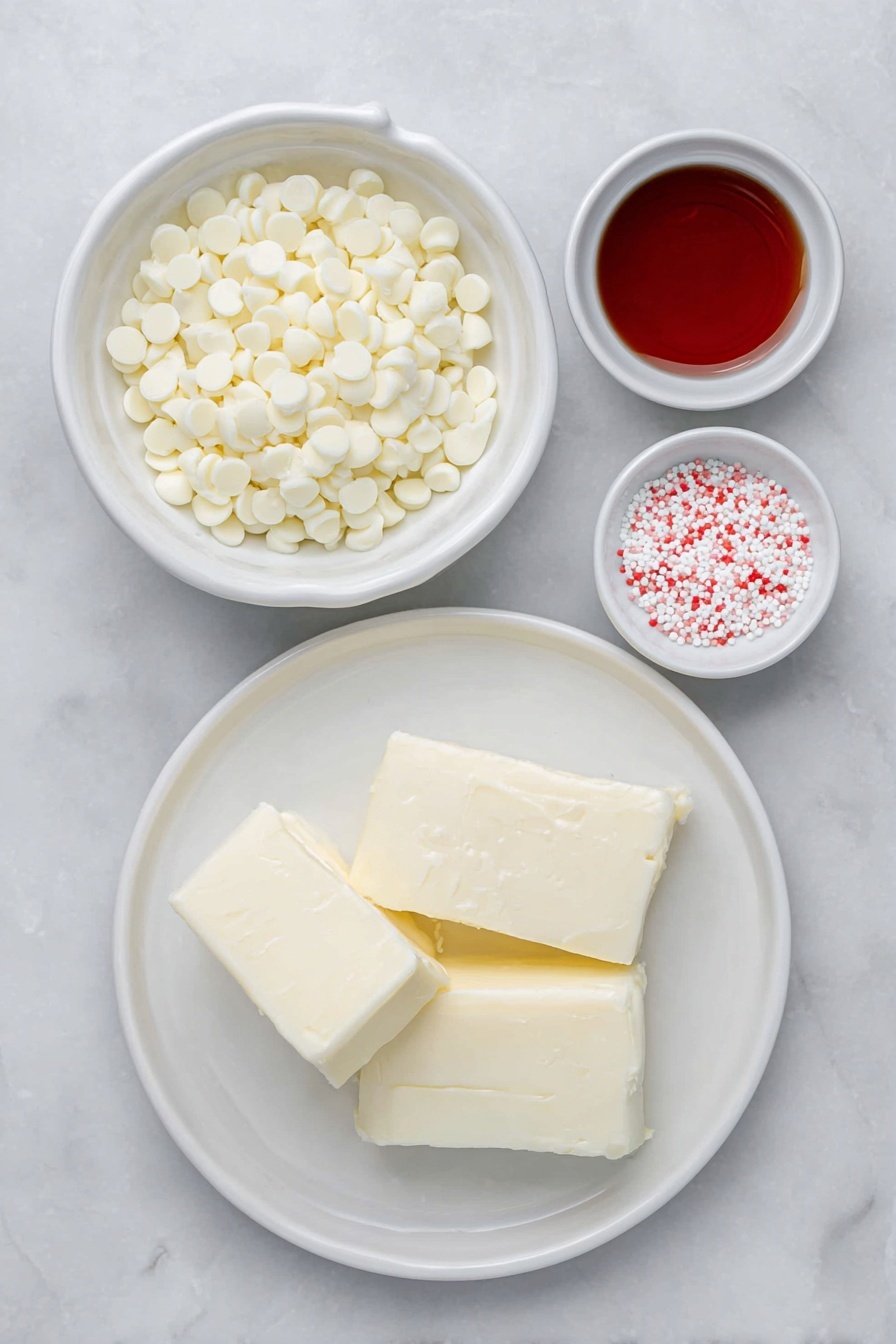
- White Chocolate Chips: Use a premium brand to get that smooth melt and deep white chocolate flavor without graininess.
- Sweetened Condensed Milk: This is essential for getting the fudge’s rich sweetness and creamy texture. Don’t substitute evaporated milk here.
- Unsalted Butter: Adds richness and helps the fudge set nicely without adding any unwanted saltiness.
- Red Food Coloring: For that vibrant Valentine’s Day hue—adjust the drops to get your perfect shade of red.
- Heart-Shaped Sprinkles: The final festive touch that makes these fudge hearts extra special and fun to gift or display.
Make It Your Way
One of the best parts about the Crispy White Chocolate Valentine Hearts Recipe is how easy it is to tailor it to your own style. Whether you want to switch up the colors, the toppings, or add your own twist, this treat is the perfect canvas for creativity!
- Red Velvet Variation: I love adding a teaspoon of vanilla extract and just a pinch of red velvet cake mix to the white chocolate layers for a subtle, tangy flavor that adds a nifty surprise inside these Valentine hearts.
- Nutty Twist: For a bit of added texture, try folding in chopped toasted pecans or pistachios into either the red or white fudge layers before setting. The crunch pairs beautifully and makes these hearts even more irresistible.
- Dairy-Free Adaptation: Use dairy-free white chocolate chips and coconut condensed milk to make a dairy-free version. The flavor holds up surprisingly well and it’s a hit with my vegan friends during Valentine’s Day.
- Seasonal Fun: Swap out the red food coloring for pink, gold, or even pastel hues for birthdays or spring celebrations while still using the festive heart-shaped sprinkles on top for a lovely seasonal take.
Step-by-Step: How I Make Crispy White Chocolate Valentine Hearts Recipe
Step 1: Prepare Your Pan for Easy Fudge Removal
Start by lining an 8 x 8 inch square pan with parchment paper or sprayed aluminum foil. I like to let the edges hang over the sides to create a “sling” so I can easily lift the fudge out later. This little step saves a lot of time and mess when it’s time to cut your hearts!
Step 2: Craft the First Red Fudge Layer
In a microwave-safe bowl, combine 2¼ cups of white chocolate chips, ⅔ of the can of sweetened condensed milk, and 2 tablespoons of unsalted butter. Microwave in 20-second bursts, stirring thoroughly after each until your mixture is fully melted and silky smooth—this usually takes about 2 minutes total. Remember, don’t overheat or the texture will become grainy!
Next, add about 10 drops of red food coloring, stirring until the color is perfectly uniform and vibrant. Spoon half of this luscious red fudge into the prepared pan, smoothing it carefully with a spoon—you’ll notice the fudge is sticky, so take your time to finesse it evenly.
Pop the pan into the freezer for a few minutes until that first layer sets nicely. Meanwhile, wrap the bowl holding the remaining red fudge mixture in towels to keep it warm and soft for the final top layer.
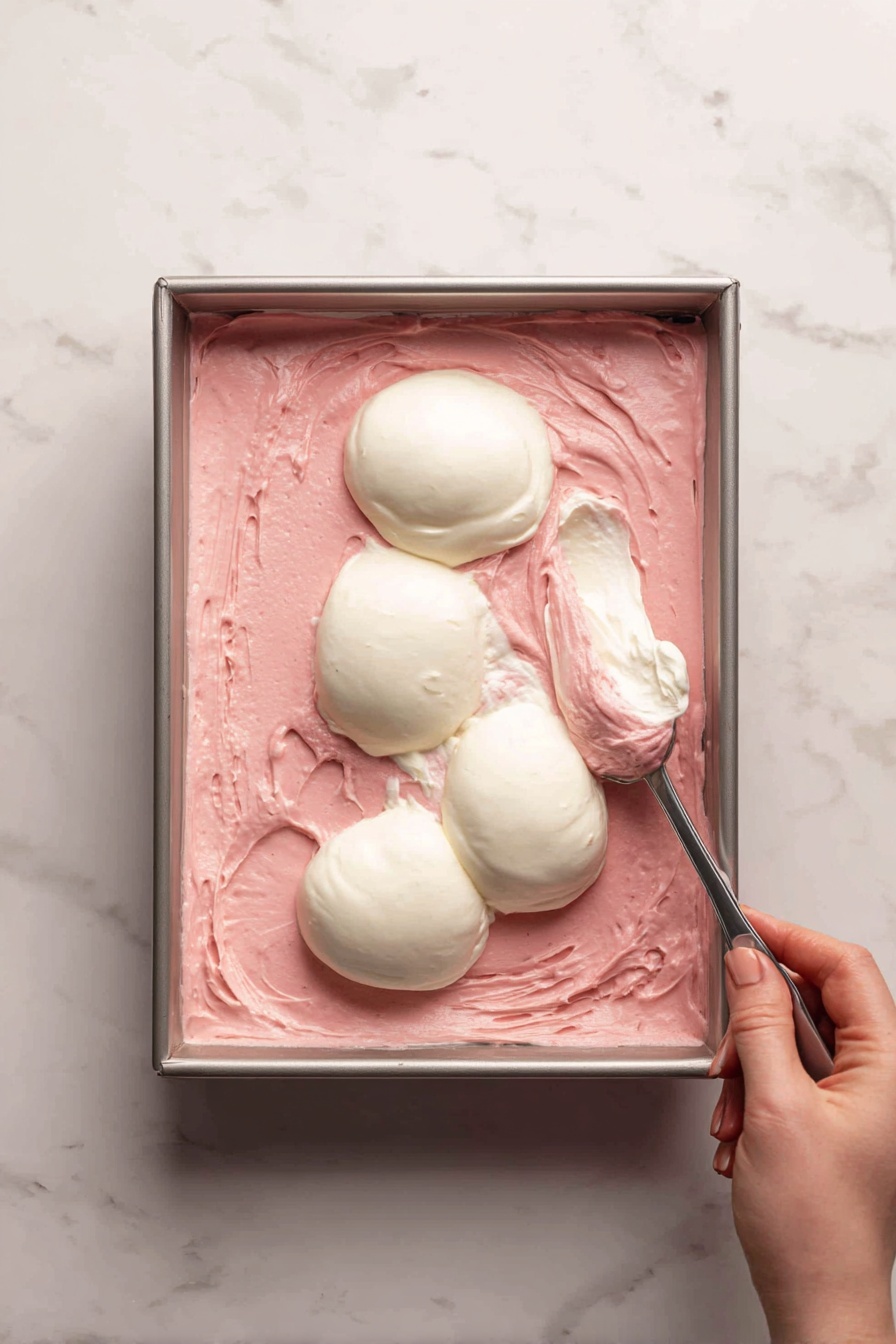
Step 3: Make the Creamy White Fudge Middle Layer
In a clean microwave-safe bowl, combine the remaining white chocolate chips, the rest of the sweetened condensed milk, and 1 tablespoon of butter. Heat this same way—in 20-second intervals with stirring—until you have a melt that’s silky smooth, again taking about 2 minutes.
Pour this beautiful white fudge over your now-set red layer, spreading it evenly with the back of a spoon. Once smooth, return the pan to the freezer for another few minutes so this layer can firm up before you add the top red layer.
Step 4: Finish With the Top Red Fudge Layer and Chill
Gently warm the remaining red fudge to soften it so it spreads easily. Spoon this over the chilled white layer and smooth it out in an even coat. Cover the whole pan tightly with plastic wrap and refrigerate for 2 full hours—this chill time is key to getting your hearts to set perfectly crispy on the outside yet deliciously creamy inside.
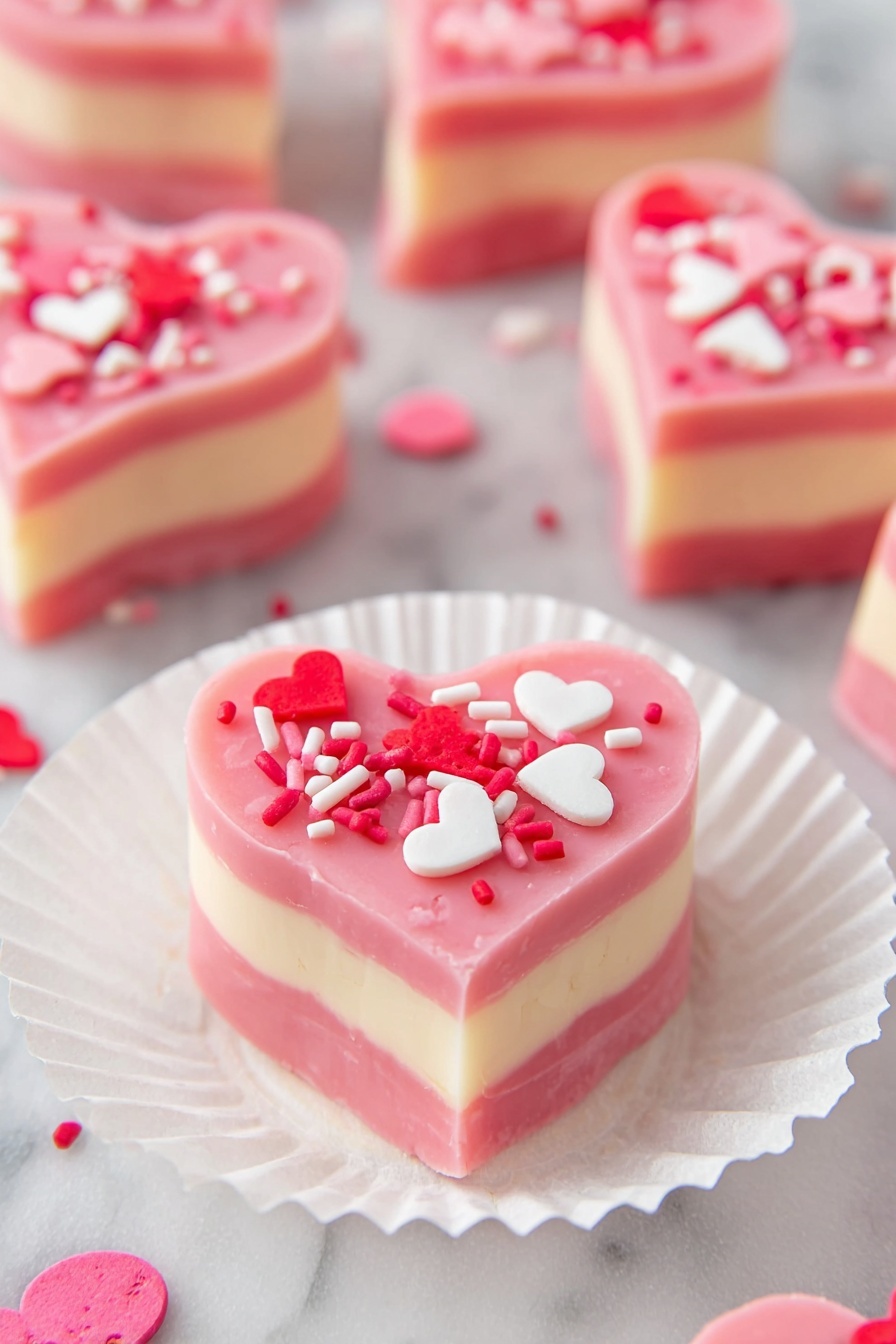
Step 5: Cut Out Hearts and Add the Finishing Touch
Once your fudge is fully chilled and firm, lift it out of the pan using the parchment sling. Place it on your countertop and grab a small heart-shaped cookie cutter. Press down firmly to cut out hearts—try to be efficient to minimize any leftover scraps. Then, generously sprinkle the hearts with heart-shaped sprinkles for a festive, Valentine’s Day-ready look.
Serve these chilled for that delightful crisp bite, or let them rest a few minutes at room temperature for a softer, melt-in-your-mouth texture. Store any extras in an airtight container in the fridge for up to two weeks or freeze for longer keeping.
Top Tip
Perfecting your Crispy White Chocolate Valentine Hearts Recipe is easier when you know a few insider tips that I’ve learned from lots of testing and tweaking. These nuggets will ensure your fudge turns out smooth, vibrant, and easy to work with every time!
- Use High-Quality White Chocolate: I’ve found that top-notch white chocolate chips melt beautifully without becoming grainy. Generic brands can be frustrating and sometimes won’t set properly.
- Stick to Sweetened Condensed Milk: I once tried evaporated milk and ended up with fudge that never firmed up. Sweetened condensed milk is essential for that perfect creamy texture and firmness.
- Don’t Overheat: Heating the fudge mixture in short microwave bursts and stirring frequently keeps it silky and prevents any graininess that ruins the texture.
- Line Your Pan for Easy Cutting: Lining the pan with parchment or foil lets you lift the fudge out hassle-free and cut your heart shapes neatly on the countertop without cracking or mess.
How to Serve Crispy White Chocolate Valentine Hearts Recipe
Garnishes
Sprinkle your white chocolate hearts with colorful heart-shaped sprinkles for an instant festive flair. For extra elegance, a light dusting of edible glitter or crushed freeze-dried strawberries adds a lovely hint of sparkle and a subtle tartness that balances the sweet fudge beautifully.
Side Dishes
These fudge hearts pair wonderfully with a cup of rich hot chocolate, a delicate rose tea, or even a sparkling rosé for celebrations. If you’re serving them at a party, fresh berries or a platter of assorted nuts complement the creamy sweetness and add textural contrast.
Make Ahead and Storage
Storing Leftovers
Store leftover hearts airtight in your refrigerator, where they’ll stay fresh for up to two weeks. When ready to enjoy again, simply bring them to room temperature for a richer, softer texture that feels just like freshly made fudge.
Freezing
If you want to keep your Crispy White Chocolate Valentine Hearts Recipe longer, freeze them! Wrap the fudge tightly in parchment paper, then cover with aluminum foil to prevent freezer burn. Frozen fudge stays great for up to 2 months.
Reheating
To enjoy frozen hearts, thaw them overnight in the fridge. Avoid microwaving frozen fudge directly, as it can alter texture. Once thawed, let them sit a bit at room temperature before serving for that signature creamy softness.
Frequently Asked Questions:
White chocolate is key to achieving the creamy, sweet layers with vibrant coloring. Using milk or dark chocolate would change the flavor and texture significantly, plus it won’t absorb the red food coloring the same way.
Freezing the layers briefly helps the fudge set quickly and prevents the colors from bleeding together, ensuring those crisp, distinct layers for your Valentine hearts.
Graininess usually means the chocolate was overheated or stirred too aggressively. Make sure to microwave in short intervals, stir gently, and avoid overheating to keep the texture smooth.
Use a small heart-shaped cookie cutter and cut the fudge on a clean countertop after lifting it out of the pan. This method helps you efficiently use the fudge with minimal waste compared to cutting in the pan.
Final Thoughts
Making these Crispy White Chocolate Valentine Hearts from scratch is such a rewarding experience — simple ingredients come together to create a beautiful, sweet indulgence perfect for sharing with loved ones. Whether you’re gifting them or enjoying as a special treat, these hearts bring warmth and charm to any occasion. I hope these tips and tricks make your fudge-making journey joyful and stress-free. Happy cooking, and may your Valentine’s Day be as sweet as these delightful little white chocolate treasures!
Print
Crispy White Chocolate Valentine Hearts Recipe
- Prep Time: 10 minutes
- Chill Time: 2 hours
- Cook Time: 3 minutes
- Total Time: 2 hours 13 minutes
- Yield: 10 servings
- Category: Dessert
- Method: Microwave
- Cuisine: American
- Diet: Vegetarian
Description
Delightfully sweet and creamy Valentine Hearts Fudge made with layers of smooth white chocolate and sweetened condensed milk, tinted with vibrant red food coloring, and topped with festive heart-shaped sprinkles. Perfect for gifting or celebrating special occasions with a homemade touch.
Ingredients
White Chocolate Fudge
- 3½ cups (2 – 12 ounce packages) White Chocolate Chips, divided
- 1 can sweetened condensed milk, divided
- 3 tablespoons unsalted butter, divided
Additional
- Red food coloring (about 10 drops)
- 1 tablespoon heart-shaped sprinkles
Instructions
- Prepare the Pan: Line an 8 x 8 inch square pan with parchment paper or sprayed aluminum foil, allowing excess to hang over the sides for easy fudge removal later.
- Make First Layer: In a microwave-safe bowl, combine 2 ¼ cups white chocolate chips, ⅔ can sweetened condensed milk, and 2 tablespoons butter. Microwave in 20-second intervals, stirring after each, until fully melted and smooth, about 2 minutes total. Avoid overheating to prevent graininess.
- Add Red Coloring: Stir in about 10 drops of red food coloring until the color is fully blended and uniform.
- Set First Layer: Spoon half of the red fudge mixture into the prepared pan and smooth evenly with a spoon. Freeze for a few minutes until set. Keep the remaining red fudge warm wrapped in towels to prevent cooling too quickly.
- Make Second Layer: In another microwave-safe bowl, combine the remaining white chocolate chips, remaining sweetened condensed milk, and 1 tablespoon butter. Microwave in 20-second bursts, stirring in between until melted and smooth, about 2 minutes. Spread this white fudge mixture over the set red layer and freeze again for a few minutes to firm up.
- Finish Top Layer: Warm the remaining red fudge gently to soften. Spoon it over the white fudge layer and smooth it out evenly. Cover the pan tightly with plastic wrap and refrigerate for 2 hours to fully chill and set.
- Cut and Decorate: Lift the set fudge from the pan using the parchment paper sling. Place on a countertop and use a small heart-shaped cookie cutter to cut out hearts efficiently to minimize waste. Evenly sprinkle heart-shaped sprinkles on top of the fudge hearts for a festive finish.
- Serve and Enjoy: Serve chilled or allow fudge to come to room temperature for a softer texture. Store leftovers as instructed to maintain freshness.
Notes
- Use high-quality white chocolate chips for the best melting and flavor; generic brands may be temperamental.
- Ensure you use sweetened condensed milk rather than evaporated milk — evaporated milk will prevent the fudge from setting.
- Avoid overheating the fudge mixture in the microwave to prevent graininess.
- Lining the pan with parchment or foil allows easy removal and cleaner cutting of fudge shapes.
- Store leftover fudge airtight in the refrigerator for up to 2 weeks.
- Freeze fudge wrapped in parchment and foil for up to 2 months for longer storage.
- Allow frozen fudge to thaw in the refrigerator overnight before serving.
Nutrition
- Serving Size: 1 serving (approx 35 g)
- Calories: 230 kcal
- Sugar: 28 g
- Sodium: 40 mg
- Fat: 12 g
- Saturated Fat: 7 g
- Unsaturated Fat: 4 g
- Trans Fat: 0 g
- Carbohydrates: 29 g
- Fiber: 0 g
- Protein: 2 g
- Cholesterol: 15 mg


Leave a Reply