If you’re craving a warm, comforting meal with a crunchy twist, this Crispy Chicken Katsu Curry Recipe is going to be your new favorite. Imagine tender chicken breast with a golden parmesan-panko crust, all smothered in rich Japanese curry sauce—pure deliciousness!

Jump to:
Why You'll Love This Recipe
I can’t get enough of this combination—the crispy, cheesy coating on the chicken paired with the thick, flavorful curry is exactly the kind of hearty dish I want on busy weeknights or lazy weekends alike.
- Golden Crispy Texture: The parmesan in the panko coating ups the crispiness and adds an irresistible savory flavor.
- Rich, Homemade Curry: A thick, authentic Japanese curry sauce bursting with tender veggies and perfectly balanced spices.
- Meal Prep Friendly: This dish reheats beautifully, making lunches or dinners for the week a breeze.
- Comfort Food Classic: Filling rice, crispy chicken, and warming curry—what’s not to love?
Ingredients & Why They Work
Gathering the right ingredients is half the fun here. I recommend using fresh and high-quality basics, especially when it comes to the chicken and vegetables. Also, mixing panko breadcrumbs with parmesan cheese is a simple trick that makes all the difference in the chicken’s crunch and flavor.
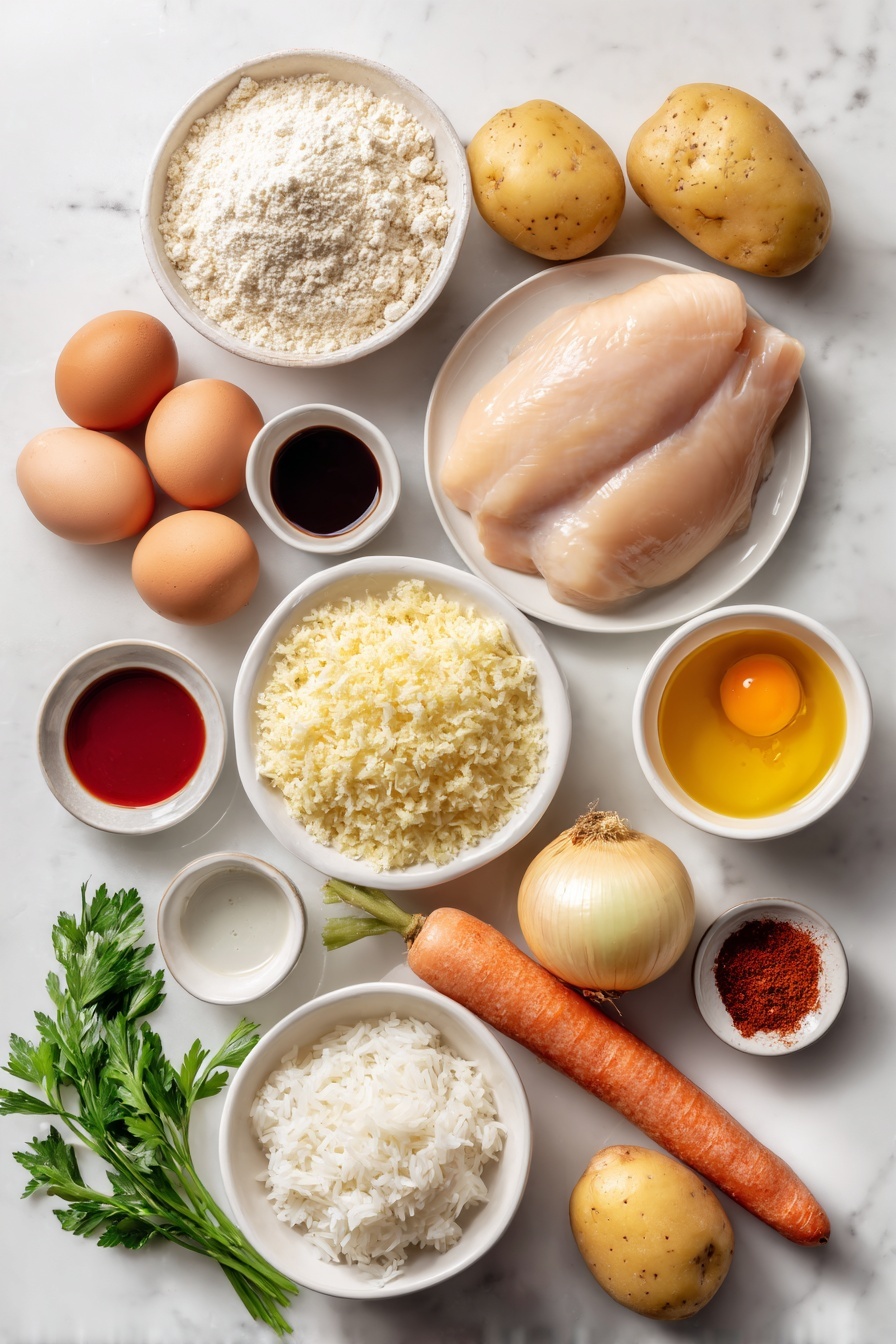
- Boneless chicken thigh or chicken breast: Both work well, but thighs give you juicier results if you prefer.
- Salt and pepper: Essential for seasoning both the curry and chicken layers.
- Butter: Adds richness and depth as you sauté your onions and chicken.
- Onion, potatoes, carrot: Classic veggies that soak up the curry flavors beautifully.
- Japanese curry roux: You can use a boxed version or make your own, either will give you that thick, comforting sauce.
- Water: For simmering the curry to the perfect consistency.
- Tsuyu sauce (noodle soup base): A secret umami booster that brightens the curry.
- Honey: Balances the savoriness with a subtle sweetness.
- Sake: Adds a lovely depth to the curry’s flavor.
- Chili powder (optional): For a tiny kick of heat—totally up to your taste.
- Fenugreek powder: Gives the curry an authentic, warm aromatic note.
- Tomato ketchup: A surprising hint of sweetness and tang.
- Cooking oil for deep frying: Make sure you have enough to maintain the frying temperature for a crisp finish.
- All-purpose flour: Used twice—for batter and dry coating—to get that crispy shell.
- Water and eggs: Combine to form a thick batter that helps the panko stick perfectly.
- Panko breadcrumbs: The Japanese secret for extra crunch and light texture.
- Grated parmesan cheese: Blended with panko for a savory, crispy crust.
- Japanese short-grain rice: The perfect sticky sidekick to soak up all that curry goodness.
- Fukujinzuke pickles (optional): Adds a crunchy, tangy contrast to the dish.
- Fresh parsley (optional): For a bright, fresh sprinkle on top when serving.
Make It Your Way
One of the best things about this Crispy Chicken Katsu Curry Recipe is how easily you can tailor it to suit your taste buds and lifestyle. Whether you want to boost the flavor, adjust the texture, or make it diet-friendly, there are plenty of fun twists to explore!
- Use chicken thighs for juicier katsu: I love swapping chicken breasts for thighs sometimes because they stay so tender and flavorful—the crisp coating pairs beautifully with that richness.
- Make it gluten-free: Swap the all-purpose flour and panko breadcrumbs for gluten-free alternatives. The katsu still turns out wonderfully crispy and just as satisfying.
- Adjust the spice level: For extra warmth, add more chili powder or a touch of grated fresh ginger into the curry sauce. It brings a nice zing that wakes up the dish without overpowering its comforting base.
- Vegetarian version: Try replacing the chicken with firm tofu, bread it the same way, and serve it atop the rich Japanese curry. It's a tasty alternative that still delivers on crispiness and heartiness.
- Meal prep-friendly: This dish stores beautifully—keep leftovers refrigerated for up to 3 days or freeze them for up to a month, making your busy week so much easier.
Step-by-Step: How I Make Crispy Chicken Katsu Curry Recipe
Step 1: Ready the curry ingredients
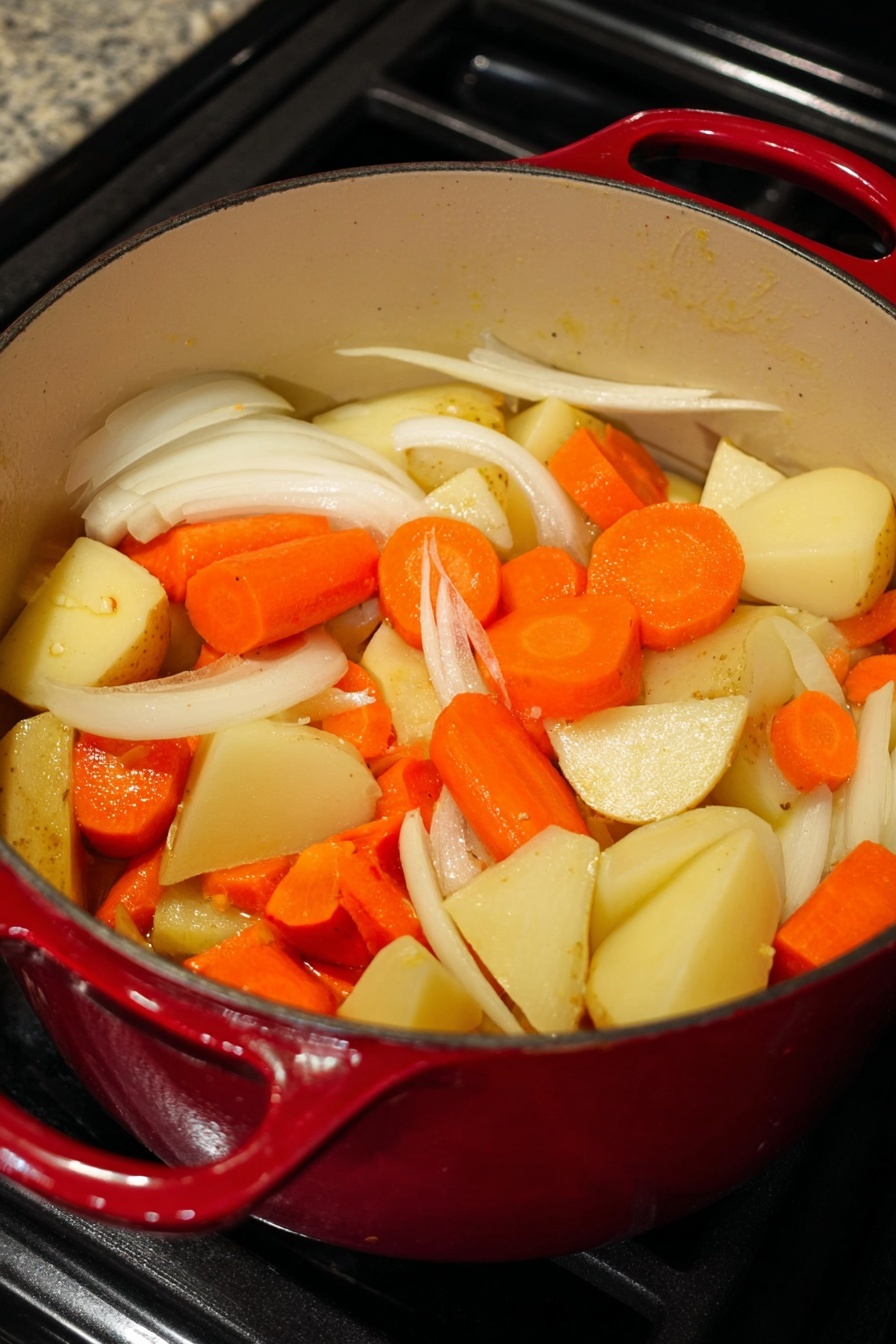
Start by cutting 300 grams of boneless chicken thigh into bite-sized chunks, seasoning them lightly with salt and pepper. Thinly slice one onion, peel two potatoes and one carrot, and chop them into similar bite-sized pieces to ensure even cooking. Having everything prepped and measured will make the cooking process smooth and enjoyable.
Step 2: Build the curry base
Heat a large pot over medium heat and melt one tablespoon of butter. Add your seasoned chicken pieces and fry until the outside is sealed—this locks in the juices and gives the chicken great texture. Toss in the sliced onions and cook until they're just starting to soften, about 3–4 minutes, releasing their natural sweetness.
Step 3: Simmer vegetables and curry roux
Add the potatoes and carrots with one tablespoon of tsuyu sauce, stirring for a minute to coat everything in flavor. Pour in 600 ml of water and bring it to a boil before lowering the heat to a gentle simmer. Stir in 4 servings of Japanese curry roux until fully dissolved—this is what thickens the sauce to that signature rich texture that comfort food dreams are made of.
Step 4: Flavor boost and slow simmer
Enhance your curry by adding half a tablespoon of honey, one tablespoon of sake, half a teaspoon of fenugreek powder, one teaspoon of tomato ketchup, and an optional pinch of chili powder for just the right touch of warmth. Let the curry simmer for 10 to 20 minutes, stirring occasionally, until it reaches a thick and luscious consistency. Keep the lid on to maintain warmth.
Step 5: Prepare the chicken katsu
While the curry simmers, heat about one liter of cooking oil to 170 °C (338 °F) in a deep fryer or a sturdy pot. Meanwhile, split two chicken breasts horizontally in half, season both sides with salt and pepper, then wrap each piece in plastic wrap. Pound them evenly with a meat tenderizer or rolling pin until about 1 cm thick—this helps them cook quickly and remain tender.
Step 6: Batter and coat the chicken
Whisk together 6 tablespoons flour, 2 eggs, and 100 ml water to create a thick batter. On a separate plate, mix 50 grams panko breadcrumbs with 4 tablespoons grated parmesan cheese for a savory twist that adds crunch and depth. Use another plate for 100 grams of flour for dry coating. Dredge each chicken piece in flour first, shake off excess, dip into the batter, then generously coat with the panko-parmesan mix.
Step 7: Fry the katsu to golden perfection
Carefully place the coated chicken pieces into the hot oil and fry for about 6 minutes, turning halfway through to ensure even golden browning on both sides. The aroma will be irresistible as the parmesan crisps up with the panko. Transfer the cooked katsu to a wire rack to drain any excess oil—this keeps the coating wonderfully crisp.
Step 8: Plate and serve your masterpiece
On each plate, arrange a portion of cooked Japanese short-grain rice alongside a generous ladle of the rich curry. Slice your golden katsu into 1 cm strips and nestle them between rice and curry. Add a side of fukujinzuke pickles and a sprinkle of fresh parsley for color and a burst of freshness. Serve immediately and savor every bite of your homemade Crispy Chicken Katsu Curry Recipe!
Top Tip
Mastering the perfect Crispy Chicken Katsu Curry Recipe is all about attention to detail during prepping and cooking. These tips will help you get that irresistible crunch and rich, comforting curry every single time.
- Oil Temperature Control: Keep your frying oil steady at 170 °C (338 °F). This ensures the coating crisps up quickly without soaking in excess oil, giving you that light, golden texture.
- Pound Your Chicken Evenly: Wrapping your chicken in plastic wrap and pounding it to about 1 cm thickness guarantees even cooking and keeps the meat tender and juicy inside that crispy crust.
- Parmesan in the Coating: Adding grated parmesan to the panko breadcrumbs boosts flavor and adds a unique savory note that elevates the whole dish.
- Simmer with Care: When simmering your curry, stir occasionally and keep the lid on to develop a thick, rich sauce without drying out or sticking to the pot.
How to Serve Crispy Chicken Katsu Curry Recipe
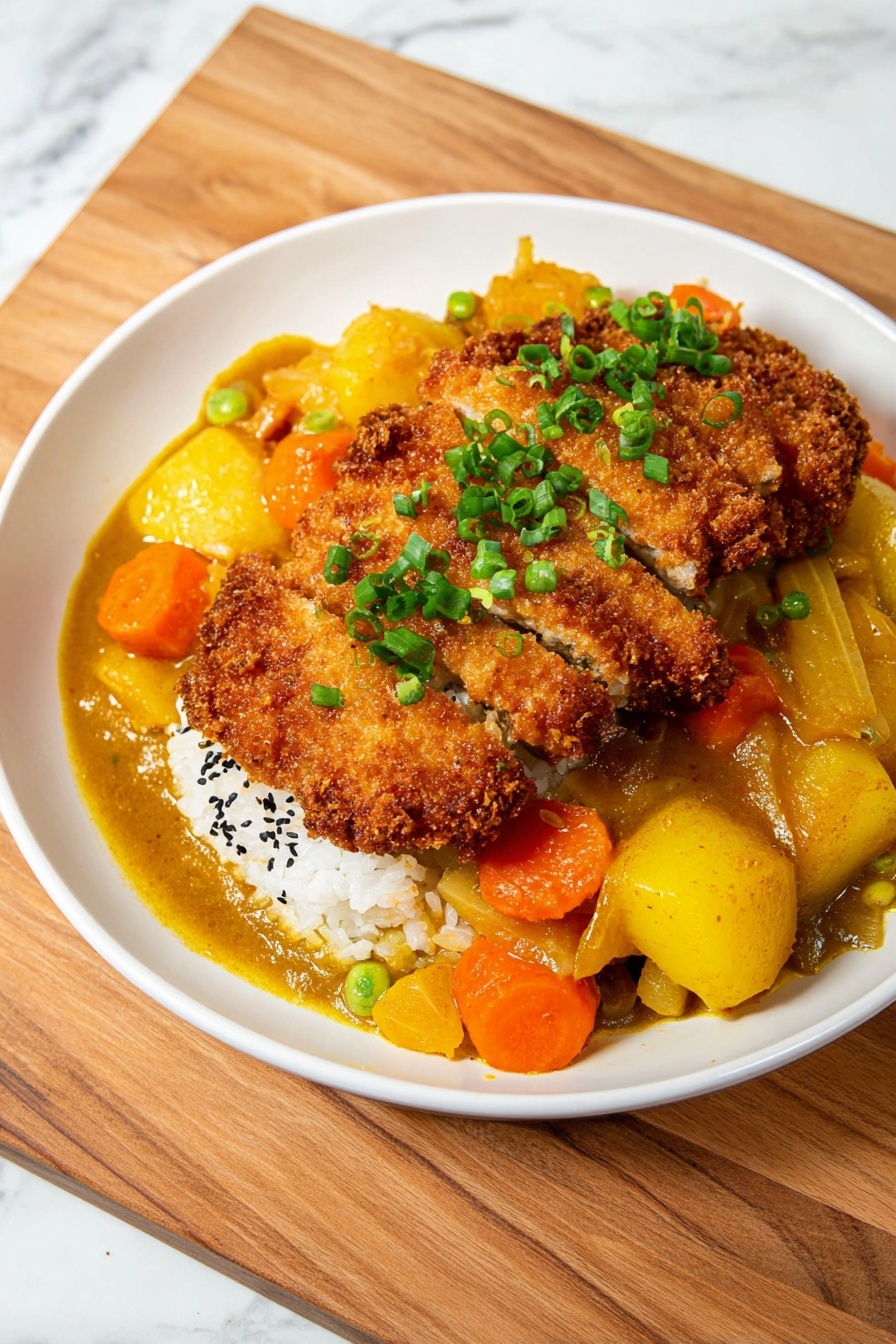
Garnishes
Classic fukujinzuke pickles are perfect for adding a sweet and tangy crunch alongside the richness of the curry. A sprinkle of fresh parsley brings a touch of color and freshness that balances the deep flavors beautifully. For an extra pop, try a drizzle of Japanese mayonnaise or a lemon wedge to brighten the katsu.
Side Dishes
Serve your katsu curry with steamed Japanese short-grain rice for an authentic base. Simple sides like a crisp cucumber sunomono salad or miso soup complement the dish without overpowering it. You can also try a side of sautéed greens or pickled daikon radish for extra variety.
Make Ahead and Storage
Storing Leftovers
Store any leftover curry in an airtight container in the refrigerator. It will stay fresh for up to 3 days, making meal prep super convenient for busy days. Keep the chicken katsu separate if possible to maintain crispiness.
Freezing
You can freeze your leftover curry sauce for up to 1 month. Freeze in portioned containers for easy thawing. It's best to freeze the katsu separately if you want to maintain its texture, though it’s still tasty if frozen with the curry.
Reheating
Reheat the curry gently on the stove over low-medium heat, stirring occasionally until warmed through. For the katsu, reheat in a preheated oven at 180 °C (356 °F) for about 8-10 minutes to crisp it back up—avoid microwaving if you want to keep the coating crunchy.
Frequently Asked Questions:
Absolutely! Using chicken thighs makes for a juicier, more flavorful katsu. Just make sure to pound them evenly to about 1 cm thickness for uniform cooking.
Simply swap the all-purpose flour and panko breadcrumbs with gluten-free alternatives. There are plenty of gluten-free flours and breadcrumbs available that work perfectly for coating and batter.
The most common issue is incorrect oil temperature. Make sure your oil stays at 170 °C (338 °F). Also, avoid overcrowding the fryer as it lowers the temperature and makes the coating soggy.
Yes! The curry actually tastes better after the flavors meld overnight. Prepare it ahead, refrigerate it, then reheat gently before serving with freshly fried katsu.
Final Thoughts
There’s something truly comforting about a warm plate of Crispy Chicken Katsu Curry — it’s like a little taste of Japan right in your own kitchen. Whether it’s a cozy weeknight dinner or part of your weekly meal prep, this dish never disappoints with its perfect balance of crispy, juicy chicken and hearty, flavorful curry. Give it a try, and I promise it’ll become a favorite in your recipe collection.
Print
Crispy Chicken Katsu Curry Recipe
- Prep Time: 20 minutes
- Cook Time: 40 minutes
- Total Time: 1 hour
- Yield: 4 servings 1x
- Category: Main Course
- Method: Frying
- Cuisine: Japanese
Description
Japanese chicken katsu curry is a comforting dish featuring tender chicken breast coated in a crispy panko and parmesan batter, served over a thick, rich Japanese curry sauce with vegetables and steamed rice. This recipe is perfect for meal prepping and provides a deliciously satisfying meal for lunch or dinner.
Ingredients
Japanese Style Curry
- 300 g boneless chicken thigh or chicken breast
- 1 pinch salt and pepper
- 1 tbsp butter
- 1 onion, thinly sliced
- 2 potatoes, peeled and cut into bite-size pieces
- 1 carrot, peeled and cut into bite-size pieces
- 4 servings Japanese curry roux (homemade or boxed)
- 600 ml water
- 1 tbsp tsuyu sauce (noodle soup base)
- ½ tbsp honey
- 1 tbsp sake
- 1 pinch chili powder (optional)
- ½ tsp fenugreek powder
- 1 tsp tomato ketchup
Chicken Katsu
- cooking oil for deep frying (approximately 1 liter)
- 2 chicken breasts
- 2 pinches salt and pepper
- 6 tbsp all-purpose flour (for batter)
- 100 ml water
- 2 eggs
- 100 g all-purpose flour (for coating)
- 50 g panko breadcrumbs
- 4 tbsp grated parmesan cheese
To Serve
- 4 portions cooked Japanese short-grain rice
- Fukujinzuke pickles (optional)
- Fresh parsley (optional)
Instructions
- Prepare the Curry: Cut 300 g boneless chicken thigh into bite-size pieces and season with salt and pepper. Thinly slice the onion; peel and cut potatoes and carrot into bite-size pieces.
- Cook Chicken and Vegetables: Heat a large pot over medium heat and melt 1 tablespoon butter. Add the chicken and fry until sealed on the outside. Add sliced onion and cook until slightly softened.
- Add Vegetables and Seasonings: Add potatoes, carrot, and 1 tablespoon tsuyu sauce. Stir and cook together for about 1 minute.
- Simmer Curry: Pour in 600 ml water and bring to a boil. Lower heat to simmer and add the Japanese curry roux. Stir until fully dissolved.
- Enhance Flavor: Add ½ tablespoon honey, 1 tablespoon sake, ½ teaspoon fenugreek powder, 1 teaspoon tomato ketchup, and a pinch of chili powder (optional). Stir well and simmer for 10-20 minutes until the curry thickens. Keep warm with the lid on, stirring occasionally.
- Prepare Chicken Katsu: Heat cooking oil in a deep fryer or large pot to 170 °C (338 °F). Cut 2 chicken breasts in half horizontally and season with salt and pepper on both sides.
- Pound Chicken: Wrap each chicken piece in plastic wrap and pound with a meat tenderizer or rolling pin to about 1 cm thickness.
- Make Batter: In a bowl, combine 6 tablespoon flour, 2 eggs, and 100 ml water into a thick batter.
- Prepare Coating: On a plate, mix 50 g panko breadcrumbs with 4 tablespoon grated parmesan cheese. On another plate, place 100 g all-purpose flour for dry coating.
- Coat Chicken: Dredge each chicken piece in the 100 g flour, shaking off excess. Dip into the batter, then coat evenly with the panko and parmesan mixture.
- Fry Katsu: Carefully place coated chicken into hot oil and fry for 6 minutes until golden brown, turning halfway for even cooking. Transfer to a wire rack to drain excess oil.
- Serve: Plate cooked Japanese rice on one side, spoon curry on the other, and arrange sliced katsu in between. Garnish with fukujinzuke pickles and fresh parsley if desired. Enjoy immediately.
Notes
- Use chicken thighs instead of breasts for a juicier katsu if preferred.
- Ensure oil temperature is steady at 170 °C to achieve a crisp, non-greasy coating.
- For gluten-free version, substitute all-purpose flour and panko with gluten-free alternatives.
- Leftover curry can be refrigerated for up to 3 days or frozen for up to 1 month.
- Adjust spiciness by increasing chili powder or adding grated ginger.
- Using parmesan cheese in the coating adds a unique savory flavor and extra crispiness.
- Make sure to pound chicken evenly to ensure it cooks thoroughly and remains tender.
Nutrition
- Serving Size: 1 serving
- Calories: 650 kcal
- Sugar: 8 g
- Sodium: 850 mg
- Fat: 30 g
- Saturated Fat: 8 g
- Unsaturated Fat: 20 g
- Trans Fat: 0 g
- Carbohydrates: 60 g
- Fiber: 5 g
- Protein: 35 g
- Cholesterol: 120 mg


Leave a Reply