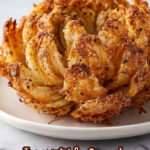
If you love that perfect crunchy, golden-on-the-outside and tender-on-the-inside snack, you're going to adore this Crispy Blooming Onion Recipe. It’s a fun, show-stopping appetizer that transforms a humble onion into a crispy, flavorful masterpiece.

Jump to:
Why You'll Love This Recipe
I have to admit, every time I make this blooming onion at home, it’s an instant hit. The crispy petals are ridiculously satisfying to pull apart, and the seasoned coating is packed with flavor that tastes way better than anything you’ll find at a restaurant.
- Stunning presentation: It looks like you spent hours in the kitchen, but really, it’s surprisingly simple to prepare.
- Crunchy and juicy: The perfect balance of crispy edges with tender, sweet onion inside.
- Customizable seasoning: The spice blend is bold but easy to tweak to your taste, especially if you like it spicy or milder.
- Great for sharing: This appetizer is designed to be pulled apart and dipped, making it perfect for a party or movie night.
Ingredients & Why They Work
Choosing the right onion and oil is key here—and mixing your spices just right makes all the difference. I always use a sweet onion like a Vidalia because its natural sugars caramelize slightly when fried, balancing the savory and spicy coating beautifully.
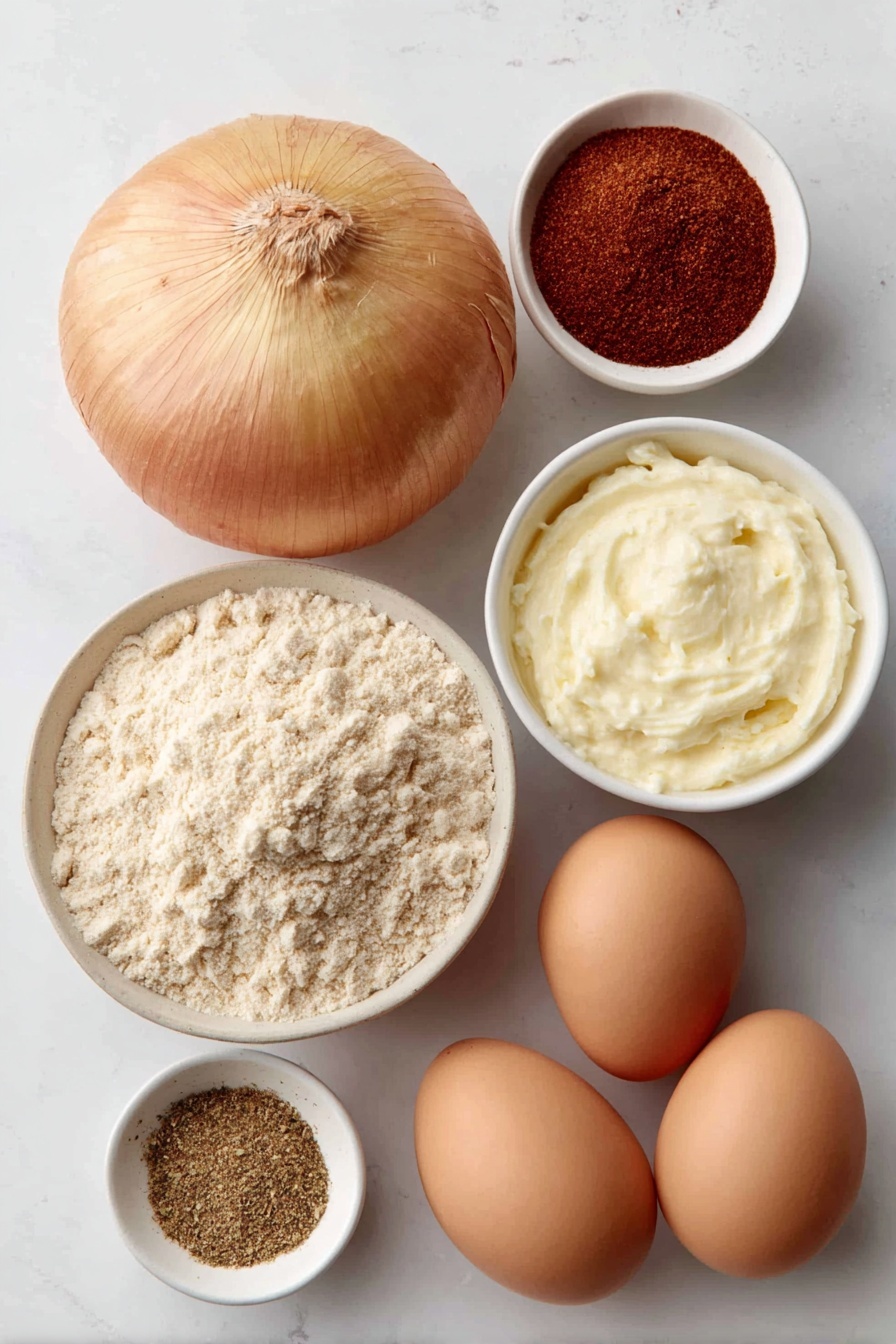
- High-heat oil: Essential for deep frying without burning, ensures that crispy golden crust.
- Large sweet onion: The star of the dish, offering sweetness and a juicy bite.
- All-purpose flour: The base for the seasoned coating that crisps up perfectly.
- Paprika: Adds smoky warmth and vibrant color.
- Kosher salt: Used in stages to bring out flavor without overpowering.
- Dried oregano: Offers a subtle herby note that balances the spices.
- Cayenne pepper: Gives a gentle heat that wakes up every bite.
- Ground cumin: Adds earthiness and depth to the seasoning mix.
- Garlic powder: Classic savory punch that complements onion beautifully.
- Freshly ground black pepper: For a bit of bite and freshness.
- Large eggs: Help the flour mixture stick and create that perfect crunch.
- Buttermilk or milk: Adds moisture and tenderness to the batter.
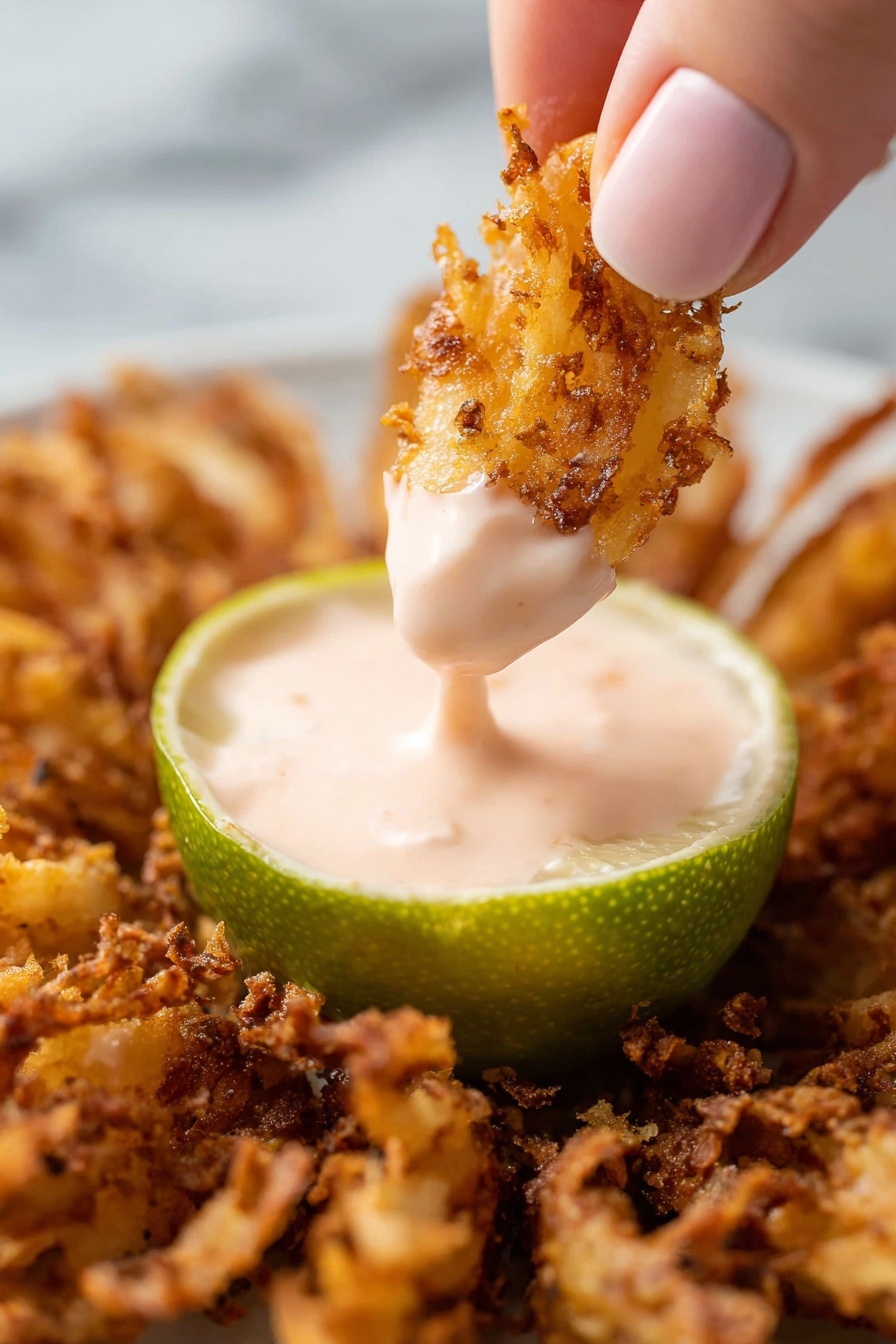
- Dipping sauce: Totally optional but highly recommended to amp up the flavor.
Make It Your Way
The beauty of this Crispy Blooming Onion Recipe is how easily you can tailor it to your taste buds or occasion. Want it spicier, milder, or with a seasonal twist? Let’s explore some fun and tasty variations you can try at home.
- Mild Version: If you prefer less heat, simply reduce or omit the cayenne pepper in the flour mixture. I’ve found this adjustment makes the blooming onion much more approachable for kids or those sensitive to spice, while keeping all the flavorful crunch.
- Extra Crunch: For an even crispier coating, you can add a bit of cornmeal or panko breadcrumbs to the flour mixture. This gives a delightful texture that really stands out when fried.
- Herb Twist: Swap the dried oregano for fresh chopped herbs like rosemary or thyme for a fragrant variation. I love this during spring when fresh herbs are abundant—it adds a beautiful, fresh aroma.
- Dairy-Free Option: Use unsweetened almond milk or another plant-based milk in place of buttermilk to cater to dairy-free diets without compromising moisture in the batter.
- Sauce Ideas: While traditional ranch or spicy mayo is delicious, consider dipping in a honey mustard or a tangy barbecue sauce to complement the smoky cumin and paprika flavors perfectly.
Step-by-Step: How I Make Crispy Blooming Onion Recipe
Step 1: Getting the Oil Perfectly Hot
Start by heating 4 quarts of your choice high-heat oil—canola, corn, or peanut—in a large stockpot over medium-high heat. Be patient and vigilant with the temperature; you’re aiming for a steady 375ºF. This heat is crucial for a crisp, golden exterior without soaking up too much oil. A kitchen thermometer is your best friend here. Also, make sure your pot has enough space so the oil won’t bubble over once you add the onion.
Step 2: Mixing the Flavorful Flour Coating
While the oil heats, whisk together 1 cup all-purpose flour with a vibrant blend of spices: 1 tablespoon paprika, 2 ½ teaspoons kosher salt, ¾ teaspoon cayenne, 1 teaspoon dried oregano, ¾ teaspoon ground cumin, ¾ teaspoon garlic powder, and ½ teaspoon black pepper. This seasoning mix is what brings that bold, irresistible flavor to each petal. Reserve about ¾ cup of this mixture separately—that’s your secret weapon for perfect double coating!
Step 3: Preparing the Wet Batter
In a separate bowl, whisk together 2 large eggs, ½ cup buttermilk (or your milk of choice), and the remaining ¼ teaspoon kosher salt until smooth. This egg wash will help the flour mixture cling beautifully to every delicate onion petal.
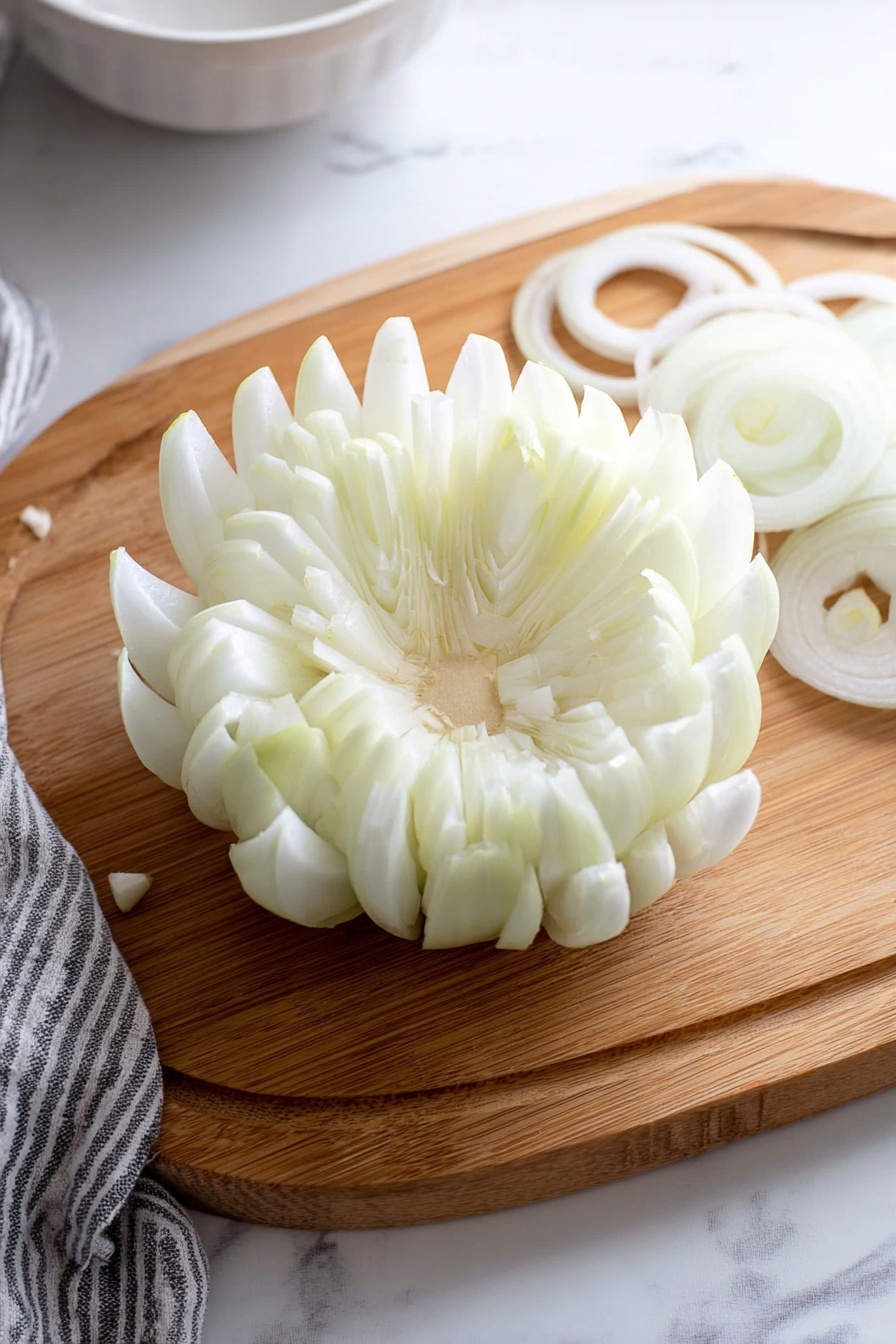
Step 4: Cutting the Onion Into a Bloom
Trim about ½ to ¾ inch off the stem end of your large sweet onion (Vidalia works wonders here) and peel away the outer skin. Place it root-side up on your cutting board. Make four initial cuts about ½ inch from the root, slicing straight down without a sawing motion. Rotate and repeat until you have eight sections, then add eight more cuts between those to total sixteen petals. The root stays intact as your flower’s base—don’t cut all the way through! Gently flip the onion to open the petals like a blooming flower. If petals cling in the center, use your knife tip to carefully free them. It’s very satisfying to see it bloom open before frying!
Step 5: The Double Dipping Dance
Place the onion cut side up in the seasoned flour mixture. Sprinkle some of the reserved flour all over the petals and gently separate them to get full coverage. Shake off any excess flour. Then, carefully dip the onion cut side down into the egg mixture. Lift petals in a scooping motion so they’re fully coated, and let the excess drip off. Return the onion cut side up to the flour mixture and coat once more, section by section, using your reserved flour to ensure a thick, even crust. This double coating is the secret to that addictively crispy texture.
Step 6: Ready, Set, Fry!
Prepare a baking sheet lined with a wire rack over paper towels for draining. Working carefully, lower the breaded onion cut side up into the hot oil. Watch as it bubbles with excitement! Keep the oil temperature steady between 360 and 365ºF to achieve a perfect golden brown crust without burning. Fry for about 4 minutes on the first side, then flip and fry another 3 to 4 minutes until tender and evenly browned. This step produces that mouthwatering deep golden color and crispy texture you’re craving.
Step 7: The Finishing Touch
Remove the onion with a spider or slotted utensil, holding it cut side down to drain excess oil. Place it back on your paper towel-lined rack with the cut side up. Sprinkle with the remaining ¼ teaspoon kosher salt. Let your masterpiece rest for about 5 minutes—this allows it to firm up slightly, making it easier (and safer!) to handle. Serve it warm alongside your favorite dipping sauce or enjoy it on its own as a crunchy, flavorful treat.
Top Tip
Mastering the perfect Crispy Blooming Onion Recipe isn’t just about following the steps; it’s about the little nuances that make your onion utterly irresistible every single time. These tips can really elevate your blooming onion game.
- Use the Right Onion: I’ve found that large sweet onions like Vidalias give the perfect balance of sweetness and volume — plus, their layers separate beautifully when cut into petals.
- Keep the Root Intact: Trust me, slicing through the root can cause your onion petals to fall apart during frying, which is a disaster you want to avoid!
- Maintain Oil Temperature: It’s key to keep the oil steady between 360 to 365ºF; too hot and the coating burns, too cool and it gets soggy. A good thermometer is your best friend here.
- Double Dredge for Crunch: The double coating with flour and egg ensures an ultra-crispy crust that really holds together — skipping or rushing this step can make a world of difference.
How to Serve Crispy Blooming Onion Recipe
Garnishes
To make your Crispy Blooming Onion even more festive and flavorful, sprinkle it lightly with fresh chopped parsley or chives. A squeeze of fresh lemon juice just before serving adds a bright, zesty touch that beautifully balances the rich fried goodness. For a little extra indulgence, a dusting of smoked paprika on top can amplify the smoky, spicy vibe.
Side Dishes
This appetizer pairs perfectly with cool and creamy sides like crisp coleslaw or a lightly dressed green salad to cut through the richness. Try pairing with classic dipping sauces such as spicy mayo, ranch, or honey mustard to complement the savory spices in the batter. For a fuller meal, serve alongside grilled chicken or steak and a baked potato for a true American feast.
Make Ahead and Storage
Storing Leftovers
If you happen to have leftovers (which is rare!), store your crispy blooming onion airtight in the refrigerator for up to 2 days. Because the delicate crispiness fades, it’s best to re-crisp them before serving again.
Freezing
Freezing a fried blooming onion isn't ideal as the texture changes significantly upon thawing. If you must, flash-freeze the breaded onion before frying on a tray, then transfer to a freezer-safe bag for up to 1 month. Fry from frozen, adding extra time to ensure it’s heated through and crispy.
Reheating
To bring back some of that crispy magic, reheat your leftover blooming onion in a preheated oven or air fryer at 375ºF for about 8-10 minutes. Avoid the microwave, as it makes the coating soggy. Keep a close eye to prevent burning.
Frequently Asked Questions:
Yes, you can, but a large sweet onion like Vidalia is ideal for the Crispy Blooming Onion Recipe because it has a mild flavor and the right size to create those beautiful petals. Yellow onions tend to be stronger in flavor and smaller, which might affect the final texture and taste.
Keeping the root intact holds the onion petals together during cooking. If you cut through the root, the onion will fall apart in the oil, making it difficult to fry evenly and to achieve the signature flower shape.
Classic dips like spicy mayo, ranch dressing, or honey mustard complement the seasoning beautifully. Feel free to get creative with BBQ sauce, blue cheese dressing, or even a sriracha aioli depending on your taste preference.
Maintaining a consistent oil temperature between 360 to 365ºF and double coating with flour and egg mixture helps form a crisp crust. Also, make sure to drain the oil well after frying and serve immediately to enjoy maximum crispness.
Final Thoughts
I hope you enjoy making and sharing this Crispy Blooming Onion Recipe as much as I do. It’s one of those appetizers that always brings smiles to the table — that perfect crunch, the flavorful spices, and the flower-like presentation make it a real crowd-pleaser. Don’t worry if your first try isn’t flawless; with a little practice (and these tips), you’ll be serving up restaurant-quality blooming onions in no time. Happy frying!
Print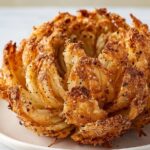
Crispy Blooming Onion Recipe
- Prep Time: 20 minutes
- Cook Time: 8 minutes
- Total Time: 28 minutes
- Yield: 4 servings
- Category: Appetizer
- Method: Frying
- Cuisine: American
Description
This Blooming Onion recipe features a large sweet onion cut into a flower shape, coated in a flavorful seasoned flour and egg batter, then deep-fried to crispy golden perfection. Perfect as an appetizer or snack, it pairs wonderfully with your favorite dipping sauce for a deliciously indulgent treat.
Ingredients
Frying
- 4 quarts high-heat oil, such as canola, corn, or peanut oil
Onion and Breading
- 1 large sweet onion (13 to 14 ounces), such as Vidalia
- 1 cup all-purpose flour
- 1 tablespoon paprika
- 3 teaspoons kosher salt, divided
- 1 teaspoon dried oregano
- ¾ teaspoon cayenne pepper
- ¾ teaspoon ground cumin
- ¾ teaspoon garlic powder
- ½ teaspoon freshly ground black pepper
Wet Ingredients
- 2 large eggs
- ½ cup buttermilk, whole milk, or 2% milk
Optional
- Dipping sauce of choice
Instructions
- Heat the oil: In a large stockpot, heat 4 quarts of high-heat oil over medium-high heat until it reaches 375ºF. Ensure there is enough room in the pot for the onion to safely fry without overflowing.
- Prepare the flour seasoning mix: In a large bowl, whisk together 1 cup all-purpose flour, 1 tablespoon paprika, 2 ½ teaspoons kosher salt, ¾ teaspoon cayenne pepper, 1 teaspoon dried oregano, ¾ teaspoon ground cumin, ¾ teaspoon garlic powder, and ½ teaspoon black pepper. Reserve about ¾ cup of this mixture separately for later use.
- Mix the wet ingredients: In a medium bowl, whisk together 2 large eggs, ½ cup buttermilk (or milk), and the remaining ¼ teaspoon kosher salt until combined.
- Cut the onion: Trim ½ to ¾ inch off the stem end of the peeled onion and place it root-side up. Using a sharp knife, make 4 initial cuts about ½ inch from the root, slicing down towards the board without sawing. Rotate the onion, repeating the cuts four times.
- Section the onion into petals: Make 4 more cuts between the initial cuts to create 8 sections, keeping the root intact. Then make 8 additional cuts between those to total 16 sections. Carefully flip the onion to open the petals like a flower, using the knife tip to separate any stuck pieces in the center.
- Bread the onion: Place the cut onion cut side up into the flour mixture, sprinkle reserved flour on top, and spread petals to fully coat. Dust off excess flour. Gently dip the onion cut side down into the egg mixture, spreading the petals to coat thoroughly. Let excess drip off.
- Coat with flour again: Transfer the onion cut side up back into the flour mixture, spreading and sprinkling with the reserved flour section by section to ensure complete coverage.
- Prepare for frying: Line a baking sheet with a wire rack atop paper towels to drain the fried onion.
- Fry the onion: Carefully lower the coated onion into the hot oil cut side up using a spider or slotted utensil. Maintain oil temperature between 360 to 365ºF. Fry until deep golden brown on the bottom for about 4 minutes, then flip and fry an additional 3 to 4 minutes until tender.
- Drain and season: Remove the onion from oil cut side down and allow excess oil to drip. Place cut side up on the paper towel-lined rack and sprinkle with remaining ¼ teaspoon kosher salt. Let cool about 5 minutes before serving with dipping sauce if desired.
Notes
- Use a large sweet onion like Vidalia for the best balance of sweetness and size.
- Ensure the oil temperature stays consistent to prevent soggy or burnt coating.
- Be careful not to cut the root fully so the onion petals stay intact while frying.
- Adjust cayenne pepper to your spice preference or omit for less heat.
- Serve immediately for the crispiest texture; leftovers can lose their crunch.
- Dipping sauces such as spicy mayo, ranch, or honey mustard pair well with the blooming onion.
Nutrition
- Serving Size: ¼ blooming onion
- Calories: 450 kcal
- Sugar: 6 g
- Sodium: 900 mg
- Fat: 28 g
- Saturated Fat: 5 g
- Unsaturated Fat: 20 g
- Trans Fat: 0 g
- Carbohydrates: 44 g
- Fiber: 4 g
- Protein: 7 g
- Cholesterol: 110 mg


Leave a Reply