There's something truly magical about the way chocolate and peppermint dance together in this dessert. The refreshing coolness of peppermint perfectly complements the rich, moist layers of chocolate, making this Chocolate Peppermint Cake Recipe a festive favorite that’s impossible to resist.

Jump to:
Why You'll Love This Recipe
I've made this Chocolate Peppermint Cake Recipe countless times, especially during the holidays, and each time it feels like the perfect cozy celebration on a plate. The balance between deep cocoa flavor and bright peppermint keeps everyone coming back for seconds.
- Decadently Moist Chocolate Layers: The use of hot coffee and Dutch-processed cocoa powder intensifies the chocolate flavor without drying out the cake.
- Refreshing Peppermint Swiss Meringue Buttercream: Light, fluffy, and not overly sweet—the peppermint buttercream is the star that lifts the whole cake.
- Customizable & Festive Presentation: Crushed candy canes and piping techniques let you get creative and make the cake truly festive.
- Great for Special Occasions: This cake works beautifully for winter parties, holiday dinners, or anytime you want a show-stopping dessert.

Ingredients & Why They Work
The magic of this Chocolate Peppermint Cake Recipe lies in the harmony of classic baking staples with those refreshing peppermint notes. Each ingredient plays a key role in texture, flavor, and overall success—I'll share a few tips here to help you pick the best ones.

- All-purpose flour: Provides structure while keeping the crumb tender; make sure it’s fresh for best rise.
- Granulated sugar: Sweetens and helps create tender crumbs and moist texture.
- Dutch-processed cocoa powder: Gives a rich, smooth chocolate flavor with less acidity; sift for lump-free batter.
- Baking soda & baking powder: They work together to make sure your cake rises perfectly fluffy without being dense.
- Vegetable oil: Keeps the cake moist and soft; don’t swap with butter for this recipe.
- Buttermilk: Adds acidity for tender crumb and helps activate the baking soda; room temperature is key.
- Hot coffee or water: Enhances the chocolate flavor and thins the batter—coffee makes it deeper but water works fine too.
- Eggs: Bind everything together and add richness; make sure they’re at room temperature for even mixing.
- Vanilla & peppermint extract: Vanilla adds warmth, while peppermint gives that refreshing zing—adjust peppermint to your taste!
- Egg whites & granulated sugar (for meringue): Makes the Swiss meringue buttercream light and fluffy but stable.
- Unsalted butter: Cubed and room temp for silky smooth buttercream and precise emulsification.
- Color gels & powdered sugar: For vibrant festive buttercream colors that won’t alter flavor or texture.
- Crushed candy canes & sprinkles: Adds delightful crunch and that unmistakable peppermint look and flavor.
Make It Your Way
One of my favorite things about this Chocolate Peppermint Cake Recipe is how easy it is to tweak it for your own tastes. Maybe you want it more minty, less sweet, or even dairy-free. Don’t hesitate to make it your own!
- Extra Minty Variation: If you’re a peppermint fanatic like me, try adding a bit more peppermint extract to both the batter and the buttercream—you'll get a wonderful festive kick.
- Chocolate Lovers’ Boost: Fold in mini chocolate chips between cake layers before frosting, for an extra hit of chocolate in every bite.
- Vegan or Dairy-Free Twist: Use a plant-based buttermilk substitute and coconut oil instead of butter in the frosting; just keep an eye on the texture as it can differ.
- Spice It Up: Add a pinch of cinnamon or chili powder to the dry ingredients for a subtle warmth that pairs surprisingly well with peppermint.
Step-by-Step: How I Make Chocolate Peppermint Cake Recipe
Step 1: Prepping the Pans and Dry Ingredients
I always start by preheating my oven to 350°F and prepping the pans carefully—grease three 6-inch round pans and dust them with cocoa powder instead of flour; it helps prevent sticking without adding unwanted texture. Then, I line the bottoms with parchment paper for an extra non-stick guarantee. After that, I whisk together all the dry ingredients (flour, sugar, cocoa, baking soda, baking powder, and salt) right in the mixer bowl. Mixing them well now means less work later, and a perfectly even cake rise.
Step 2: Mixing Wet Ingredients
In a separate bowl, I whisk together the vegetable oil, buttermilk, eggs, vanilla extract, and, if you’re going for it, peppermint extract. Then I slowly pour in the hot coffee or water while whisking gently to avoid cooking the eggs. This step is a bit like magic—watch how that hot liquid starts making the cocoa and coffee flavor pop!
Step 3: Combining for a Smooth Batter
Pour the wet ingredients into the dry and mix on medium speed for 2 to 3 minutes. The batter will be thin, but that’s how you know it’ll bake into a moist and tender crumb. I sometimes use a kitchen scale to make sure I distribute the batter evenly across the pans, which really pays off with consistent baking.
Step 4: Baking and Cooling
Bake for 30 to 35 minutes until a tester inserted in the center comes out mostly clean. The cakes will pull slightly from the sides, which is a great sign they’re done. Let them cool in their pans for 10 minutes, then carefully turn them out onto a wire rack to cool completely—this prevents sogginess and keeps the layers airy.
Step 5: Making the Peppermint Swiss Meringue Buttercream
This is the part where patience really pays off. Start by whisking egg whites and sugar together, then place the bowl over a hot water bath. Whisk constantly until it’s smooth and reaches about 160°F—no graininess should remain, or your meringue won’t fluff up properly. Then, back on the mixer, whisk until the meringue forms stiff peaks and cools to room temperature. When you switch to the paddle attachment, add cubed butter slowly—you might see it look curdled at points, but keep going! Eventually, it smooths out into the creamiest frosting. Add vanilla and peppermint extracts last to keep those fresh flavors intact.
Step 6: Coloring & Layering Your Cake
I take about 1 ½ cups of the buttercream and mix in powdered sugar and red gel coloring to get that beautiful festive red, while the rest gets brightened with a white color gel to keep the classic peppermint vibe. Then I spread about ⅔ cup frosting on each layer, sprinkle crushed candy canes, stack, and crumb coat the whole cake before chilling it. Finally, I frost the exterior, smooth it with a cake comb, and pipe red and white dollops on top for that finished festive look.
Top Tip
From my many attempts at this Chocolate Peppermint Cake Recipe, I’ve learned a few things that make all the difference between a good cake and a great one. These tips will help you skip the frustrating hiccups and impress anyone who gets a slice.
- Room Temperature Eggs: Cold eggs can cause the batter to curdle or not mix evenly—let them sit out for 30 minutes before baking.
- Grease-Free Meringue Tools: Even a trace of oil in your bowl or whisk will stop the egg whites from whipping properly, so I always clean mine with lemon and hot water.
- Slow Butter Addition: When making the buttercream, add butter in small chunks on low speed—rushing this step causes frosting to split and become grainy.
- Don’t Skip the Cooling: Allowing your cake layers to cool fully before frosting helps your buttercream hold up perfectly and prevents melting.
How to Serve Chocolate Peppermint Cake Recipe

Garnishes
I love adding extra crushed candy canes around the base of the cake and sprinkling peppermint candy sprinkles on top—they add that satisfying crunch and festive sparkle. On occasion, I’ve topped slices with a few fresh mint leaves for an elegant touch that really refreshes the palate.
Side Dishes
Serve this cake alongside simple vanilla bean ice cream or a dollop of freshly whipped cream to balance out its richness. A cup of peppermint tea or a rich espresso also pairs wonderfully, complementing the flavors perfectly without overpowering them.
Creative Ways to Present
For holiday parties, I’ve piped edible snowflakes with royal icing on the cake sides and sprinkled edible glitter for a dazzling effect. Another fun idea is to serve individual slices in clear cups layered with crushed candy cane and whipped buttercream to create a festive parfait style treat.
Make Ahead and Storage
Storing Leftovers
I usually store leftover cake tightly wrapped in plastic wrap and kept in an airtight container in the fridge. It stays moist and tasty for up to 4 days, though in my house, it rarely lasts that long!
Freezing
If I want to save cake for later, I slice and freeze the layers separately, wrapped tightly in plastic and placed in a freezer bag. You can freeze the buttercream as well, though I recommend freezing assembled cake for best texture. Just thaw overnight in the fridge before serving.
Reheating
When reheating a slice, I pop it in the microwave for about 10-15 seconds to warm just slightly—it brings back that freshly baked feel without melting the frosting. For the whole cake, letting it come to room temperature works best.
Frequently Asked Questions:
Absolutely! You can omit the peppermint extract if you prefer a classic chocolate cake. To keep a festive winter vibe, consider adding a hint of vanilla or almond extract instead.
The thin batter is normal because of the hot liquid; it ensures the cake stays moist and has a tender crumb. Don't worry—it’s not an error!
You'll know the Swiss meringue buttercream is ready when it's smooth, silky, and holds its shape well when piped or spread. If it looks curdled at first, keep mixing—it will come together.
Dutch-processed cocoa is preferred here because it’s less acidic and creates a richer flavor. If you only have natural cocoa, it will still work but expect a slight difference in flavor and color.
Final Thoughts
This Chocolate Peppermint Cake Recipe has become one of my go-to desserts whenever I want to bring some seasonal joy to the table. Its moist layers, refreshing mint, and beautiful presentation make it a crowd-pleaser every time. Give it a try—you’ll find it’s as rewarding to make as it is delicious to eat.
Print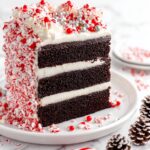
Chocolate Peppermint Cake Recipe
- Prep Time: 2 hours
- Cook Time: 35 minutes
- Total Time: 2 hours 35 minutes
- Yield: 12 servings
- Category: Dessert
- Method: Baking
- Cuisine: American
- Diet: Vegetarian
Description
A festive and moist Chocolate Peppermint Cake featuring rich cocoa layers infused with peppermint, layered and frosted with a smooth Peppermint Swiss Meringue Buttercream decorated with crushed candy canes and festive piping.
Ingredients
Chocolate Peppermint Cake:
- 1 ½ cup all-purpose flour
- 1 ½ cups granulated sugar
- ¾ cup Dutch-processed cocoa powder sifted
- 1 ½ teaspoon baking soda
- 1 teaspoon baking powder
- 1 teaspoon salt
- ¼ cup vegetable oil
- ¾ cup buttermilk room temperature
- ¾ cup hot water or hot coffee
- 2 large eggs room temperature
- 2 teaspoon vanilla extract
- 1 teaspoon peppermint extract optional
Peppermint Swiss Meringue Buttercream:
- 6 large egg whites
- 2 cup granulated sugar lightly packed
- 2 cups unsalted butter cubed, room temperature
- 1 teaspoon vanilla extract
- 1 teaspoon peppermint extract or more to taste
- bright white color gel
- 2 tablespoon powdered sugar
- red color gel
Assembly:
- ½ cup crushed candy canes plus more for outside of cake
- candy cane sprinkles
Instructions
- Preheat and Prepare Pans: Preheat your oven to 350 degrees Fahrenheit. Grease three 6-inch round baking pans, dust them with cocoa powder, and line the bottoms with parchment paper to prevent sticking.
- Mix Dry Ingredients: In the bowl of a stand mixer fitted with the paddle attachment, combine the all-purpose flour, granulated sugar, Dutch-processed cocoa powder, baking soda, baking powder, and salt. Stir these together to blend evenly.
- Combine Wet Ingredients: In a medium bowl, whisk together the vegetable oil, buttermilk, hot water or coffee (gradually to avoid cooking eggs), eggs, vanilla extract, and peppermint extract if using. Ensure the eggs are at room temperature for smooth mixing.
- Make Cake Batter: Add the wet ingredients to the dry ingredients in the mixer. Mix on medium speed for 2 to 3 minutes until fully combined; the batter will be thin.
- Bake the Cake: Divide the batter evenly between the three prepared pans, using a kitchen scale if available for accuracy. Bake for 35 minutes or until a cake tester inserted comes out mostly clean. Allow cakes to cool in pans for 10 minutes before turning out onto wire racks to cool completely.
- Prepare Swiss Meringue Buttercream: Combine egg whites and sugar in a clean bowl. Place this bowl over a hot water bath and whisk constantly until the mixture is hot to touch (about 160F) and no longer grainy, approximately 3 minutes.
- Whip Meringue: Transfer the bowl to a stand mixer and whisk on medium-high until stiff peaks form and the bowl is no longer warm, around 5 to 10 minutes.
- Add Butter and Flavor: Switch to the paddle attachment. Gradually add cubed room temperature butter while mixing until smooth. Mix in vanilla and peppermint extracts, whipping until the buttercream is silky and well combined.
- Color Buttercream: Remove 1 ½ cups of white buttercream for decorating. To this, add powdered sugar and red gel coloring to achieve a deep red shade. Optionally, brighten the remaining buttercream with bright white gel color.
- Assemble Cake: Place the first cake layer on a stand or plate. Spread about ⅔ cup white buttercream, sprinkle ¼ cup crushed candy canes over it, then repeat with remaining layers. Apply a thin crumb coat all around and chill the cake for 20 minutes.
- Final Frosting and Decorating: Frost the cake generously with the remaining buttercream, smoothing sides using an icing smoother and a cake comb for texture. Pipe dollops of red buttercream with a 1M tip on top, spacing them out, then pipe smaller dollops of white buttercream with a 4B tip between the red dollops. Decorate the base with crushed candy canes and candy cane sprinkles for a festive finish.
Notes
- Ensure absolutely no egg yolks are in the whites and that all equipment is grease-free for best stiff meringue results.
- The buttercream may look curdled during mixing; continue beating until it becomes smooth.
- Using hot coffee instead of water enhances the chocolate flavor.
- Room temperature eggs and butter improve texture and mixing.
- Use a kitchen scale to evenly distribute batter for consistent cake layers.
- Bright white gel color helps achieve a crisp white frosting to contrast the red.
Nutrition
- Serving Size: 1 slice
- Calories: 450 kcal
- Sugar: 40 g
- Sodium: 280 mg
- Fat: 25 g
- Saturated Fat: 15 g
- Unsaturated Fat: 8 g
- Trans Fat: 0 g
- Carbohydrates: 55 g
- Fiber: 4 g
- Protein: 5 g
- Cholesterol: 80 mg


Leave a Reply