If you're on the hunt for a flavorful, healthier game-day snack, let me introduce you to my all-time favorite Buffalo Cauliflower Wings Recipe. These baked bites pack a spicy punch without the guilt, and trust me, even wing lovers will be hooked!

Jump to:
Why You'll Love This Recipe
I still remember the first time I whipped up these buffalo cauliflower wings on a whim – they were gone before the game's first quarter! Here’s why I keep coming back to this recipe:
- Simple Ingredients: You only need under 10 everyday pantry staples to get these wings ready.
- Healthier Than Traditional Wings: Baked, not fried, with cauliflower stealing the show for a nutritious twist.
- Perfectly Crispy: Baking at 375°F and flipping halfway ensures every bite has that coveted crunch.
- Spicy, Tangy Buffalo Flavor: Classic Buffalo sauce elevated with melted butter for that irresistible bite.
Ingredients & Why They Work
When shopping for this buffalo cauliflower wings recipe, look for a fresh, firm head of cauliflower and quality Buffalo sauce (Frank's is my go-to). The combination of spices adds depth without overpowering the natural veggie flavor.
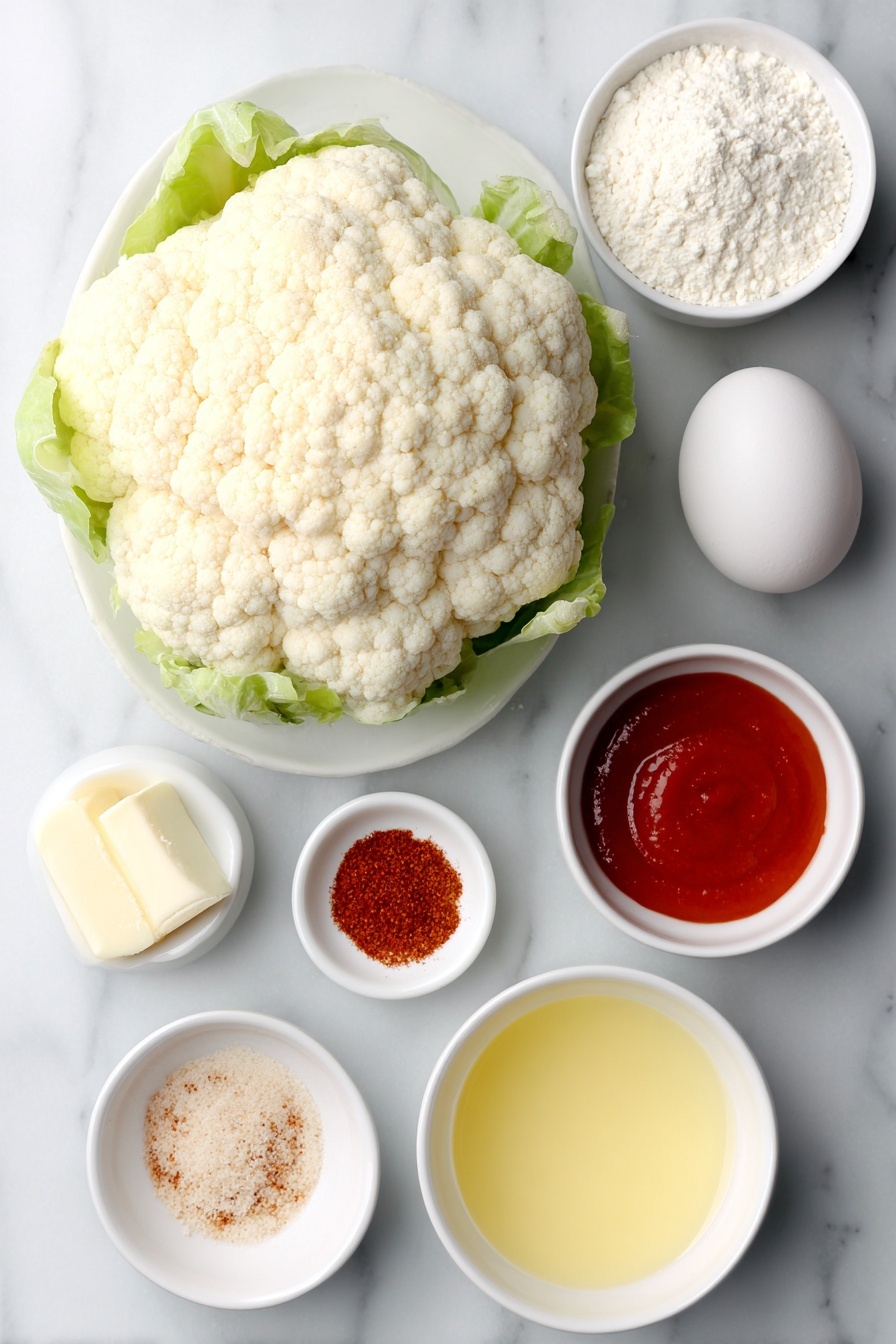
- Cauliflower: The star of this dish—choose a firm head with tightly packed florets for the best texture after baking.
- All-purpose flour: Helps create a thick, crispy batter that clings perfectly to each floret.
- Ground paprika: Adds subtle smoky warmth that complements the heat of the Buffalo sauce.
- Onion powder: Boosts savory notes without overpowering the other flavors.
- Garlic powder: A must-have for that classic Buffalo wing flavor profile.
- Salt: Essential for seasoning and bringing out the flavors in the batter.
- Buttermilk: Gives the batter moisture and helps tenderize the cauliflower; homemade works great if you’re out.
- Butter: Melted and mixed into the Buffalo sauce to smooth out the heat and add richness.
- Buffalo sauce: The bold, spicy coating—Frank’s RedHot is a classic choice that never disappoints.
Make It Your Way
Buffalo Cauliflower Wings Recipe is wonderfully versatile, so feel free to put your own spin on it! Whether you're customizing for dietary needs or packing in extra flavor, these wings welcome your creativity.
- Vegan Variation: I love swapping regular buttermilk for plant-based buttermilk and using coconut oil instead of butter. It keeps the wings just as rich and tangy, perfect for my vegan friends.
- Gluten-Free Twist: Switching to gluten-free flour works beautifully and makes these accessible to everyone without sacrificing that crispy texture.
- Spice it Up: For those who crave extra heat, I like adding a pinch of cayenne pepper to the batter or mixing some hot sauce into the Buffalo sauce for an even bolder kick.
- Seasonal Flavors: In the fall, a sprinkle of smoked paprika or a touch of maple syrup in the Buffalo sauce gives a lovely seasonal twist that's unexpected but delicious.
Step-by-Step: How I Make Buffalo Cauliflower Wings Recipe

Step 1: Preheat and Prepare Your Space
First things first, set your oven to 375°F. I line two baking sheets with parchment paper—this not only helps keep the cauliflower from sticking but makes cleanup a breeze. Having your baking sheets ready means you can move right into coating your cauliflower florets without a pause.
Step 2: Mix the Flavor-Packed Batter
Grab a large bowl and combine the flour, ground paprika, onion powder, garlic powder, and salt. Then, pour in the buttermilk and stir well. You should end up with a thick batter that clings nicely to the cauliflower. If your batter feels too thin, a tiny extra sprinkle of flour can help it thicken up for perfect coating.
Step 3: Coat Each Floret Evenly
Now it's time to toss the cauliflower in that flavorful batter. Make sure each floret gets fully coated by stirring gently but thoroughly. When placing them on the baking sheets, spacing is key — leave room between florets so the air can circulate and crisp them up beautifully.
Step 4: Bake the First Side to Golden Perfection
Pop the trays into your preheated oven for 20 minutes. You'll notice the batter starting to firm up and the cauliflower will begin to soften. Keep an eye on them—they should turn a light golden color, signaling you're ready for the next step.
Step 5: Flip & Bake Again for Maximum Crispiness
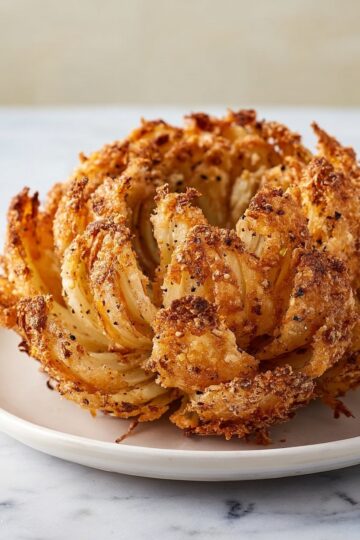
Carefully flip each cauliflower floret over to ensure even cooking and that signature crispiness on all sides. Return the trays to the oven and bake for another 20 minutes. By the end, your cauliflower wings will have a crisp, golden crust that's irresistibly crunchy yet tender inside.
Step 6: Whisk Together the Classic Buffalo Sauce
While the cauliflower bakes, mix up your Buffalo sauce. Melt the butter and combine it with your Buffalo sauce in a bowl, whisking until fully blended and smooth. This step is where the wings get their iconic tangy, spicy punch.
Step 7: Toss, Serve, and Savor
Once your cauliflower is baked to crispy perfection, transfer the florets into the bowl with the Buffalo sauce. Toss them gently to coat every piece in that rich, spicy sauce. Serve immediately and watch these crowd-pleasers disappear fast—perfect game day snacking that’s both tasty and a bit healthier!
Top Tip
Getting those Buffalo Cauliflower Wings perfectly crispy and flavorful is easier than you think, especially with a few tricks up your sleeve. These tips come from my own kitchen experiments and are sure to help you nail the recipe every time.
- Even Coating: Make sure each cauliflower floret is fully coated in the thick batter to achieve that perfect crispy texture — a thin or patchy coating will leave spots soggy.
- Space for Crispiness: Don’t overcrowd your baking sheets! Giving enough space around each piece ensures the hot air circulates evenly, resulting in wings that are crispy on all sides.
- Flip with Care: When flipping the cauliflower after 20 minutes of baking, use tongs to gently turn each piece so you don’t knock off the batter. This helps keep that crunchy coating intact.
- Customize Your Heat: Experiment with different Buffalo sauces or adjust the butter-to-sauce ratio to find your ideal level of spicy and richness — I love sticking to Frank’s for that classic tangy kick.
How to Serve Buffalo Cauliflower Wings Recipe

Garnishes
Buffalo Cauliflower Wings are fantastic when garnished with a handful of fresh chopped parsley or chives to add a pop of color and freshness. For the full game-day vibe, serve them with crisp celery sticks and carrot sticks on the side — both classic and refreshing accompaniments.
Side Dishes
To round out your snack spread, consider easy, crowd-pleasing sides like creamy ranch or blue cheese dressing for dipping, crunchy sweet potato fries, or a cool cucumber salad. They complement the spicy wings beautifully and keep things balanced.
Make Ahead and Storage
Storing Leftovers
Store any leftover Buffalo Cauliflower Wings in an airtight container in the refrigerator for up to 3 days. This helps keep them fresh while preserving their flavor.
Freezing
If you'd like to freeze the wings, place them in a single layer on a baking sheet to flash freeze first, then transfer to a freezer-safe container or bag. Frozen wings can last for up to 2 months. This is perfect for prepping ahead for parties or quick snacks.
Reheating
To reheat, pop the wings on a baking sheet and bake at 375°F for about 10-15 minutes or until heated through and crisped back up. Avoid microwaving if you want to keep that irresistible crunch.
Frequently Asked Questions:
Absolutely! Simply swap the buttermilk for a plant-based alternative like almond or soy milk mixed with lemon juice or vinegar, and use vegan butter or coconut oil in place of dairy butter for the sauce. This keeps the wings just as flavorful and friendly for vegan diets.
To make the recipe gluten free, substitute the all-purpose flour with a gluten-free flour blend. This adjustment will keep your Buffalo Cauliflower Wings crisp and delicious without gluten.
Baking at a steady 375°F and spacing the cauliflower well on the parchment-lined baking sheets is key. Also, flipping them halfway through helps both sides crisp evenly. This method avoids frying but still delivers crunch.
Yes! You can prepare the buffalo sauce mixture in advance and store it in the fridge. Just warm it up slightly before tossing with the freshly baked cauliflower wings for the best flavor and texture.
Final Thoughts
This Buffalo Cauliflower Wings Recipe has quickly become one of my favorite go-to appetizers. It strikes the perfect balance between spicy, tangy, and crispy, all while feeling just a bit healthier than traditional wings. Whether you’re hosting a game day party or just craving a snack that packs a punch, I hope you enjoy making and sharing these as much as I do. Happy cooking and snacking!
Print
Buffalo Cauliflower Wings Recipe
- Prep Time: 10 minutes
- Cook Time: 40 minutes
- Total Time: 50 minutes
- Yield: 6 small servings
- Category: Appetizer
- Method: Baking
- Cuisine: American
- Diet: Vegetarian
Description
This easy Buffalo Cauliflower Wings recipe is a crowd-pleasing appetizer perfect for game day. Featuring baked cauliflower florets coated in a flavorful, spicy batter and tossed in classic Buffalo sauce, these wings are a healthier snack option made with under 10 simple ingredients.
Ingredients
Cauliflower Wings
- 1 head cauliflower, cut into florets
- ¾ cup all-purpose flour
- 1 teaspoon ground paprika
- 1 teaspoon onion powder
- 1 teaspoon garlic powder
- 1 teaspoon salt
- ¾ cup buttermilk
Buffalo Sauce
- 2 tablespoons butter, melted
- ⅓ cup Buffalo sauce (Frank's recommended)
Instructions
- Preheat Oven: Preheat your oven to 375 degrees Fahrenheit and line two baking sheets with parchment paper. Set aside for later use.
- Make Batter: In a large bowl, combine the flour, paprika, onion powder, garlic powder, and salt. Stir in the buttermilk until a thick batter forms.
- Coat Cauliflower: Add the cauliflower florets to the batter, tossing to evenly coat each piece. Arrange the coated florets on the prepared baking sheets, spacing them out to allow air circulation for crispiness.
- Bake First Side: Bake the cauliflower in the preheated oven for 20 minutes.
- Flip and Bake Second Side: Carefully flip each piece to the other side and bake an additional 20 minutes to ensure even cooking and crisp texture.
- Prepare Buffalo Sauce: While baking, whisk together the melted butter and Buffalo sauce in a bowl until fully combined.
- Toss in Sauce: Once the cauliflower is done baking, transfer the florets to the buffalo sauce bowl and toss until each piece is fully coated in the sauce.
- Serve and Enjoy: Serve the buffalo cauliflower wings immediately as a tasty and flavorful appetizer or snack.
Notes
- To make homemade buttermilk, add 1 tablespoon of apple cider vinegar or lemon juice to ¾ cup milk (dairy or plant-based), let stand for 5 minutes, then use as directed.
- For a vegan version, substitute plant-based buttermilk and vegan butter or coconut oil instead of dairy butter.
- For gluten free wings, replace all-purpose flour with gluten free flour.
- Make sure to space the cauliflower pieces well on the baking sheets to allow air circulation and achieve maximum crispiness.
Nutrition
- Serving Size: 1 small serving
- Calories: 150 kcal
- Sugar: 2 g
- Sodium: 400 mg
- Fat: 7 g
- Saturated Fat: 3 g
- Unsaturated Fat: 3 g
- Trans Fat: 0 g
- Carbohydrates: 18 g
- Fiber: 4 g
- Protein: 4 g
- Cholesterol: 15 mg


Leave a Reply