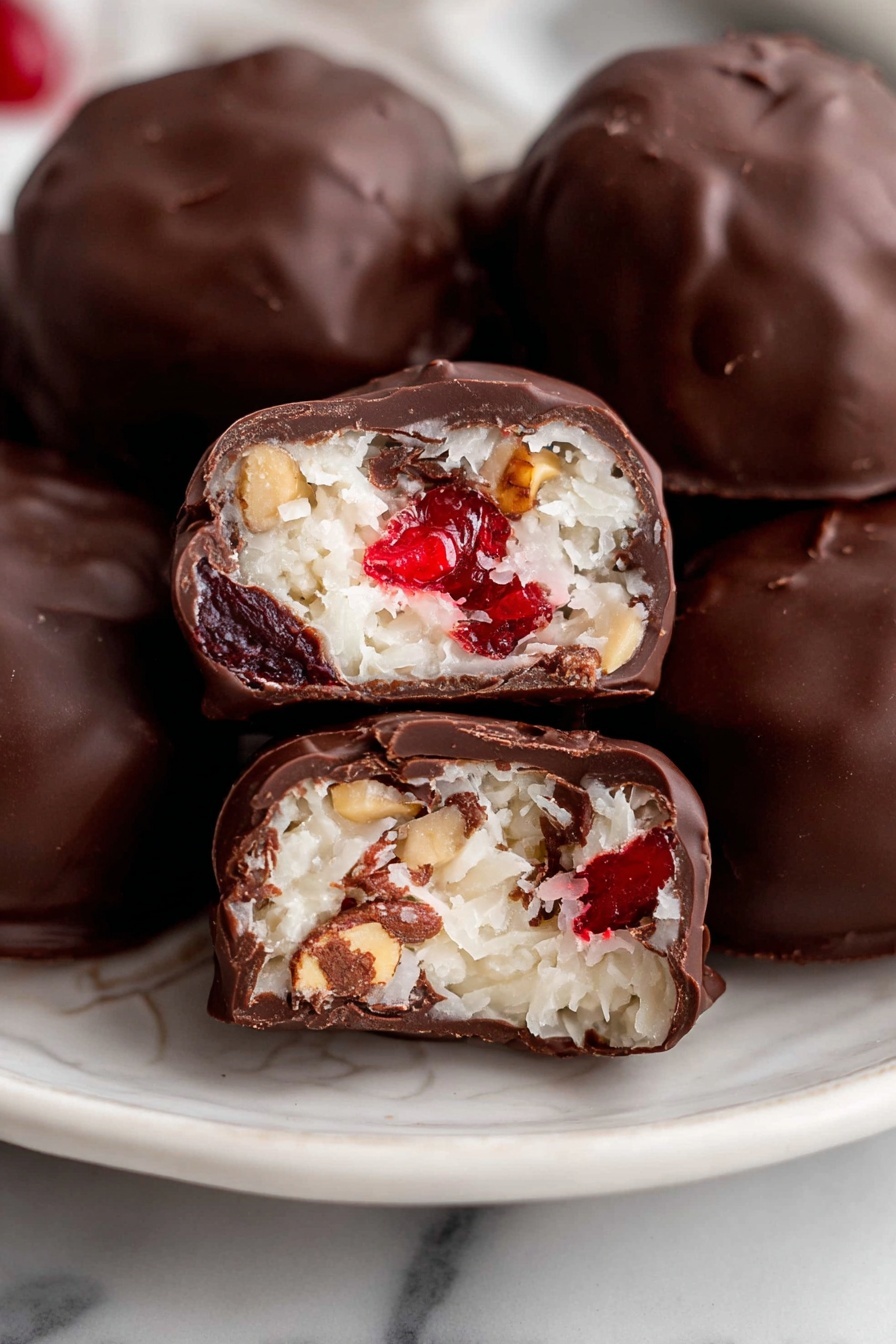
There’s something utterly charming about the classic Martha Washington Candy Recipe. Its blend of chewy coconut, sweet cherries, crunchy pecans, and rich chocolate is like a little bite of nostalgia wrapped in every piece. Trust me, once you try making these at home, you’ll understand why they’re a holiday favorite and beyond.

Jump to:
Why You'll Love This Recipe
I’m genuinely excited to share this recipe because it’s one of those homemade treats that never fails to impress, whether it’s for family gatherings or gifting. It’s easy enough for everyday bakers and decadent enough for candy lovers to swoon over.
- Rich, nostalgic flavor: This candy combines coconut, cherries, pecans, and chocolate into a timeless, buttery bite.
- Simple to make: No complicated candy thermometers or tricky techniques—just straightforward mixing and dipping.
- Customizable texture: You can adjust nut and fruit ratios to match your preferences.
- Perfect for gifting: These candies look beautiful wrapped up and hold up well when stored.
Ingredients & Why They Work
The magic of the Martha Washington Candy Recipe comes from a few simple, quality ingredients that each play a vital role. From buttery richness to the sweet pop of cherries and a satin chocolate coating, every element has a purpose.
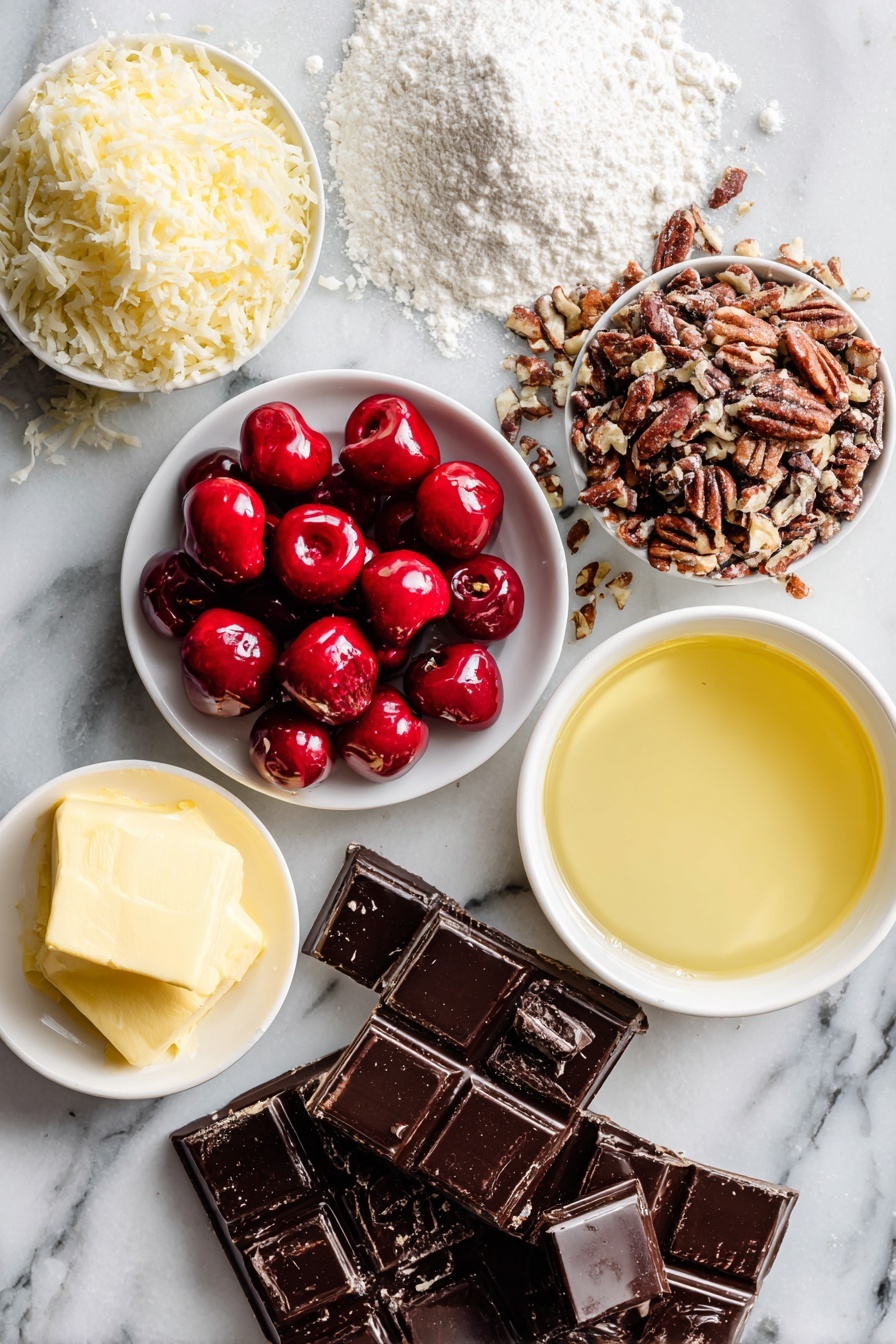
- Unsalted butter: Melted butter adds that essential smooth richness that bakes, I’ve found, makes the candy tender without overwhelming sweetness.
- Powdered sugar: Offers sweetness and helps bind the mixture without graininess.
- Vanilla extract: Brings warmth and depth that highlights the buttery and sweet components.
- Sweetened shredded coconut: Provides chew and body, balancing the smooth condensed milk.
- Sweetened condensed milk: Acts as both sweetener and binder, lending the candy its creamy, sticky texture.
- Maraschino cherries: When well-drained and chopped, these add bursts of floral, fruity sweetness that cut through the richness.
- Chopped pecans: Their toasted crunch creates contrast and a nutty background that elevates every bite.
- Chocolate melting wafers: They melt smoothly and harden with a nice sheen, perfect for candy coatings.
Make It Your Way
I love tweaking the balance of fruit and nuts in the Martha Washington Candy Recipe depending on what’s on hand or the occasion. Don’t be afraid to make it your own—these candies are wonderfully forgiving!
- Variation: Once, I swapped out pecans for chopped walnuts and added a hint of almond extract alongside vanilla—it gave the candy a lovely nutty complexity friends really enjoyed.
- Dietary tweak: For a dairy-free version, try using vegan buttery spread and ensure your chocolate wafers are dairy-free.
- Nut-free alternative: Omit the nuts and replace with toasted sunflower seeds for crunch if you need a nut allergy-friendly option.
- Seasonal touch: Add a sprinkle of orange zest to the mixture for a bright, citrusy twist around the holidays.
Step-by-Step: How I Make Martha Washington Candy Recipe
Step 1: Mix your base ingredients carefully
Start by melting your unsalted butter gently—not too hot, just melted and warm to the touch. In a large bowl, whisk the melted butter together with powdered sugar until smooth and creamy. Add the vanilla extract and blend well. Getting this silky base perfect helps your candy set with the right texture.
Step 2: Fold in coconut and condensed milk
Next, stir in the shredded coconut and sweetened condensed milk. The mixture will start to get sticky and thick, which is exactly what you want. Make sure everything is evenly combined so each bite has that coconutty chew and creamy sweetness.
Step 3: Add cherries and nuts
Drain your maraschino cherries very well, then chop them finely. Adding too much moisture here can make it tricky to roll the candy later, so pat them dry if needed. Fold in the cherries and chopped pecans gently but thoroughly—this is where all those wonderful pops of flavor come from.
Step 4: Chill and shape the candies
Using your hands or a small cookie scoop, roll the mixture into 1-inch balls. Place them on a parchment-lined baking sheet and chill in the fridge for about 30 minutes. The chill firms everything up, making the balls easier to dip without breaking apart.
Step 5: Melt and dip in chocolate
While the balls chill, melt your chocolate wafers either in the microwave with short bursts or over a double boiler, stirring often for a smooth finish. Once your candies are firm, dip them fully into the melted chocolate using a fork or dipping tool, letting excess drip off before setting back on parchment.
Step 6: Final chill and serve
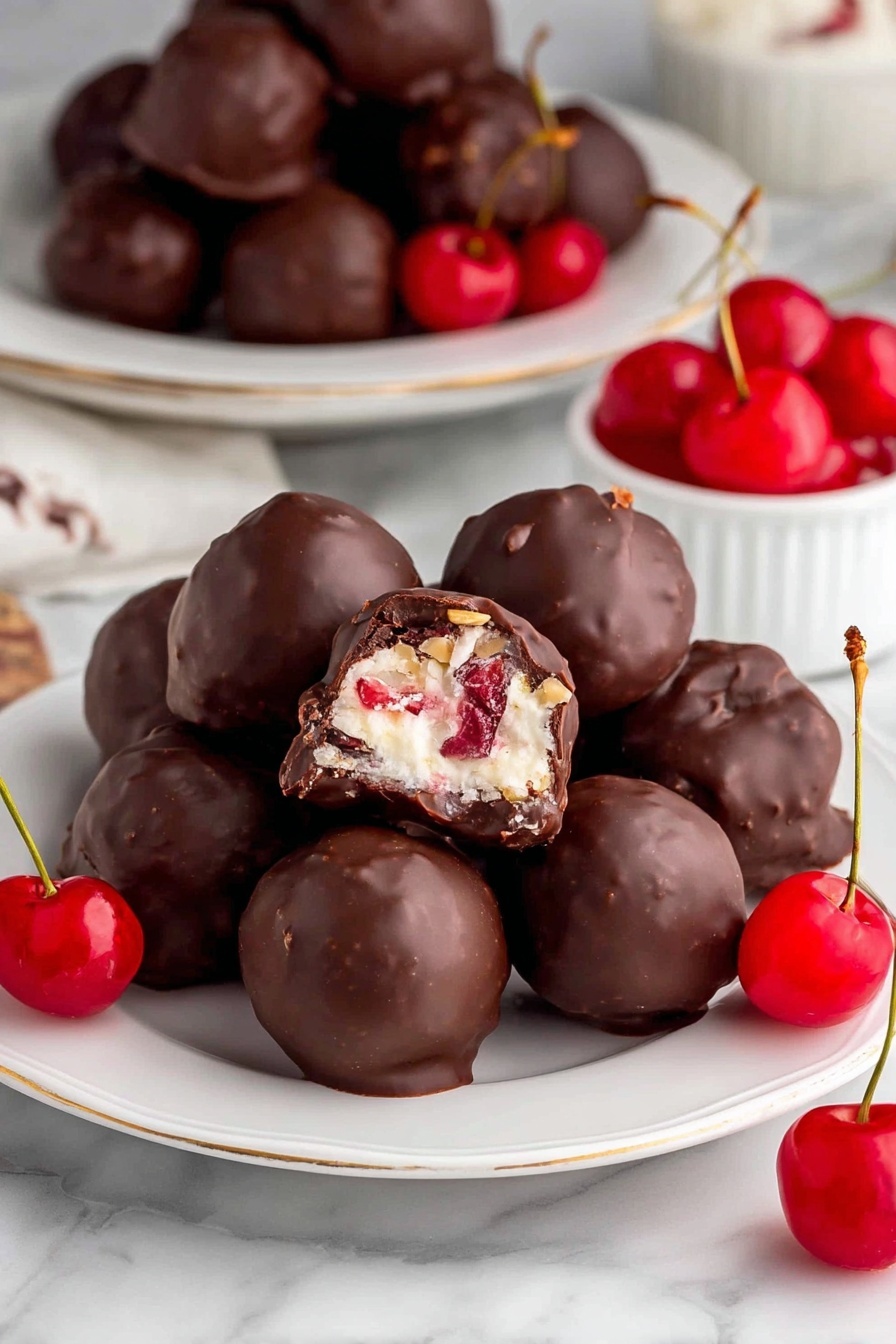
Pop them back in the fridge until the chocolate sets firm, about 10-15 minutes. After that, your Martha Washington candies are ready to enjoy or package up as gifts. I love how they hold their shape but offer a delightfully chewy bite under that chocolate shell.
Top Tip
After making this recipe dozens of times, I’ve learned a few tricks that keep your Martha Washington Candy perfect every time. These tips helped me avoid common pitfalls and get a candy texture that’s just right—even if you’re new to candy-making.
- Dry your cherries well: Excess moisture can make the mixture too soft and sticky, so give those cherries a good pat down.
- Chill thoroughly before dipping: Cold candy balls hold together better when dipped, preventing your chocolate coating from cracking.
- Use a fork or dipping tool: This helps coat each candy evenly and lets the excess chocolate drip off cleanly for a smooth finish.
- Keep candies cool after coating: Store them in the fridge so chocolate stays shiny and firm, especially in warmer kitchens.
How to Serve Martha Washington Candy Recipe
Garnishes
I usually keep these candies simple, but for a little extra charm, I sprinkle some finely chopped toasted pecans or a little flaked coconut on freshly dipped chocolates before they set. It adds a nice rustic look and a bit of texture that makes them feel extra special.
Side Dishes
These candies are so rich and sweet that I like to serve them alongside a strong cup of coffee or a lightly brewed tea. They also pair wonderfully with small bowls of fresh berries or roasted nuts for a balanced snack platter.
Creative Ways to Present
One holiday, I arranged mine in a festive box lined with parchment and tied with a satin ribbon—everyone loved the homemade touch. For parties, try placing them on pretty tiered trays or wrap individual candies in cellophane and tie them up for cute favors.
Make Ahead and Storage
Storing Leftovers
I store leftovers in airtight containers in the fridge, layering parchment paper between rows to keep everything neat and prevent sticking. They stay fresh and delicious for up to two weeks, which means you can enjoy them slowly without losing any of that original charm.
Freezing
Freezing these candies works well if you want to prepare far in advance. Just separate the layers with parchment and seal tightly in a freezer-safe container. When thawed, they retain their texture nicely, and I find thawing overnight in the fridge gives the best results.
Reheating
Since these are no-bake candies coated in chocolate, reheating isn’t really necessary. If the chocolate seems a bit firm after chilling, just leave them at room temperature for 10-15 minutes before serving to soften slightly.
Frequently Asked Questions:
The candy’s unique combination of chewy coconut, sweet cherries, crunchy pecans, and smooth chocolate coating creates a delightful contrast in flavors and textures that’s hard to resist. It’s a nostalgic favorite that brings both richness and a touch of fruitiness.
Absolutely! While pecans add a traditional nutty crunch, you can substitute walnuts, almonds, or even seeds like sunflower for allergies. If you omit nuts entirely, the candy will be softer but still delicious. Just keep the other ratios the same.
Chilling the candy balls thoroughly before dipping is key. Cold, firm balls hold together better under the warm chocolate coating and reduce the risk of cracking or breaking. Also, handle them gently using a fork or dipping tool.
Store them in an airtight container in the refrigerator with parchment paper between layers. This keeps them fresh, maintains the chocolate coating, and prevents sticking. They last up to two weeks when stored properly.
Final Thoughts
This Martha Washington Candy Recipe has been a delightful part of my kitchen life for years, bringing smiles and warm memories with every bite. I hope you find making it as rewarding and joyful as I do—it's the kind of treat you'll want to keep coming back to, whether as a homemade gift or a special indulgence. So grab your ingredients, roll up your sleeves, and enjoy every moment crafting these little bites of happiness!
Print
Martha Washington Candy Recipe
- Prep Time: 45 minutes
- Cook Time: 0 minutes
- Total Time: 1 hour 30 minutes
- Yield: 36 servings
- Category: Dessert
- Method: No-Cook
- Cuisine: American
Description
Martha Washington Candy is a sweet, rich treat featuring a creamy coconut and cherry mixture coated in smooth chocolate. Perfect for holiday gatherings or as a delightful homemade confection, these bite-sized candies combine shredded coconut, maraschino cherries, pecans, and sweetened condensed milk, all dipped in melted chocolate for a luscious finish.
Ingredients
Base Mixture
- 1½ sticks unsalted butter melted
- 4 cups powdered sugar
- 1 teaspoon vanilla extract
- 3 cups shredded coconut sweetened
- 14 ounce (1 can) sweetened condensed milk
Add-ins
- 10 ounce (1 jar) maraschino cherries drained and chopped
- 1½ cups pecans chopped
Coating
- 16 ounces chocolate melting wafers
Instructions
- Mix Base Ingredients: In a large mixing bowl, combine the melted butter and powdered sugar until smooth. Add in the vanilla extract and mix well to ensure all ingredients are evenly incorporated.
- Add Coconut and Condensed Milk: Stir in the shredded coconut and sweetened condensed milk until the mixture is evenly combined, creating a thick and sticky consistency.
- Incorporate Cherries and Pecans: Gently fold in the chopped maraschino cherries and chopped pecans ensuring an even distribution throughout the mixture.
- Form Candy Balls: Roll the mixture into 1-inch balls and place them on a baking sheet lined with parchment or wax paper. Chill the balls in the refrigerator for about 30 minutes or until firm to set their shape.
- Melt Chocolate: While the balls chill, melt the chocolate wafers using a microwave in short bursts or a double boiler, stirring until the chocolate is smooth and fully melted.
- Dip Candies in Chocolate: Remove the chilled balls from the fridge. Using a fork or dipping tool, carefully dip each ball into the melted chocolate, making sure it is fully coated. Let excess chocolate drip off.
- Set Chocolate Coating: Place the chocolate-coated candies back onto the parchment-lined baking sheet. Chill in the refrigerator for 10 to 15 minutes until the chocolate coating is firm and set.
- Serve and Store: Serve the candies once the chocolate has hardened. Store leftovers in an airtight container in the refrigerator to maintain freshness.
Notes
- Pat cherries completely dry before adding to avoid extra moisture that could make the mixture too soft.
- Use a small cookie scoop to form uniform and evenly sized candy balls for consistent cooking and presentation.
- Keep candies in a cool spot if serving at room temperature to prevent melting of the chocolate coating.
- Make-Ahead: These candies can be made up to 2 weeks in advance when stored properly in the refrigerator.
- Storage: Store leftovers in an airtight container in the fridge for up to 2 weeks.
- Freezing: For longer storage, freeze candies up to 3 months in a freezer-safe container with parchment paper between layers to prevent sticking.
Nutrition
- Serving Size: 1 piece
- Calories: 180 kcal
- Sugar: 20 g
- Sodium: 60 mg
- Fat: 9 g
- Saturated Fat: 5 g
- Unsaturated Fat: 3 g
- Trans Fat: 0 g
- Carbohydrates: 24 g
- Fiber: 1 g
- Protein: 2 g
- Cholesterol: 15 mg

Leave a Reply